
Inspection
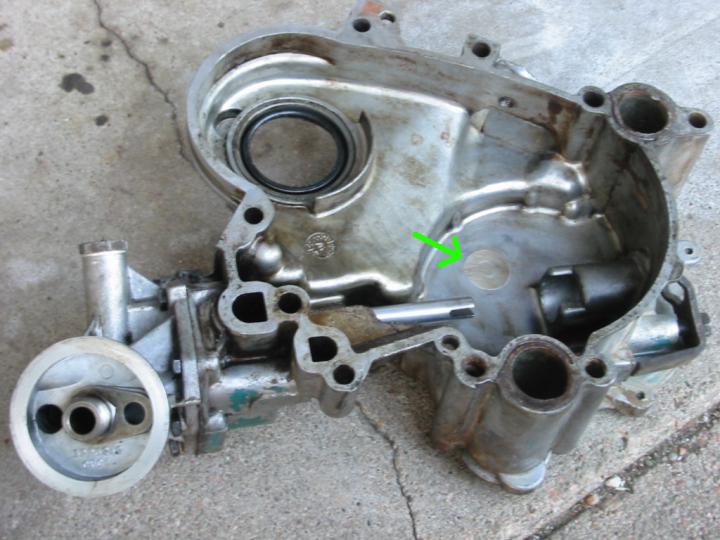
Inside of timing cover
One of the weakest points in the design of the AMC V8 is the aluminum timing cover. Unlike the timing cover on a small block Chevy, which merely covers the timing set (as the name implies), the AMC V8 timing cover does much more. It houses the timing set, the distributor, the fuel pump, and the oil pump.
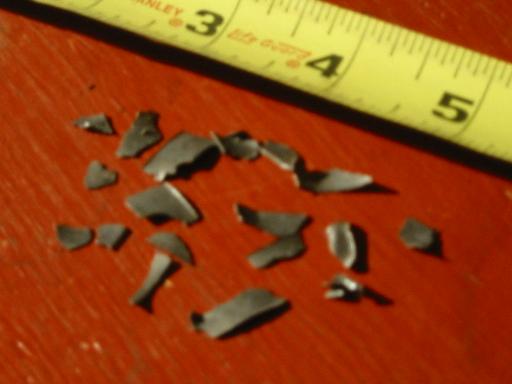
The weak point comes from the oil pump cavity, which is carved out of the lower part of the timing cover. The pump gears fit inside this cavity and are driven by the distributor shaft, which is in turn driven by the cam gear. The pump cavity is enclosed by a separate oil pump cover what fits against the end of the gears and provides an attaching point for the oil filter. The oil pump pickup tube screws into the center of the block, and passes oil through a passage in the bottom of the block to the oil pump cavity in the timing cover. Because this pump cavity is made of soft aluminum, it tends to wear quickly, and is easily scored if metal bits (like these) are sucked through the pump.
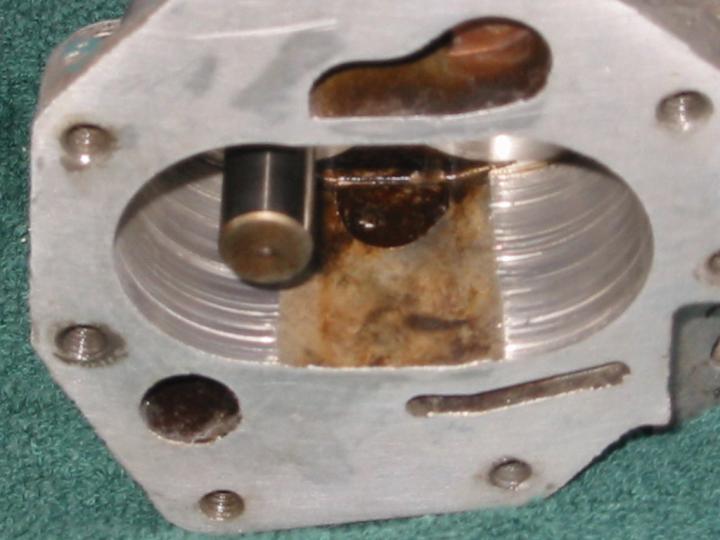
Old, scored oil pump cavity
There are two dimensions that need to be measured when testing oil pump clearance. The side wall clearance is the distance between the side of the gears and the cavity wall. Measure it by inserting a feeler gauge against the wall and rotating the gears. Factory spec is .0005-.0025″ (.0005″ preferred). The other dimension is gear end clearance, which is the distance between the end of the gears and the surface of the oil pump cover (aka oil filter adapter). Factory spec is .002-.006″ (.002″ preferred).
End clearance can be measured two ways. For the first method, put a strip of red plastigauge (green only measures to .003″) across the end of the gears, then bolt on the pump cover & gasket. Remove the cover and check the width of the plastigauge with the scale on the package.
For the second method, place a place a straight edge across the end of the pump gears and use a feeler gauge to measure the distance between the straight edge and the timing cover surface that mates to the pump cover. Subtract this distance from the thickness of your pump cover gasket (generally .010-.012″) to find your end clearance.
Of those two dimensions, the more important one by far is the end gap. The side gap is a low pressure area in the pump, and therefore isn’t as critical as the high pressure end gap clearance when you’re trying to generate good oil pressure. I’ve measured several timing covers, both new (Crown) and used, some of which were taken off vehicles that were known to get 30 psi at warm idle. The end gap on all of them is in the .002-.003″ neighborhood. Even minor scoring on the pump cavity’s side wall doesn’t seem to adversely affect the oil pressure very much.
That second method for measuring end clearance is only accurate if your pump cover has a smooth mating surface. On older covers, the gears may have created grooves in the pump cover that increase the clearance between the gears and pump cover even if the gears stick out the proper distance beyond the timing cover mating surface. If this is the case, you can easily correct the problem with a little elbow grease. Tape a sheet of 220 grit sandpaper to a very flat surface. A piece of tempered window glass works best, but a good quality workbench surface will do in a pinch (it’s what I used). Rub the pump cover around on the sandpaper while placing even pressure across the entire surface. Once I sanded the mating surface down far enough to remove all the grooves, I used some 320 grit sandpaper to smooth the surface a little bit more (this may or may not be necessary).


If your gears don’t stick out far enough beyond your timing cover, you have two options. Either get a thinner gasket (I’ve seen both .010″ (Melling) and .012″ (Sealed Power) gaskets) or sand down the mating surface of the timing cover as described above. If you decide to sand the surface, use great caution. It’s imperative that you take an equal amount off the entire surface, and that it be completely flat. If you put more pressure on one side of the surface while you’re sanding (which is easy to do since the cover is lopsided), then you’ll have different clearances from one side the pump to the other.
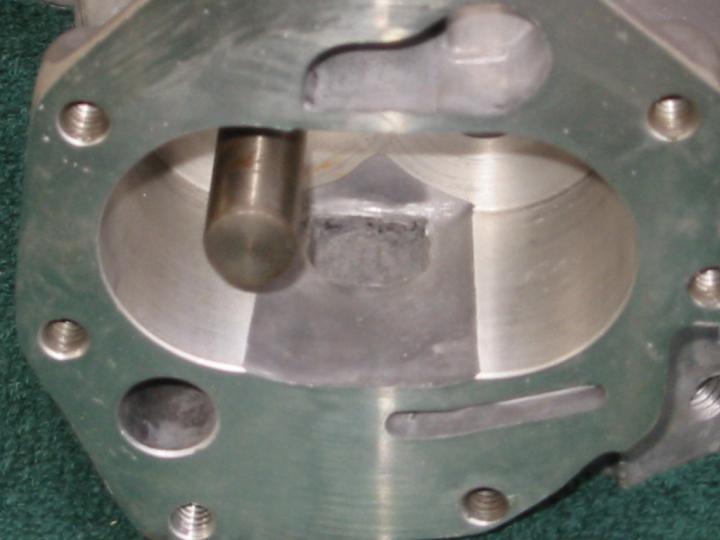
New, smooth oil pump cavity
If your pump cavity side clearance is too high, you have two options. (Remember, .0025″ seems to be plenty tight to generate good oil pressure, despite what the factory spec recommends.) If you like to experiment and have a machinist that you trust, you can have a sleeve made that fits along the side wall to reduce the clearance. You’ll need some mechanism to prevent this sleeve from rotating in its bore and interfering with where the gears mesh (the pump cavity cross section looks like the MasterCard logo with two intersecting circles). Your other option is to get a new timing cover, either from a low-mileage rig in a junk yard or brand new from a Crown distributor. New covers cost about $225-260.
As of July 2002, Crown is the only manufacturer of replacement timing covers these days. They even provide them to the Jeep dealers. They’re manufactured off-shore, and the quality control is sometimes lacking. Early batches had problems with the distributor alignment which caused the cam/distributor drive gears to self destruct almost immediately, but this problem has reportedly been resolved in later batches. On the two brand new Crown covers that I measured, the side wall clearance was still .0025″. On at least one of those covers, the end clearance with a .010″ gasket was a whopping .007″. I’ll be returning that cover for a refund soon, obviously. Crown has reportedly been good about accepting such returns, but it’s still a pain to have to deal with it. The moral of this story is that you still need to check the clearances, even on new parts, because mistakes will often get made during the manufacturing and shipping process.
When I inspected my original 1977 timing cover initially, I saw the bad scoring and measured the borderline-spec clearances (with what I later discovered was a .012″ gasket), and decided that I ought to order a new cover. Except for the scoring, the new cover from Crown was worse than my original timing cover, so after a lot of measurement and research to learn the above information, I opted to return the new cover and just clean up my old one instead.


Dress Up
I figured that my newly-rebuild engine should look as good as it ran, so I bought a couple cans of AMC Blue engine paint from American Performance Products in Cocoa, FL. They’re one of the few places that sell AMC Blue. There are two different AMC Blue colors, BTW. Up through 1973 used a lighter, metallic color, while 1974 and later used a non-metallic, turquoise-ish blue.
I noticed when I cleaned up my old timing cover that the factory engine paint really didn’t stick very well to the aluminum timing and oil pump covers. Another bit of research (mainly from the marine community) suggested that I should first prime the aluminum with a self-etching primer such as Sherwin Williams 988. The self etching primer reportedly sticks to aluminum better and is less toxic than zinc chromate, which was also suggested by some people. No local hardware store carried it, so I had to go to an automotive paint supplier. $6 per rattle can. BTW, don’t confuse zinc chromate with the cold galvanizing paint, which also has a high zinc content. They’re two different animals.
I replaced my cast iron water pump with a new aluminum Flow-Kooler pump, so I needed to prime that as well as the timing & oil pump covers. Since there are several hard-to-reach crevices on the covers, I primed the whole thing and then painted the back sides of them before I installed them on the engine block. To keep paint out of unwanted orifices, I bolted the water pump & oil pump cover to the timing cover with a couple bolts, then covered all the remaining holes and the water pump bearing with low-tack masking tape (the blue stuff that painters use).
The primer smells nasty, but it dries to the touch in just a few minutes, so I didn’t have to wait long before I could open up my garage door to get some ventilation without blowing crud all over my newly-painted parts. The primer dries to a very flat, light grey color. The engine paint seemed to stick well, but only time will tell. The AMC Blue paint looks much greener when it’s wet than it does when it’s dry, so don’t freak out if you’re using a new can to touch up previously-painted areas.