
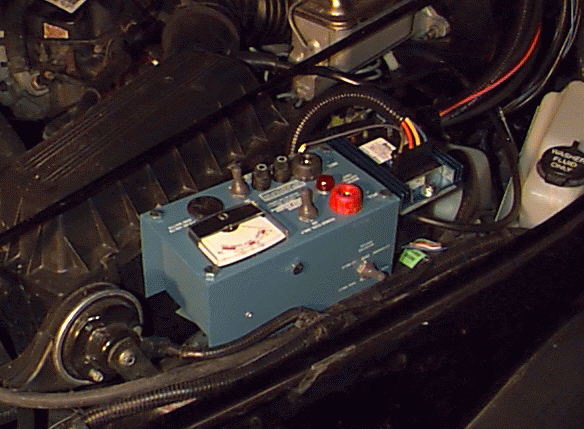
Premier Power Welder control box
Once I started making custom upgrades to my Jeep, it quickly became apparent that either I’d spend many paychecks paying professional welders to do my work for me, or I needed to learn how to weld myself. I opted for the latter, obviously, and signed up for a $55, 10-Saturday class on MIG welding at the local community college.
For those considering this, MIG welding is trivial. The hard part is getting the voltage & wire speed set right, but once done, a monkey can run the welding gun. I had planned on getting a 110-volt MIG welder before I began my serious upgrades this summer. They generally run about $500-700 for models with 20-50% duty cycles and true gas (MIG/GMAW) capability which can weld metal up to 1/4″ thick.
Then, while I was out in Moab wandering around the vendor displays, I got sucked into the Premier Power Welder booth. They were having a sale that saved me $200, bringing the price for their on-board stick welder with a 160-amp alternator down to US$699. That’s not much more than I’d have paid for a MIG welder, and the Premier would be portable. When Pat Gremillion taught me to stick weld on his personal unit (his famous orange Bronco, Der Welder Wagon, was setup next to the booth), I decided it wasn’t that much tougher than MIG, and bought one. Besides, they said it could be converted to a MIG welder by simply purchasing a normal wire feeder from my local welding supply outlet.
Unfortunately, that’s when the headaches began. We all got home from Moab early the next week, and I received my new welder a week after that. I opened it up to find they’d shipped me an alternator with a single V pulley instead of the serpentine required by my ’95 YJ. So much for installing it that weekend. I called Premier, and they apologized and exchanged the pulley in a few days. Turns out Jan had written down the wrong pulley type when she took my order in Moab.
While waiting for the new pulley, I shopped around town and bought the other welding tools I’d need. It turns out that the wire feeder required to convert the Premier to MIG costs $600-900 — more than the cost of an entire home MIG welder. The resulting setup would have basically been a commercial-quality welder, but that’s overkill for me.
Busy evenings kept me from installing it for a week. When I did try to install it, I removed my York air compressor, which sits over the alternator, then removed my old 90-amp alternator. When I tried to install the new 160-amp alternator, I found that the mounting brackets didn’t even come close to matching up. Grrr. So much for installing it before the 4×4 Fest that weekend.
When I called Premier the next day, I found that Pat & Jan were out of town. I dealt with Becky (their daughter), who was exceptionally nice and apologetic, but not terribly knowledgeable about the details of the various alternators they offered. I faxed her a drawing of the mounting brackets on my stock alternator, while she tried to get a hold of Pat on their trip. After several days, they thought that what I needed was a 170-amp Chrysler-face alternator. Unfortunately, they were back ordered, and weren’t expected in until late that week, which was also when Pat & Jan were due back. I sent back my 160-amp since that obviously wouldn’t work. By the next Monday, I hadn’t heard anything, so I called to see what was up. Jan confirmed that I did indeed need the 170-amp Chrysler face, and that she apparently completely overlooked what type of vehicle I had when she took my order. The bad news was that the 170-amp was $100 more than the 160-amp, bringing my total to $800. That was pushing my price limit for a stick welder (now $200-300 more than the MIG welder I would have gotten originally), but I agreed, and Jan said I should receive the new alternator late that week.
When the new alternator arrived, other priorities kept me from installing it for a while. I finally took the time to hook it up the night before I was to take some friends wheeling for the day. I got everything hooked up, but chickened out when it came time to throw the switch at midnight Saturday, just hours before we were to leave. I let it sit for another 10 days until A) I wasn’t about to leave town, B) it wasn’t raining (no lights in the garage), and C) family had left town after my brother’s wedding.
It’s a good thing, too, because when I finally did hook everything up and start the engine, I got no juice from the alternator. I measured the voltage on the four regulator wires at the three engine states (just like the manual says), and called Pat at Premier. He gave me several things to check, none of which worked. He called his alternator manufacturer the next morning, and they decided that the stator was bad in my alternator, so they sent me a new one.
It arrived the next Tuesday, after I’d been without a running Jeep for six days. I installed the alternator in about 20 minutes (I’m getting good at that by now), and fired it up. It appeared to do its job, but it whined like you wouldn’t believe — so loud, in fact, that my wife could hear it over the engine noise while following a block behind me in a different car. The previous Premier alternator didn’t do that, so I think there’s still a problem. Then again, that could be because the previous alternator wasn’t charging. Whining Premier alternators are apparently not rare, but mine was excessive. Some of the voltages at the regulator are different from what Premier specifies, which worried me. I called Pat again (he remembers me now). He said the voltages were correct, which must mean the docs are wrong, but he was baffled as to the cause of the noise. They’re sending me a fourth alternator Thursday morning, which means I’ll be without the Jeep until Monday. I hate driving my wife’s car in town, and our untimely rural house sitting stint keeps me out of biking range.
The latest arrival from my alternator-of-the-week-club came Monday morning. The shaft doesn’t seem like it spins (by hand) any smoother than that of the noisy unit, but that didn’t appear to be the problem. I installed it Tuesday night, and it works great. No noise whatsoever. Looks like the job is finally complete.
Nearly two months after I paid for the thing at Moab, that’s where I currently (10 Jun 98) stand. My advice to the rest of you is to know exactly what you’ll need before sending in your order. Pre-1990 Jeeps (and other Chrysler vehicles) can use the 160-amp alternator. Post-1990 Jeeps (& family) need the 170-amp Chrysler face alternator. 1990 owners need to look under the hood to see which style they’ve got. YJs late in the ’95 production run may actually have a TJ engine, and therefore may need the TJ installation instructions.
At this point, I’d recommend that your first welder be a simple, 115V garage unit (preferably gas-capable MIG for beginners). If you find that you need an on-board welder, you can get one later.
Installation (finally)
I’ve rambled long enough about the ordeal I went through to get the thing to my door. Here’s how to install it.
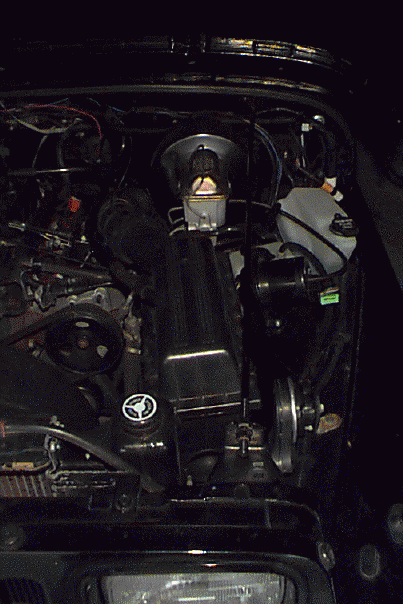
Air box space
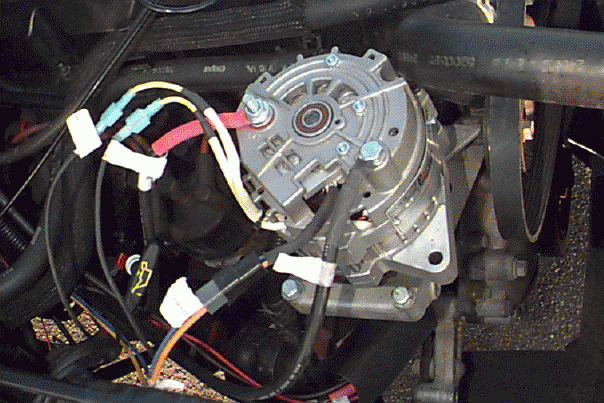
The toughest part of the installation is figuring out where to put the control box, which is roughly 4x4x8″, plus all the wires and the regulator. Premier recommends that you place the control box on the opposite side of the vehicle from the battery, and insists that you keep it at least 12″ from the battery. Placing it where the factory jack used to sit is therefore acceptable, but not recommended. I didn’t want to get rid of my jack anyway, so I squeezed the control box onto the driver’s side fender well just outboard of the air filter box. My cruise control unit already sits there, so it was a tight fit. Not only is this location easy to access, it’s also pretty well protected from water and mud that may fly up into my engine compartment.
The first order of business was to fabricate some mounts for the box and regulator, since the fenderwell isn’t flat. I got a 1/8″x1.25″ strip of steel with holes in it. I cut a couple 3-4″ long strips and bent them into V’s. One side of each V was bolted to the bottom of the control box, while the other side was bolted to the fender well. When positioning the control box, make very sure that it sits flat and isn’t twisted slightly. Several things inside the box (including the big heat sink) cannot touch the sides of the box without causing problems. I removed the regulator from the side of the box and moved it to the end. I made another bracket from the same strip metal that extended the regulator horizontally straight out from the top of the control box, positioning it right above my cruise control unit (like I said, space here was tight).


I already had a hand throttle installed before I got the welder, so I didn’t install the one Premier sent. You’re on your own for placement and routing if you use theirs.
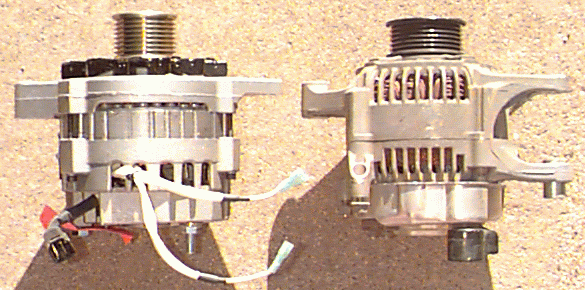
Two alternators
Before you do anything with the alternator or related wiring, be sure to first remove the cable from the negative battery terminal! There’s a lot of juice running through those cables, and you don’t want it to take any short cuts, especially through you.
Next, remove the factory alternator. If you’ve got my York air compressor setup, you’ll have to remove the compressor first so you can get to the alternator. On my ’95 YJ 2.5L, there were two bolts with 15mm heads. The one below the alternator is threaded into the mount and has no nut. The one above is longer and has a nut behind the mount. The upper bolt is long enough (4.5″?) to pass through the front alternator ear, the mounting bracket, and the bushing in the back ear. In order to avoid removing the bushing from the back ear, I picked up a 3.5″ 3/8″ bolt with two washers and a nylock nut to replace the OEM upper bolt. This will make it much easier to swap the old alternator back in place in an emergency.


Once the old alternator is free, point it face down and disconnect the wiring harness. Five nuts hold the wiring harness to the alternator using 7mm and 10mm nuts. Along with the new alternator, Premier sent a 50-ohm resistor that’s to be mounted between the two 7mm wiring harness leads. The brown ignition wire from the PPW control box should also be mounted to the 7mm lead farthest from the 10mm ground lead. This will get you the much-sought-after keyed ignition voltage. After making these connections, make sure you tape off all five of the old harness leads to avoid any unwanted electrical connections. Once everything is working, you can warm up the heat shrink tubing to protect the harness.
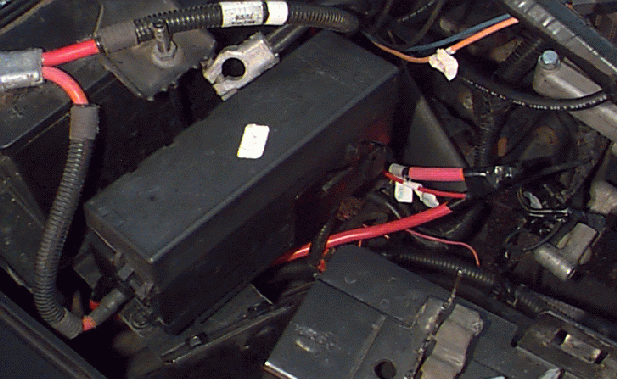
Battery wires
There are two wires coming from the control box that want to be connected to the positive battery terminal. The best place that I could find to do this was where the positive battery wire is bolted into the Power Distribution Center, aka the engine compartment fuse box. Unfortunately, this is about as far away from where I mounted the control box as you can possibly get. I solved the problem by buying an 18″ 4awg starter cable for $5 to use as an extension. Make sure that you insulate the connection between the control box wires and the extension using plenty of electrical tape or heat shrink tubing. If that connection ever touches grounded metal, you’ll see fireworks.
New PPW wiring harness
The rest of the connections from the control box are pretty self explanatory. All the wires are very well labeled, and their corresponding connection points on the back of the alternator are pretty obvious.
Once you’ve got everything plugged in, put your alternator belt back on and start up the engine. Don’t forget to reconnect the negative battery cable first — it won’t start if you don’t (oops). Get a volt meter and verify that the alternator is working by testing the voltage between each of the four regulator wires and ground. The installation instructions provided by Premier document what each of these voltages should be under various conditions. If your numbers aren’t close to what they specify, you’ve got a problem. On my setup (’95 YJ), the second test (key on, engine off) had identical results to the first test (all off), which differed from what the instructions dictated. Pat said that was OK. This is probably because I wired the brown ignition wire to an old OEM alternator lead, which isn’t hot until the engine starts.
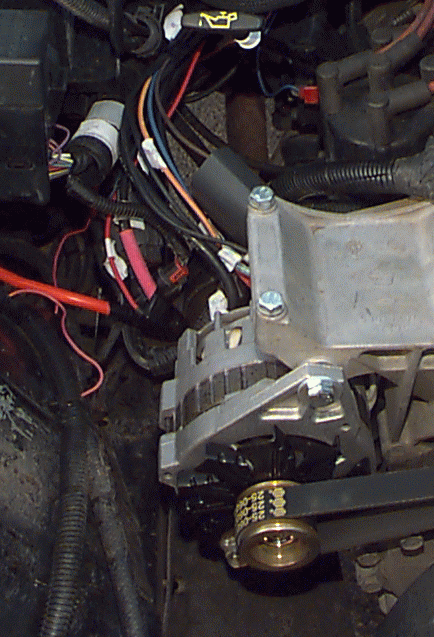
Completed setup
If the above numbers work out, it’s time to give it a real world test (read: play with it). If your vehicle has a voltage gauge, verify that the needle’s where it should be (around 14 V). My ’95 YJ dropped from 14.7 with the OEM alternator to 14.2 with the Premier alternator, but that’s still well within the acceptable range.
Next, try out the electrical outlet. Find an incandescent light or a power tool and plug it in. Turn on the master and power tool switches on the Premier’s control box, then raise the engine RPM until the voltage gauge reads 115V. Turn on your appliance and see what happens. If nothing burns up, go somewhere… anywhere… and try welding a couple beads on some 3/16″ or thicker metal. If that works, declare the unit to be functional.
One thing to keep in mind is that whenever the control unit’s master switch is on, which is whenever you’re using it for fun stuff, there is no charge going to your battery. Whenever you’re not using the Premier for a length of time, you should turn off the master switch so your battery doesn’t run dead from powering the engine with no help from the alternator.
Overall Impressions
After a bit of practice on a sheet of 3/16″ steel, I was able to get some decent looking welds. The high frequency current (used by the Premier instead of high amperage) makes the arc whistle when you weld, which would make the dwarves proud. I was able to fix a friend’s broken seat bracket, made of 1/8″ (or thinner) steel. That’s about the minimum you can weld with the Premier. I tried running beads on some 16 gauge (or so) steel, and couldn’t get a decent bead without burning clear through. Since a lot of my future welding will likely be on thinner metal like that, I’m wondering if I might have been better off just getting a good MIG welder instead of the Premier. If you’ve got the cash, get one of each. Sears advertises a Craftsman MIG welder (gas-ready) for $300. That plus the Premier should cover just about any thickness or type of metal you’re likely to come across.
One good book for beginning welders is the Welder’s Handbook by Richard Finch. If you’re just getting started, this book will bring you up to speed on the various popular types of welding.
Confused about the thickness of a particular gauge of wire or sheet metal? This chart lists the thickness and weight for each gauge in both English and metric units.
Toubleshooting
I’ve had a couple problems with my Premier alternator since I installed it. In order to save you some trouble and take some load off Pat, I’ll list the problems and solutions here.
-
- Problem: Alternator stopped charging battery. Voltage gauge on dash dropped steadily to 12 V. Check engine light came on and gave some electrically-related DTC that I now forget. The stator light (red/orange) on the Premier voltage regulator was out, and the blue wire (stator voltage) read 0 volts, which indicated that the alternator wasn’t engaged and sending a charge to the battery. Under normal circumstances, the blue wire should show a varying voltage that gets higher as the battery needs more juice.
Solution: The alternator and the mess of wires connected to it (which should have been sealed in shrink-wrap tubing) had gotten covered in mud from the day’s outing. Not just a little mud, but lots of mud (read about it here). The initial power-spraying didn’t help, presumably because the York air compressor was blocking too much of it. Upon limping home, I removed the compressor, sprayed it off thoroughly again, and it fired right up. The red stator light on the regulator came on and the blue stator wire showed 10-12 volts. I guess I should have shrunk-wrapped those wires like the instructions told me to. Then again, maybe the alternator itself was full of mud. [17 Oct 1998] - Problem: When lots of electrical stuff is running in the vehicle (radio, lights, heater fan on high), the check engine light comes on after a few minutes and indicates insufficient charging voltage to the battery. The voltage gauge on the dash reads right around 13.8-14.0 volts. The red stator light on the regulator turns off several seconds after starting, or doesn’t even come on at all. The voltage on all four wires is correct, including a stator voltage of 7 V or so on the blue wire.
Solution: Replacing the main regulator with the spare Ford-style regulator gave all the same voltage readings, but the check engine light never came on. The spare regulator was replaced with the main regulator a few minutes later, and then the main regulator temporarily worked again, complete with red stator light and everything, but the condition came back. Premier replaced the regulator under warranty. [late Jan – mid Feb 1999] - Problem: Alternator puts out 1.5V (or so) lower on all wires when engine runs at idle speed. When above 1200 rpm, all voltages are normal. Alternator emits low-pitched whine/howl. Welder can’t strike an arc, and needs much higher engine rpm to get to normal welding voltage.
Solution: The stator on the alternator has gone bad. Replace alternator. Pat had me send it directly to PennTex, who makes the alternators for Premier. [7-9 Apr 1999] - Problem: A broken lower alternator mount (first discovered Oct ’98) finally manged to work its way loose, and the vibrations cracked the upper mounting ear on the alternator face plate (the one attached to the good mount). With the alternator no longer attached to anything, Bad Things ensued. Fortunately, I was at a stop light just a few miles from home when it let loose.
Solution: Premier sent me a new face plate for $10. It was shaped a bit differently than the previous one, and the cooling fan had to be shimmed out 1-2mm with some washers to clear the surface of the face plate. Replacing the face plate was a pain, and in retrospect may have caused the loose battery post mentioned below. The broken mounting bracket was also replaced from a Jeep dealer for less than $10. [Summer 1999] - Problem: Alternator often isn’t giving sufficient charging voltage to the battery (diagnostic code 47). When revving up for welding, sometimes the stator light flickers out and voltage needle drops. Other times it works, but I must rev 500 rpm higher to get required voltage (originally, 1800 rpm would hit the bottom of the red welding range). DC power outlet can never reach more than 85V regardless of rpm. Voltage at all four regulator wires looks good.
Solution: At Pat’s instruction, sent alternator to PennTex for diagnosis. They dismantled it & found a little charring on the back of the stator, as though there had been a short. A battery post was also loose. They replaced the stator, brushes, and wiring in the original case, after which it tested fine for them. S/N when returned was 6989558, p/n PW170 CRY. [Nov 99 – 31 Jan 2000] - Problem: Partial recurrence of previous problem. Welding requires a higher engine rpm to achieve same welding voltage as before. DC power outlet reaches 85V at 1800 rpm, but will never go higher regardless of rpm. Voltage at all four regulator wires looks good.
Solution: Doh! The paper label on the voltmeter had gotten wet and wrinkled, and one of the wrinkles was so tall that it was blocking the needle from going past 85V. Flattening the wrinkle fixed the problem. I can still reach the top of the welding range at 3000 rpm (a comfortable speed for my ’95 4-cyl engine), so I’m not going to worry about the increased rpm unless it continues to worse. BTW, PennTex claims the alternator was manufactured in June of ’98, so it’s now out of the 12-month warranty period (yet they covered it in Jan 2000). Premier suggested I send it to Ace Alternators for repair this time, had it been necessary. [Aug 2000] - Problem: Dash voltage gauge reads 12V. Check engine light indicates insufficient charging voltage from alternator. No voltage on orange stator wire at regulator.
Solution: Replacing the normal blue regulator with the replacement Ford-style regulator got things back to normal. Despite the regulator being 2.5 yrs old, Premier replaced it under warranty with a newer, beefier regulator that’s basically one big, chrome, heat sink. [Sep 2001] - Problem: The alternator powers the Jeep just fine, but the welder and
power tool outlet have stopped working. With the master & booster switches
on, the meter reads 0V, and I can’t strike an arc. If I also turn on the
power tool switch, the meter reads 75V, even at 2500 rpm. Still no welding
arc, though. Here’s the voltages that I measured at the regulator:
Engine off: 12V on red, 0V on all others.
Ignition on: 12V on red, 0V on all others.
Engine idling: 14V on red, 13.5V on brown, 7V on orange, 5.3V on blue.
Solution: Pat recommended I send the alternator & box to Ace Alternator. It sounds like the box isn’t flipping over to weld mode. If so, then it should cost about $250. Ace ended up repairing the alternator and replacing the entire welding box. Ace struck me as shysters who wanted to get as much money from me as possible, regardless of the actual problem. [Dec 2014 – Mar 2016] - Problem: Less than 2 years after the last repair, the alternator suddenly stopped charging the battery. I tried swapping on a spare Ford-style regulator, but that didn’t change anything. After charging my battery overnight, the Penntex 170A alternator shows the following regulator voltages:
Off: red 12.4v, others zero
Key on: red 12.2v, others zero
Engine on: red 12.0v, blue 12.0v, brown 3.2v, orange zero
I swapped the original, OEM alternator back on, and everything works fine.
Solution: The problem isn’t obvious from the voltages listed above. PPW wants me to send in the entire system for further diagnosis. After talking with Ace Alternator, I wrote down “solenoid / meter / rectifier” and “stator / regulator / rectifier,” but I no longer remember what those meant. I uninstalled the entire PPW, reinstalled the stock alternator, and left the PPW sitting on a shelf. It needs a new home, and I need a 110V MIG welder. [Jan 2018]
- Problem: Alternator stopped charging battery. Voltage gauge on dash dropped steadily to 12 V. Check engine light came on and gave some electrically-related DTC that I now forget. The stator light (red/orange) on the Premier voltage regulator was out, and the blue wire (stator voltage) read 0 volts, which indicated that the alternator wasn’t engaged and sending a charge to the battery. Under normal circumstances, the blue wire should show a varying voltage that gets higher as the battery needs more juice.
Contacts are:
- Premier:
Becky Gremillion (secretary? & front-line tech support, Pat’s daughter)
Jan Gremillion (office manager, Pat’s wife)
Pat Gremillion (head technical dude & master welder)
tech@premierpowerwelder.com
P.O. Box 639
Carbondale, CO 81623
970-963-8875 (tech support & international orders)
800-541-1817 (sales orders) - PennTex:
Glen Stroud or Dave
7607 Flagstone Dr.
Fort Worth, TX 76118
817-590-2818 - Ace Alternator (authorized PennTex repair station):
Attn: Greg
P.O. 9758
7185 Mohawk Terrace
Yucca Valley, CA 92284
[Last updated 1 December 2019]