
Table of Contents
Thermostat Housing Problems
When I rebuilt the 401 V8 in my ’77 Jeep Wagoneer, I noticed that one of the thermostat housing bolt holes was partially clogged with something. Attempting to drill out the hole only killed the drill bit, so I’m assuming that the object was a piece of a broken tap or some other super-hard object. I was able to get a couple threads from the bolt to grip before the bolt bottomed out in the hole, so I decided to give that a shot & see if it worked. It held up for a while, but eventually started to leak coolant out from between the housing & manifold. About nine months later (before a long road trip), I decided I ought to fix it.
I put a carbide cutting bit on my Dremel tool and ground away enough of the obstruction that I could get about 1/2″ of bolt into the hole (not sure why I didn’t think of this originally). However, when I tried to cut new threads into the hole, the threads on my tap went flat & then the tap broke. I drilled the 5/16″ hole out to 3/8″ and tried again with the next larger tap, but it also went flat. These were mid-grade taps, not the el-cheapos you find at the corner hardware store. Perhaps super high quality taps would have worked better.
Upon further inspection, it appears that somebody sometime welded the original hole shut for some reason, then redrilled a new hole slightly off-center. This also meant that the thermostat housing didn’t line up quite right with the ports in the manifold, but it was close enough to get by. Anyway, this weld material was apparently harder than my taps, and that’s what caused them to go flat.
I tried using JB Weld to “weld” a stud into that hole rather than threading it for a bolt. It seemed solid, but when I tried to tighten the nut (spec is 13 ft-lbs), it slowly pulled the stud up out of the hole. JB Weld isn’t that strong, I guess. The manifold is cast iron, so using a real welder on it would be too hot to do in place on the engine.
I then took the Wag down the street to a mechanic friend and asked him to look at it. He said to fix it right, they’d have to tap the hole for a larger bolt, screw it in, then drill out that larger bolt and tap it for the 5/16″ bolt that the thermostat housing required. $165 total, most of which was labor. After all that, I’d still have a thermostat housing that was slightly off-center. I decided I didn’t want to put that much money into the stock manifold.
I pulled the stock manifold from my ’78 parts Wag with the intention of installing it instead. However, that manifold looked terrible (the rest of my engine is freshly painted) and was of unknown quality (although there were no obvious problems). I knew that swapping the intake manifolds was going to be a lot of work, so I figured that if I was gonna go to the trouble, I may as well shell out the bucks for a shiny new Edelbrock Performer intake manifold.
Edelbrock Performer Install
I chose the Performer model because it’s the lowest-rpm manifold that Edelbrock makes (idle-5500 rpm). The new air gap will make better power at high rpm’s, but is geared for 1500-6500 rpm. The Torker starts at around 3000 rpm. Since my Wag will rarely see more than 3500 rpm, the normal Performer makes the most sense.
Since my Wag is destined to be a daily driver and tow rig, I decided that I really should keep the EGR (exhaust gas recirculation) setup. The EGR circulates a small bit of exhaust gas (go figure) back into the intake. This dilutes the fresh air/fuel mix, which reduces power somewhat, but also greatly reduces the temperature of the charge, which in turn prevents pinging under heavy loads. The EGR also reduces NOx emissions, so the vehicle will run cleaner. There are no emissions tests where I live, but I like to breathe fresh air. It was also rumored that on vehicles designed to use EGR, disconnecting it will decrease gas mileage. For all these reasons, I decided to spend the extra $50 to get the EGR version of the Performer intake manifold.
I ordered the manifold from Summit Racing, who had the best prices ($232 for the EGR Performer). Because I was in a rush, I shelled out the extra cash for overnight shipping and paid about $280 total. Here’s a tip: Summit charges for overnight shipping in 20-lb chunks. The non-EGR Performer weighs just shy of 20 lbs, so it fell into the first tier. The EGR version is a few ounces heavier, which pushed it into the next tier and doubled the overnight shipping cost. Summit offers free ground shipping, so this is only an issue for expedited delivery.
The new manifold was quite pretty and extremely light weight. According to my bathroom scale, the new Performer weighed 20 lbs, while the original cast-iron manifold weighed 56 lbs. That’s a difference you can really feel when you’re stretching into your engine bay to carefully install the manifold.
There are a few gotchas that caused me much pain, and I want to prepare you so at least you know what you’re getting into.
First, the Performer instructions tell you to remove the oil splash pan from the bottom of your stock manifold (just drill out the rivets with a 1/8″ or so bit) and install it on the Performer with the supplied rivets. The problem is that the bottom of the Performer is shaped differently than the stock manifold, so I spent 90 minutes beating, bending, and otherwise mangling the pan so that it would fit over the enlarged runner on the bottom of the Performer. If the stock pan won’t fit, Edelbrock really should provide a new one that will fit their manifold (even if they charge for it). Having to that much custom sheet metal work is just ridiculous. Leaving the pan off isn’t a good idea, because when hot oil splashes onto the bottom of the manifold, it heats it up, which reduces power. The colder the air/fuel mixture, the better. In retrospect, if you use a full valley pan gasket instead of separate gaskets that only mate to the heads, then this pan isn’t as useful. However, the factory setup used both the valley pan & this little pan, so I figured I should, too. I’m told that the bottom of the non-EGR Performer is shaped differently and doesn’t have this problem.
A/C Compressor Bracket
The second problem is that boss containing the hole for the A/C compressor bracket’s rear bolt (the only one on the manifold) is exactly 1/2″ too tall, so the bracket doesn’t fit right. I had to put some 1/2″ spacers and longer bolts in the two front holes (on the compressor) to compensate. You’d think Edelbrock could do better than that. I’m told by several others that their Performers (mostly non-EGR) were positioned correctly, so who knows what’s wrong with mine.
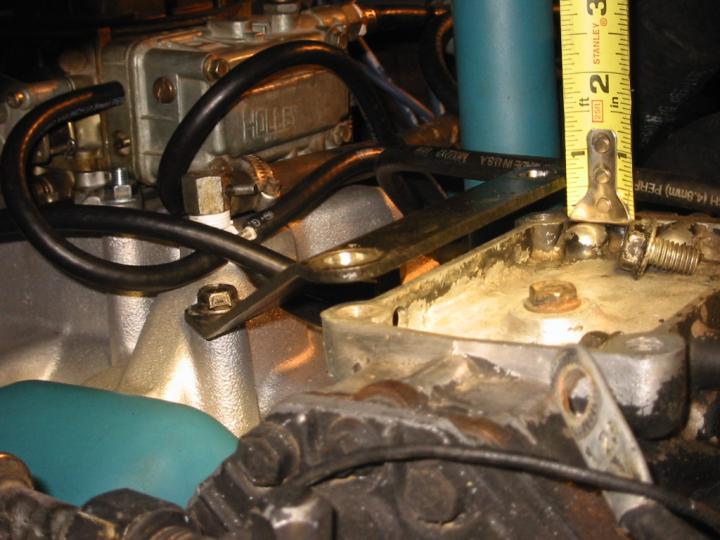
The third problem(s) dealt with the location of the front & rear fittings for manifold vacuum ports. Both fitting holes moved. The front one slid 3″ to the right (passenger) side and a bit rearward because there’s no longer an intake runner in the original spot. Good thing my vacuum hoses had plenty of slack. Although it still fits with my Holley 4160 (1850-4) carb, it sits right in front of one of the float bowl bolts, so I’ll have to remove the carb any time I want to remove the float bowl. It also somewhat obscures the lower front left vacuum port on the carb, but that’s still usable, so I can live with it. I never had a factory carb, so I don’t know how it would fit with that.
The rear vacuum port fitting moved forward a good inch from its factory location, and now sits directly below the rear float bowl on my 4bbl carb. The carb hits this port before it seats on the manifold, in fact. Fortunately, I never used this port, so I can just find a plug and cap it off so the carb will fit. A 1″ spacer would probably make it clear, but that might make the air cleaner contact the hood, which would be bad. This move was just stupid, because placing the port farther down the runner would have moved it far enough back to clear the carb. I’m told that the non-EGR Performers have this same problem.
I sure hope that having my EGR functional was worth all the hassle it’s caused me.
Emissions Equipment
When I got my Wag, much of the emissions equipment wasn’t connected properly or at all. In fact, I think the PCV valve was about the only one that was done right. In an effort to improve driveability and gas mileage, I decided to hook it all back up. Finding documentation on which ports were what on my non-stock Holley carb made this process somewhat more difficult, but the folks on the FSJ-List came through for me. You can find vacuum hose routing diagrams for AMC I-6 and V8 engines here.
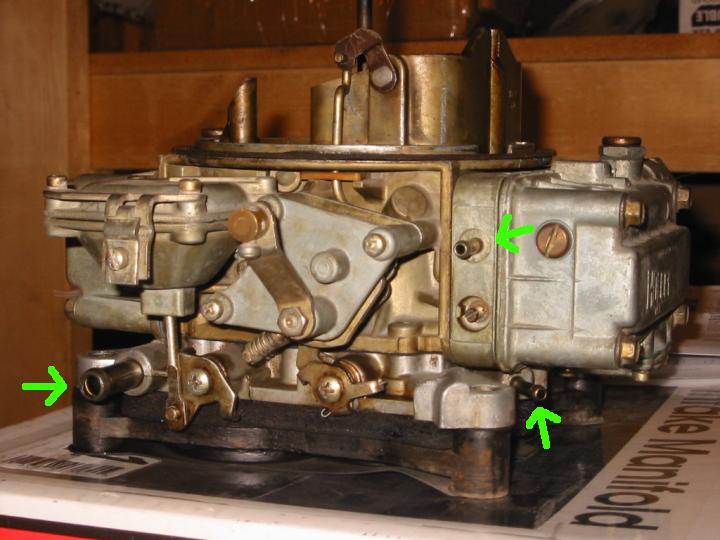
Right side of Holley 1850 carb
The three vacuum ports on my carb are marked in this photo of the right (passenger) side of the carb. Carbs with automatic chokes may have a couple more exposed vacuum fittings, but since I’ve got a manual choke, these three are all I’ve got.
The large port in the lower left of the photo connects to a hose for the PCV valve. The PCV valve plugs into a roughly 1″ rubber grommet on the right rear corner of the manifold. If the valve sounds like it’s full of BB’s when you shake it, then it’s probably good.
The small port sticking out diagonally from the front right corner of the carb (under the front float bowl, lower right of the photo) is a 3/16″ manifold vacuum port that can be used for anything needing manifold vacuum. I chose to run it to the CTO switch for the distributor advance.
The small port pointing sideways right above the right idle mixture screw in the front metering block (upper port in the photo) is a 3/16″ ported vacuum port. Both the distributor advance and the EGR valve need ported vacuum, so I had to tee both of them off this same port.
According to the TSM, the distributor vacuum advance needs manifold vacuum when cold and ported vacuum once the engine’s warmed up. This switch is handled via a coolant temperature override (CTO) switch (aka “ported vacuum switch”) plugged into the thermostat housing. CTO switches are color coded to indicate the temperature at which they switch. According to the TSM, the FSJ V8 should use a yellow CTO switch that changes at 160 degrees. When a 3-port CTO switch is cold, the middle and top ports are connected, and the lower one (closest to the base) is closed. When the coolant is above the switch temperature (160 degrees, in this case), the top port closes and the middle and bottom ports get connected. The proper setup has the middle port connected to the vacuum advance canister on the distributor, the top port connected to a manifold vacuum source (I used the port under the front float bowl on the base of the carb), and the bottom port connected to a ported vacuum source (I used a T connector to connect it to both the EGR’s CTO and the vacuum port just above the carb’s idle mixture screw). You may want to re-time the distributor after messing with all this. Spec for a ’77 401 V8 is 8 degrees BTDC with the vacuum advance hose disconnected.
The EGR valve is supposed to get a ported vacuum signal, but only when the engine warms up. The EGR’s CTO switch is also supposed to open at 160 degrees according to the TSM, meaning it also needs a yellow switch. Most parts stores list a grey CTO for this application that opens at 115 degrees. That’s the CJ setting according to the TSM, and it’s too cold for a heavy FSJ to run well.
Since the EGR CTO switch only needs to turn the vacuum on and off rather than switch from one source to another, it only requires a 2-port CTO switch. The factory switch had 2 ports, but I couldn’t find any yellow 2-port CTO switches anywhere. I ended up using a 3-port switch identical to the one for the distributor advance and just leaving the top (cold) port unused. Note that either you need to hook the vacuum source to the lower port or you need to cap the upper port. If you put the vacuum source on the middle port and the EGR hose on the lower port while leaving the upper port un-capped, you’ll get a vacuum leak until the engine warms up.
According to my ’77 TSM, there were two types of EGR valves used. California models had an integral exhaust backpressure sensor… (more later)
Last updated 10 Apr 2003