
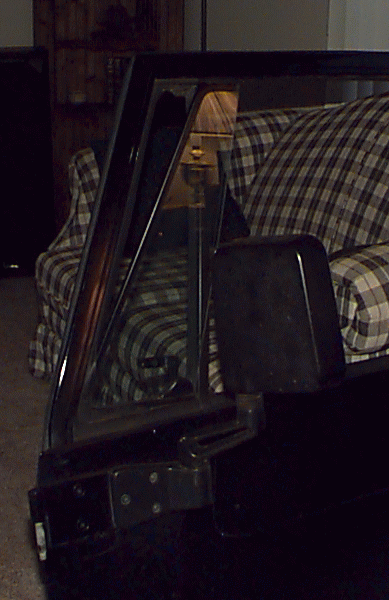
Damaged vent window
My ’95 YJ, with factory hard top and doors, was recently broken into and liberated of $700 in tools. The thief entered rather cleanly by prying the top of the triangular vent window away from its frame and then sticking his hand through to unlock the door. The dealer quoted me US$145 for a new vent window plus 0.8 hours of labor, and the insurance company concurred.
However, since nothing about the window appeared to be damaged, I decided to buy a few new tools and fix it myself. It was pretty simple once I’d accumulated all the necessary tools, but the factory service manual was a bit misleading about the process. I’ve described my experience below, quoting from the FSM where appropriate (pp 23-136 to 23-138) and making lots of my own comments. Hopefully, this will help save somebody else $170 if (God forbid) their YJ gets vandalized the same way. I could probably do this job again in about 30 minutes now that I know what I’m doing and have acquired all the necessary tools.
Required Tools
- T-20 Torx driver
- Medium-large Phillips head screwdriver
- 7/32″ hex head wrench/driver
- Knife blade or other skinny object
- Pliers or vice grips
This can be done with out removing the door from the Jeep, but since I have no lights in my garage, I removed my door and performed the operation in my living room.
Step 2
Lower the door window glass to the down-stop position.
Yeah, I know 2 comes after 1, but the ordering in the FSM didn’t make sense. It’s much easier to roll the window down before you remove the window crank.
Step 1
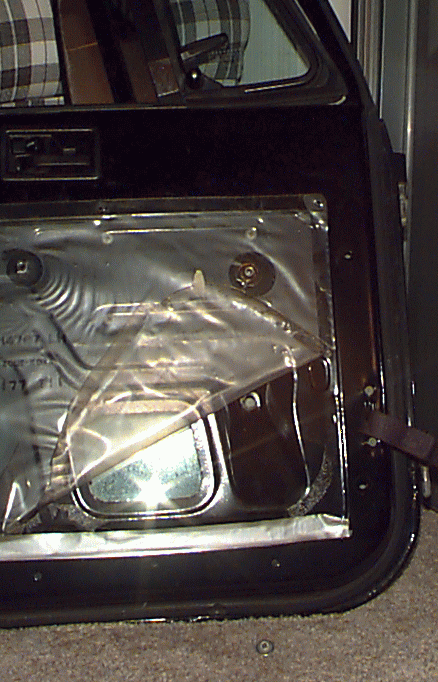
Remove the trim panel and the waterdam.
Using a knife blade, pop the cap off the window crank mount point to expose the attaching screw. Using the T-20 Torx driver, remove the window crank and the pull strap. The vinyl trim panel that lines the inside of the door is held on by eight push-in plastic rivets. Stick your fingers between the trim panel and the metal door and slowly pull it away. You’ll hear a clicking noise, like running your fingernail along the teeth of a comb. Don’t worry, this is normal. Once all the rivets are clear, the trim panel will slide (or fall) out of the metal retainer that runs the length of its top.
The waterdam is the sheet of plastic that protects the trim panel from water that leaks through the weatherstripping. You don’t need to remove the entire thing; instead, just fold back the lower forward corner until the first large screw is uncovered. The sides of the plastic are affixed to the metal with a light adhesive. I found duct tape to be a suitable substitute upon reassembly.
Step 3
Remove the division channel upper attaching screw and the lower adjustment screw.
The division channel is the bar separating the vent window from the main window. The upper attaching screw is on top of the door frame immediately above the division channel. There are also two similar Phillips screws on the front of the window frame that will need to be removed.
Adjustment screw
The lower adjustment screw is the one formerly hidden behind the water dam. This is what gave me the most trouble. Because it’s held in place with a lock washer, I nearly stripped the screw clean trying to remove it with a screwdriver, even after dousing it with WD-40. Fortunately, the screw head is big enough to grab with vice grips, so that did the trick. (Remember that all my tools were stolen in the break-in. The vice grips forced my third tool run during this operation.)
Step 4
Detach the front three inches of weatherstrip seal from the door upper frame. Lower the division channel and tilt it toward the rear of the door.
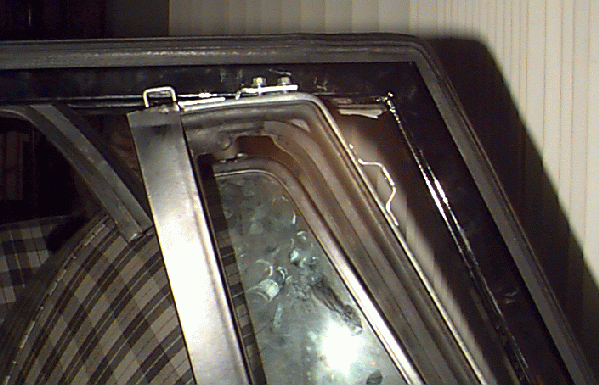
Removed vent window
The weatherstrip inside the window frame along the top of the main window is just shoved in there. Using your pliers or vice grips, get a good grip on the end nearest the vent window and slowly pull it downward. I found pulling out four to five inches of it gave me more room to work.
My division channel wouldn’t move vertically, so I just rotated it rearward until the hardware normally hidden inside the window frame was free.
Step 5
Remove the vent window glass from the door frame
The thief had already done this part for me. To replace the vent window glass back onto its upper post, I used a 7/32″ socket to loosen the two screws on the top of the vent window frame. They hold the upper post in place, and it needs to be raised enough to slide the window back in place under it. You then drop the post back down into its hole on the window glass and tighten the screws. Open and close the vent window a few times to make sure the glass meets up with the weatherstrip tightly. I noticed mine now has a gap along the lower forward edge of the glass, but it looks like that might have been a pre-existing condition. I’ll look into it more if it doesn’t survive my next car wash.
To reassemble everything, just reverse these steps. The only caveat is to make sure the lower end of the division channel (inside the door) doesn’t press too tightly against the window when it’s rolled down. To test this, put the vent window frame back in place, leaving the three upper screws loose and finger-tightening the lower adjustment screw. Put the window crank handle back on and roll the window up and down a few times. If you feel more resistance when the window is nearing the bottom, then you need to loosen the division channel by pulling the top of the channel rearward just a hair. By looking at the scratches on the paint and washer, you can probably tell exactly where the adjustment screw was when you started, which will help reposition it correctly upon reassembly.
If you have any questions or comments about this procedure, just holler.