
It’s now common knowledge that Chrysler only made one gas tank for the 1991-95 Wrangler (YJ). If you bought the 20-gallon (75.7L) tank option, you got an unmodified, 20-gallon tank. If you bought the 15-gallon (56.8L) tank option, you got a 20-gallon tank with an extended fill vent hose that prevents you from putting more than 15 gallons in it. It’s mechanically stupid, but probably a good marketing move by Chrysler.
If you want the extended range of the larger tank, but were too cheap to pay for Chrysler for the 20-gallon option, you can upgrade the tank yourself by whacking off the fill vent hose extension. According to Kevin Fell, this same mod will also work on XJ’s of that vintage. The word on the street is that this change will NOT work with early (’87-’90) YJ’s, which did indeed use two different size tanks. This particular fix also won’t work on the ’97-present TJ’s, but rumor has it you can drop the tank and lower the pump/sending unit so that the pickup tube doesn’t run dry when there’s still 5 gallons left. See the bottom of this page for brief instructions. Anyway, here’s how to do the late-YJ fix:
- Empty as much gas as possible from your tank. I did this by driving my tank dangerously close to empty, which happened to coincide with a good-weather weekend day. You could also siphon the gas into a jerrycan. The tank doesn’t have to be empty; it’s just a lot lighter that way.
- Raise the rear end of the vehicle up to give yourself some working room. I put my back tires up on ramps. Tall jack stands, a full-vehicle shop lift, a pit, or at least 6 inches of suspension+body lift would also work.
- Take off the gas cap to relieve any pressure from the inside of the tank.
-
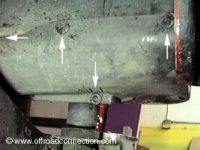
Plastic shroud below the gas cap
Remove the plastic shroud covering the underside of the body below the gas cap. It’s roughly 9″ square (not very square, actually). There are four plastic rivet-type-things holding it in place. Three are on the leading edge of the shroud, about an inch up from the bottom inside the left rear wheel well. The fourth is at the rear end of the shroud, but also has the head facing forward. To remove these, press what looks like the washer against the surface and use some pliers or a large, flat-head screwdriver to pry what looks like the rivet head directly away from the surface. Once the head is about 1/2″ from the washer, the whole thing (head and washer) should pull out of the hole as one piece. After removing all four rivets, the shroud will basically just fall in your lap. Don’t worry, it’s light.
-

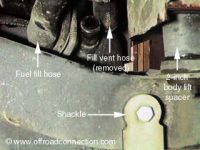
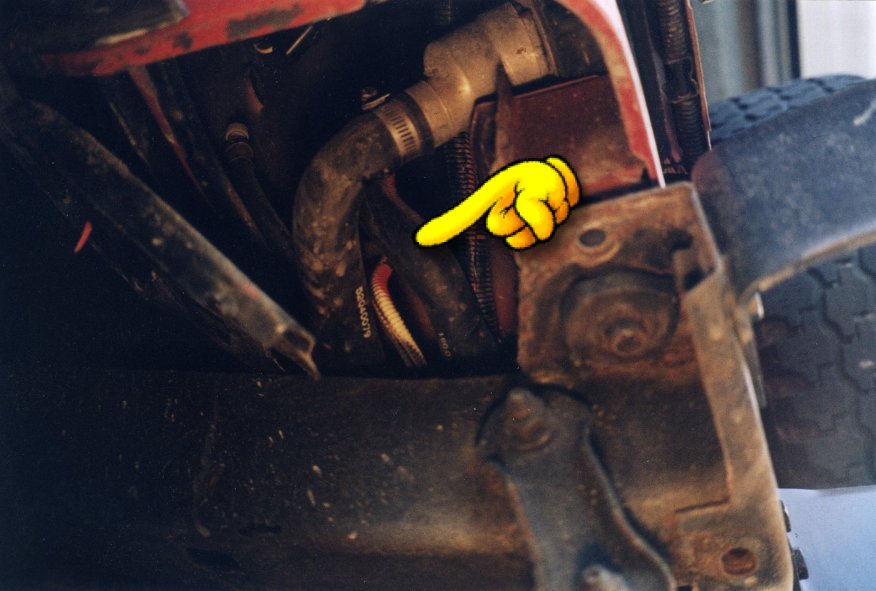
Fill vent hose
If you look up at the back side of the filler cap, you will see two hoses, roughly 1.5″ in diameter, running from the filler cap into the tank. The fill vent hose is the upper of the two connections to the filler cap and the rear-most connection to the gas tank. We want to disconnect the fill vent hose from the tank by releasing the screw clamp and pulling the hose off the nozzle on the tank. On my stock ’95 YJ, the screw part of the clamp was located directly on top of the hose (mostly hidden by the hose) and pointed directly back toward the sheet metal of the body about an inch away. It was impossible to get either a screwdriver, pliers, or a ratchet between the clamp and the body in order to release the clamp. Therefore, I decided to drop the tank down to give myself clearance.
-
Disconnect the vent hose
The factory service manual gives the following directions for removing the gas tank. My comments are added:
- Disconnect the fuel fill hose and fill vent hose from the filler neck (up top, by the gas cap). Just loosen the screw clamps and pull the hoses off the mounts. These clamps were reasonably accessible on my rig.
- Disconnect the fuel tank vent hose from the vent tube. Disconnect the fuel supply and return hoses from their respective tubes. These three are all located at the top, front, left corner of the gas tank, above and behind the rear track bar. They’re each only about 1/2″ in diameter. The shop manual doesn’t say just how to disconnect these from the tubes, and I couldn’t figure it out, so I left them connected. If you figure out how, let me know and I’ll update my instructions.
- Centrally position a transmission jack under the skid plate/fuel tank assembly. I instead used a large-base hydraulic jack sitting on a cinder block (for added height), with a 14″ square of plywood between the jack and the skid plate.
- Remove the skid plate/fuel tank assembly mounting nuts (but not the tank strap nuts). There are four of these nuts on the back, right where the skid plate meets the rear frame cross piece. You want to remove the four rear-facing, 1/2″ nuts, as the two down-facing nuts are the tank strap nuts mentioned above. There are also three of these nuts holding the front of the skid plate to a cross member. The bolt head is on top of the cross member; the nut is below. Both must be anchored when loosening. Unless you have a pit or a big shop lift, I recommend approaching these nuts from in front of the rear tire, rather than from the rear of the vehicle.
- Lower the skid plate/fuel tank assembly slightly and disconnect the gauge sender wire connector. Then lower the tank on the jack. Since I was unable to disconnect the three tubes on the front of the tank, I couldn’t drop the tank down more than an inch or so, and hence never got to this step. Because of this, disconnecting the top end of both filler hoses was probably unnecessary.
- I would have preferred lowering the tank at least three (maybe four) inches in order to have good access to the screw clamp on the filler vent hose. I tall body lift would have accomplished this, and would probably have made the entire tank removal unnecessary.
-
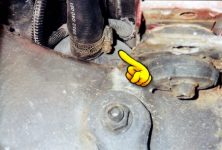
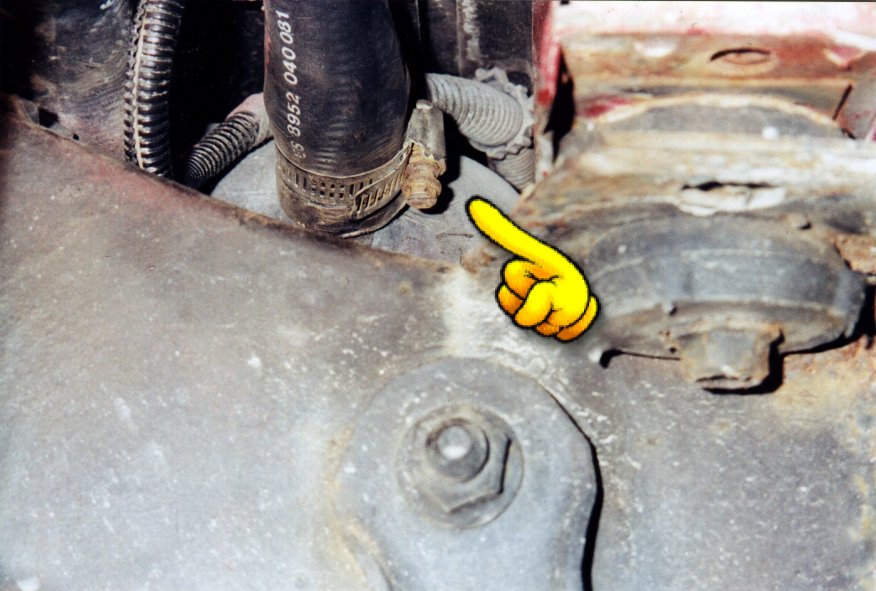
Fill vent hose clamp
After trying several methods of loosening the filler vent screw clamp with the tank lowered only one inch, my dad (whose driveway and extensive tool collection I used for this job) had an idea. We took a flat-head screwdriver piece intended for a ratchet wrench (about 2 cm long) and gripped it with some tiny little (5-6″ long) needle-nose vice grips. This gave us enough clearance to get around the hose while still being short enough to clear the body sheet metal. This may or may not have worked even with the tank fully raised–it would have been a real tight fit. Not lowering the gas tank would eliminate most of the work up to this point.
- I (very slowly) unscrewed the hose clamp and removed the filler vent hose from the tank nozzle.
-
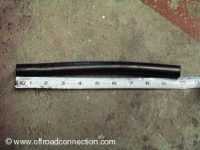
Entire fill vent hose
The job up to this point took almost three hours due to my screwing around trying to fully lower the gas tank. By following these directions and knowing when to give up on the tank, it should only take about 60 minutes. The rest of the job will only take about 30 minutes.
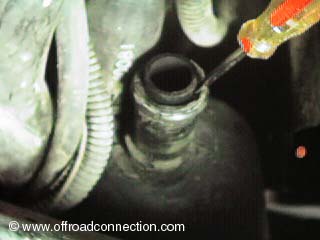
- If you look into the nozzle where the vent hose was connected to the tank, you’ll see that there’s another hose lining the inside of the nozzle, almost flush with the opening. (The hose has already been pulled out a bit in the photos.) This hose is about 9.75″ long, and extends down into the tank about 7″. Gas is prevented from filling above the level of the bottom of this tube. By shortening this tube, you can increase the amount of gas that will fit into your tank. Sneaky, huh?
-

Removing the vent hose
You need to remove the liner tube. I wedged a thin screwdriver between the inner tube and the outer nozzle to create a gap between the two, then grabbed the inner tube with the aforementioned vice grips (needle nose pliers would work) and pulled hard. Since I couldn’t lower the tank fully, the departing liner tube wouldn’t clear the bottom of the body panel. I could therefore only pull the tube out about 4-5″ at a time. I used a utility knife to cut off about 2″ of the tube, then grabbed onto the remaining section and pulled it out a few more inches. You should eventually cut off a total of about 7″ of tube. I think I whacked about 7.25″. You want to leave just enough of the tube to line the entire nozzle where the hose mounts, but no more. If it extends down into the tank, you’ll lose fuel capacity. I recommend removing the last section entirely so you can use an open work space to get a nice, clean, even cut along the 2.0-2.5″ section of tube that you’ll be re-inserting back into the nozzle.
-

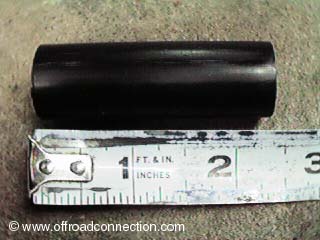
Trimmed fill hose
Once cut, insert the remaining section back into the nozzle. This must be done, because the nozzle reportedly needs the added support in order to maintain pressure for the hose clamp. The tube goes in about as hard as it came out. I used a hammer to pound it in, but you must be very careful that you don’t hit any metal and cause a spark near all those gas fumes. I’ve always wanted to go out with a bang, but I’m not ready to do so just yet. A rubber mallet would probably be a better choice.
- If you merely increase the volume of your tank without replacing the fuel gauge sending unit, then your dashboard gas gauge will be inaccurate. It’ll read “full” for the first quarter tank, and then start dropping when your fuel level drops below 15 gallons. I called my local dealer, and they said that a new sending unit for a 20 gallon tank would cost about US$220. At that cost, I think I can live with a slightly-inaccurate gas gauge. If you do decide to replace your sending unit, this is when you’d do it. You must have the gas tank completely lowered in order to do this, since the sending unit is accessed from the top of the tank.
- Now you just need to reassemble everything you spent the first hour or more disassembling. Lift the gas tank back up, reconnecting the sending unit wire if necessary, and replace the seven screws that hold it in place. Re-attach any hoses you may have loosened or disconnected. While you’re at it, make sure the screw clamps are oriented at accessible angles. You never know if you’ll have to take this apart again. Replace the shroud under the filler hoses.
- That’s it! Go fill up your tank with gas. I was able to put 19.077 gallons into mine, plus whatever was already in there during the operation. I’ve since put in as much as 19.8 gallons on a single fill-up.


Many thanks to Don Birren and Dorian Jepsen for the photos, which I forgot to take when I performed the procedure myself.
After following my instructions, Chris Lawson made these comments:
- He didn’t need to drop the tank at all. This is the most common comment I get on the above instructions, especially from those who have body lifts.
- The clamp was facing backwards as well, but he had a small enough 1/4″ ratchet and socket. He could only turn it a little at a time and it took 20 minutes, but it worked fine.
- He found it easy to not jack up the vehicle and just lie underneath on a creeper.
- Even going slow, the total time required was a little over 1 hour.
Jeff Yokomura has a similar writeup with better pictures at JeepWire.Com.
Here’s how to “enlarge” your TJ gas tank, written by an anonymous contributor:
Take down the tank and gain access to the top. Unscrew the sending unit/pump/filter and pull it out. It holds about a litter of fuel inside to keep the pump cool, so lift it straight out and tilt it back into the tank.
The column is more like a telescoping unit. It can slide up or down. Tabs on the side allow it to click in two positions. 15g and 20g. Sliding it down lowers the intake of the whole assembly, where before it sat about 4.5 inches above the tank bottom. The float actually drops because of this making the whole system fairly accurate now.
I don’t know about yours, but my fuel gauge lied all the time. Empty meant I had 4 gallons left and it would always drop hard on the last quarter. Now it’s consistent all the way through.
[Last updated 28 December 2000]