
With my ’77 Wagoneer almost road worthy, I decided to borrow my dad’s ’96 E-350 to tow my ’95 YJ to Attica, IN, for a get together of some JPOR Mailing List members. Since I didn’t have a trailer and didn’t plan to get one in the near future, I opted to setup my YJ for flat towing. This entailed attaching a tow bar and configuring my YJ’s rear lights to work as trailer lights when hooked up to the tow vehicle.
Tow Bar
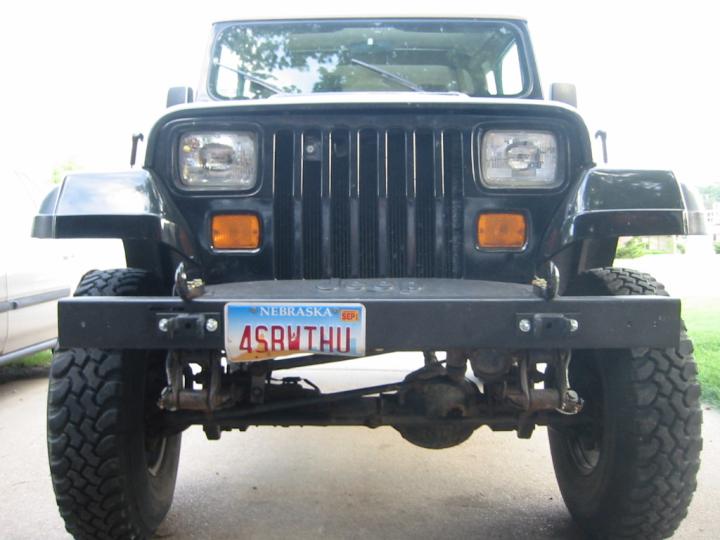
License plate location
I bought a Hidden Hitch model 44000 on sale for $103 from JC Whitney. Quadratec sold the same model for $130. Amazon also sells updated models now, of course. It’s an adjustable-width tow bar that comes with bumper mounting brackets. Valid widths between bumper mounts range from 24-41″, although Hidden Hitch recommends 35-40″ as an ideal width. I chose to center my mounting brackets across my frame ends, which are about 31″ apart. Close enough, and probably stronger than mounting them outboard of the frame. Note that on a stock YJ, the license plate is centered across the passenger side frame (Nebraska requires a front license plate, unlike some states). I’d moved mine inboard about 8″ some time ago (when installing my fog lights), and the mounting bracket conveniently sits about 1/4″ from the edge of my plate now.
This was as simple as removing my bumper, measuring the location where the 2.5″-wide frame meets the bumper, and then drilling two 1/2″ holes on each side (at 4″ centers) to mount the brackets. Note that the bumper mounting holes are not centered on the frame, so don’t just measure an equal amount out from each side of the mounting holes! A drill press came in really handy when drilling those 1/2″ holes through the 5/32″ thick bumper.


The hitch comes with grade-5 mounting hardware and large washers for the back side of bumper. The instructions recommend installing the bracket mounting bolts finger tight and then hooking up the tow bar to make sure the quick-release pins don’t bind as the bar rotates up and down. With the bar still attached, you can then torque the mounting bolts down to 75 ft-lbs. I put a liberal amount of Loctite on the threads of those bolts–just in case.


Ideally, you want the tow bar to sit parallel to the road when it’s hooked up to your tow rig. For me, this meant getting a receiver hitch that raised the ball up about 6″, but the best I could find was 4″. It turned out close enough. If you have to stop suddenly, the more level your tow bar is, the less likely your towed vehicle will be to climb into the back seat of your tow rig, and the better it will handle under all stopping conditions. Also make sure that the ball on your hitch is rated for the weight of the vehicle being towed. A 3/4″ shaft is only good for 3500 lbs. A 1″ shaft is good for 5000 lbs.
Don’t forget the safety chains or cables. The towed vehicle (“toad” in RV-speak) needs to be secured to the tow rig. You can connect the tow bar to the tow vehicle and then the toad to the tow bar, or you can get longer chains/cables and secure the toad directly to the tow vehicle, which is what I did. I bought two 5000-lb, 64″ long coiled cables for $43 at a local RV supply store, and I used them to bypass the tow bar altogether. I attached them to the Jeep by drilling a hole in the bottom edge of the bumper just outboard of the frame. I inserted a screw-close link through that hole, and then clipped the chain into the link.


Trailer Wiring
The goal here is to have a plug on my YJ that I can connect to the trailer wire plug on the tow vehicle so that my YJ’s marker, rear turn signal, and brake lights function just like a trailer’s would. I wanted this to be a permanent setup, so that I wouldn’t have to do anything except plug my YJ into my tow rig whenever I wanted to tow it somewhere. This configuration is also cheaper than a portable setup using mag-mount lights, which generally costs $50.
The first thing to do is locate the factory wires that power the marker lights, brake lights, and rear turn signals. I spliced into mine up under the dash to protect against flooding. Connector C203 sits in front and to the left of the fuse box and above the e-brake pedal, but can be pulled down a ways for easy access. At that connector, the wires of interest are the dark green wire w/ red tracer (left rear turn/brake), the brown wire w/ red tracer (right rear turn/brake), and the black wire w/ yellow tracer (all marker and dash board lights). Be sure that first wire is dark green, not light green.


Now that I knew where I was going, the next step was to route my wire. I used a 4-wire flat plug, which seems to be most common for smaller trailers with no electric brakes. My plug lies just inside the bottom left corner of the grille and can be pulled out when it’s time to tow. It then runs (inside split loom wiring for protection) up behind the left marker light, through a hole below the headlight bracket, along the left hood line, and along the top of the firewall to a large grommet in the center of the firewall. I’ve used that grommet to route numerous wires from the engine bay to the dash area, and there’s still plenty of room for more. Just cut a slit in the rubber with a knife and slide the wire through. Once under the dash, I routed the wire over the steering column to the vicinity of the aforementioned connectors. This required about 10′ (+/- a few inches) of 4-conductor wire, about 2′ of 1/2″ split-loom wiring, and a half dozen zip ties. I had bought 24′ of wire with a connector at each end and a half dozen wire splices for $10 at a local parts store.


At first, you might think that you could merely splice the trailer wiring into the factory wiring harness and call it good. That works for the marker lights, but if you do that for the turn/brake lights, you’ll fry components in your YJ when your tow rig sends juice down the line. The proper method is to install diodes at each splice so that current will only run in the proper direction regardless of which source sends it. These diodes cost about $15 each and are available at most RV supply stores or online. I got mine at Leach Camper Sales at 27th & Cornhusker in Lincoln, Nebraska. The diodes come with spade connectors for you to put onto your newly-snipped wires. The following diagram explains which wires to snip and which trailer wires to connect where. To determine which end of the factory wires goes toward the lights, find the split-loom wire that runs below the drivers door and follow it up to the connector. Connect that end to the “OUT” side of the diodes. The final result looks like the final photo above.
To connect the 4-wire flat plug at the YJ’s grille to the 7-wire round plug on my dad’s van, I took 6′ of my remaining 14′ of 4-way wire with one end factory-terminated to a flat plug and spliced it to 12″ of wire that had the opposite gender 4-way flat plug on it. This 7′ “extension cable” is a little longer than necessary, but it can be wrapped around the tow bar to take up the slack. I then bought an adapter plug that allowed me to plug the 4-wire flat plug into the 7-wire round outlet on the van.
Shopping List
| Item | Cost |
|---|---|
| Hidden Hitch 44000 tow bar | $103.00 |
| 64" coiled safety cable kit (Roadmaster 643) | 43.49 |
| Valley receiver ball insert (5.25" drop / 4" rise) | 30.00 |
| Chrome hitch ball (2" ball, 1" x 2-1/8" shank) | 6.95 |
| 5/8" hitch pin (Larin HPC-625) | 3.99 |
| Roadmaster wiring diodes (two) | 21.00 |
| Trailer wire kit (24' 4-way wire, two connectors) (Calterm 08010) | 10.49 |
| 4-wire flat connector w/ 12" wire, trailer end (Hopkins 48105) | 1.99 |
| Plug adapter - 4-way flat into 7-way round (Blue Lightning 15408) | 7.95 |
| Total | $228.86 |
Useful info came from the January 2002 issue of Petersen’s 4-Wheel & Off-Road, pages 132-133, and from my factory service manual, sections 8W-51 and 8W-52.
Gear Selection
Of course, while you’re flat towing, you need to somehow allow the axles to turn freely without the engine running. The safest and most paranoid method is to simply remove both driveshafts. This is a pain, though, and adds 30 minutes of dirty wrenching both before and after your trip. IMHO, it’s overkill.
The owners manuals for all the YJs I’ve heard of recommend that, when flat towing, you should put the t-case in neutral and the transmission in gear (5th or Drive). I believe this is because the transmission oil slinger is on the input shaft, and the engineers don’t want the output shaft of the tranny slowly rotating for hours on end without any oil being thrown onto it. IMHO, this is a pretty small concern, because the only thing that would make the tranny output (and t-case input) turn is the fluid currents in the t-case caused by the turning t-case output shaft.
The problem with putting the tranny into gear while towing is that if your t-case somehow wiggles into gear, your entire drivetrain will suddenly lock up. At best, this could snap a driveshaft U-joint, causing your driveshaft to spin wildly with one end free while you drive obliviously down the road. At worst, the jolt could pull both your Jeep and tow rig end-over-end off the highway. I actually talked to someone who experienced this worst case scenario first hand. Both his Jeep and his pickup rolled, and both were totaled. All this could have been avoided by simply shifting both the t-case and the tranny into neutral before beginning the trip. As an added precaution, it’s not a bad idea to use bungee cords or twine or something to tie off the shifters so they can’t move from their neutral positions.
Dave Sharpe shared his experience:
“I recently tried towing my 95 Wrangler behind my truck with a tow bar. I put the transfer case in neutral and the transmission in second. It seemed pretty difficult to tow, couldn’t get over 35mph, which I attributed to the truck also having to carry a heavy camper. Five miles down the road I found a place to turn around. Got out to check things, and found power steering fluid blown all over. Apparently the transfer case popped back into gear on the bumpy road. It destroyed the engine. I’m guessing it kept pumping gas in which washed down the oil from the cylinder walls. I put both transfer case and gear box in neutral and it towed home easily. Now with a new engine in, I’m shy of putting the transmission in gear for towing.”
Oh, and don’t forget to leave a key in the ignition to unlock the steering column. If the steering wheel can’t turn freely, handling will be ugly even with a large tow rig. (see below)
Remember that the larger your tow rig (like a moving van or motor home), the less likely you will be to notice any problems with your Jeep that occur en route. Horror stories abound online about drivers happily cruising down the highway while their toad disintegrates behind them.
Aftermath
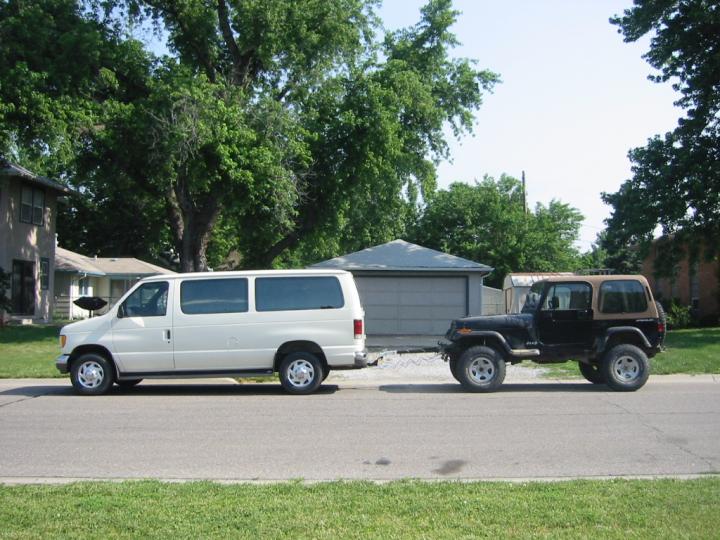
Van towing YJ
The results of using this setup (photo at right) to tow the 3500-lb YJ behind a 1-ton van with roughly a 120″ wheelbase on a 1200-mile road trip were phenomenal. The van towed the YJ like a dream for most of the trip. It seemed a little squirrelly for the first 200 miles, as though it wanted to over-correct for even the slightest turn of the steering wheel while driving down the highway. When we stopped for lunch, I realized that I’d forgotten to unlock the steering wheel. DOH! With that taken care of, we never even knew the YJ was back there for the rest of the trip. Even doing 70 mph through Chicago while changing lanes and occasionally quickly decelerating, the two-vehicle rig handled flawlessly. There were times, at night, that I had to tap the brakes just so the brake lights would light up the YJ so I could make sure it was still back there. It handled that well.
A few months later, I finally got my Wagoneer road worthy and used it to tow my YJ on the 250-mile round trip to our wheeling spot in Kansas. Overall I was pleased, but I’d gotten spoiled by using a 1-ton van with an MPI 460 V8 and 4.10 gears on my maiden voyage. The fresh 401 V8 in my Wag still had plenty of power with its 3.54 gears (no overdrive). Even with a combined vehicle weight of roughly 8000 lbs, I was still able to accelerate up steep hills on which my YJ alone (with its 2.5L 4-cyl) could never maintain the speed limit. I got about 10 mpg on the trip, despite the fact that I tested the acceleration ability on almost every hill. 😉 Braking was quite adequate, but I may still upgrade to rear disc brakes someday. The big difference was in handling. There was a pretty strong wind on the trip down, which made things a little squirrelly at high speed, and forced me to stay below 60 mph. The trip back was calm, and I could drive 70 mph comfortably. The extra 11″ of wheelbase and no doubt some extra weight makes the E350 a more stable tow rig than the Wagoneer.
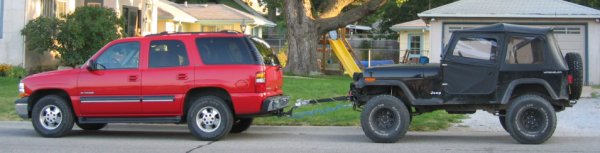
About 18 months after that, we bought a 2001 Chevy Tahoe to use as a family cruiser and tow rig. I used it to flat tow the YJ for the first time on this trip to Kansas again. I was very impressed. Towing the YJ behind the Tahoe wasn’t quite as transparent as it was behind my dad’s E350 (duh), but it was noticeably better than my ’77 Wagoneer, even with it’s 401 V8. The Tahoe is also considerably more comfortable than either of those vehicles. The added weight (+500 lbs) and wheelbase (+7″) compared to the Wag were very noticeable, as were the 4-wheel disc brakes and the awesome little 5.3L (~323 ci) Vortec engine with 3.73 gears. The 5.3L makes about the same torque and 60 more horsepower than my Wag’s 401. I only averaged 11 mpg round trip (still better than the Wag), but half of that was driving 65-70 mph into a 20 mph head wind through hilly terrain. Dropping my speed to 60-65 probably would have improved mileage a bit, since the tranny (in tow/haul mode) had to drop out of overdrive in order to climb most of the steeper hills.
Last updated 28 October 2011.
Thank you so much! This write up is exactly what I needed! Amazing!
Great information. Thank you! Why don’t you need a diode in the marker light circuit?