
I finally finished making the upper front shock adapters and attaching the shocks just two hours before we were to leave town for the Flatlanders Jeep Club’s annual 4×4 Fest. There were a couple small things yet to be done (like securing the hard front brake lines to the frame), but nothing that would prevent me from wheeling — or so I thought. I had intentionally just tack welded the spring perches to the axle tubes, since I wanted to be sure there would be no vibrations before permanently affixed them. I figured the combination of tack welds and tight U-bolts would be enough to keep everything in place for a couple days.
Everything worked flawlessly both around town and on the two-hour highway drive down to the 4×4 Fest. After some experimenting, I decided to set the shocks on 1 around town. This is as soft as the shocks will get, and the add-a-leaves are now the limiting factor in ride quality. I use 3 front and 4 back for highway travel when I’m fully loaded with wheeling gear, since I want a little more stability at high speed. Off road, I crank both ends up to 5. (I accidentally left them on 5 for the highway drive back home once, and the ride was much rougher. Shocks do make a difference!)
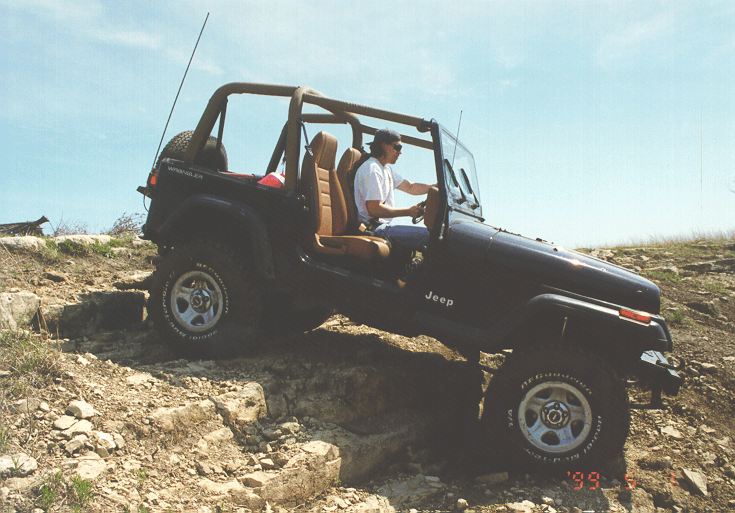
Ledge climbing with new SOA
Once at the park, we took the top & doors off & left them on a friend’s trailer. Beautiful weather, no top, new lift — it could only go down hill from there, and it did. The first two hours in the ORV area were great. I got put on the medium trail because the event insurance required lockers for the hard trail. Everything we did was a cake walk with all my new clearance. On ledges where I used to have to slowly creep down the perfect line to avoid kissing the rocks, I was now able to just point the Jeep where I wanted to end up and let it go. I could bounce down any old line without fear of hitting my undercarriage. I swore this lift was going to make a lazy driver out of me.
Most of the early part of the trail had us descending all the hard obstacles. About two hours into the ride, we finally tried to climb up our first set of ledges. I lined up and started to push over the ledge, then felt a nasty clank from somewhere below. I stopped and asked the bystanders what broke. Bob Belbeck, our tail gunner, peeked underneath and said he didn’t see anything wrong. With the clutch to the floor, I eased up on the brakes, trying to roll backwards down the 20-degree slope I was on. The Jeep went nowhere. I didn’t care what Bob didn’t see, there was definitely something wrong. He looked again, and noticed that what he didn’t see was my rear driveshaft. It was now nearly horizontal (hiding between the frame rails), and my rear pinion was pointed up at a 45-degree angle. Apparently, my crappy tack welds weren’t enough to keep the spring perches in place when climbing ledges in 4-low 1st gear.
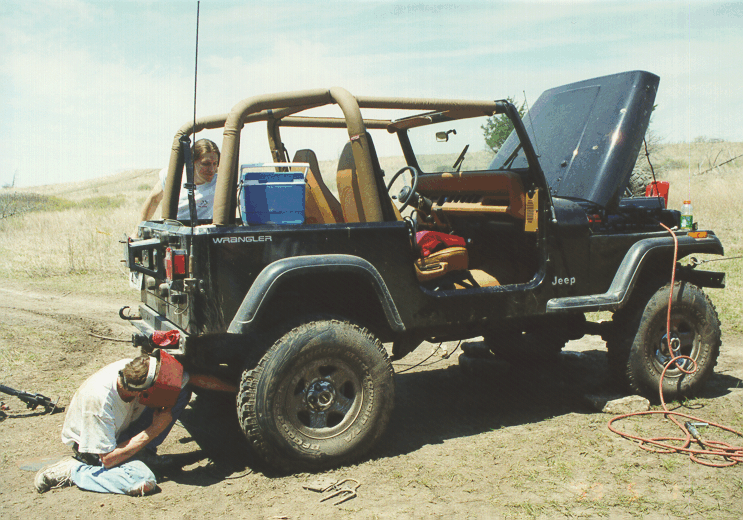
Rolling workshop
Fortunately, Brad Elder and his friend (whose name I unfortunately can never remember) drove up just then in his friend’s killer ’97 TJ. The squeezed by me up the ledges, and then winched me to the level ground at the top. We stayed behind while the rest of the group continued on their way. My Premier Power Welder was about to earn its keep. We used the winch to position the Jeep so that the pinion angle was back where it belonged, confirmed by quadruple checking the angle of the driveshaft and pinion. As we were doing this, Todd Reynolds, a new friend in a built Sammy that had come down with us from Lincoln, drove up. Todd recently moved back to Lincoln from Nevada, where he owned a 4×4 shop. Since I didn’t have much faith in my welding skills at that point, Todd generously agreed to do the job for me. We had the axle back in place less than an hour after it snapped, and Todd went on his way.
The only irreparable breakage appeared to be the seals on the rear pinion U-joint. No problem, I’ve got a spare. After mostly installing it, Brad & I found that the caps were the right size, but the cross section was about 1/4″ too small to fit the larger 1330-style joint that the ’94-present Wranglers used. Parts America’s computer had failed me yet again (they also don’t carry correct belts or hoses for my ’95 YJ). Several other folks offered me their spare U-joints, but they unfortunately had fallen prey to the same inaccurate part number. I then remembered that I had brought along my old rear driveshaft, which included the OEM U-joint. Due to space reasons in my YJ, I’d left the tub o’ spares back at the trailer. Brad, his friend, and my lovely wife Stacy headed back to get them while I stayed behind to hold down the fort.
During the couple hours that I waited there, nearly the entire event population passed by at various times. In fact, I found two other people that had broken things (a suspension locating arm and a shock eye). After never being used outside my garage for over a year, my welder finally saw field action three times that day.
When Brad & friend finally returned with my old driveshaft, we were unable to extract the U-joint from the rusty yoke. Two hours of waiting down the drain. We starting comparing the parts we had on hand, and realized that the cross piece of the broken U-joint still appeared to be OK. Since the end caps were the same size as the spare U-joint I had, we put the new caps & seals onto the old cross piece and hoped for the best. A month later, it’s still running fine.
When I got home, the first thing I did was permanently weld the spring perches to the axle so that this wouldn’t happen again. It’s much easier to do with the tire removed, BTW. The second thing I did was call Tom Wood, where’d I’d gotten my new CV driveshaft, to find out what size U-joints I really needed. The larger U-joint used on the rear pinion of the ’94-present YJs is a Spicer 1330-style joint. Spicer part numbers 5-1203X or 5-213X will both work, but the 1203 is both cheaper and better. The smaller U-joint used in Tom’s CV-joint and on the rest of the Wranglers, including the rear of the ’87-’93 YJ’s, is a Spicer 1310-style. It’s Spicer part number 5-153X. Tom will sell the 5-1203X for $15 and the 5-153X for $12. I also found them locally at Lincoln Radiator for $14.40 and $12.83, respectively. While the Spicer joints are more expensive than the no-name brands, they are worth the extra cost. They’re more durable and will need replacement less frequently than the cheaper alternatives. According to a local shop, the Spicers have a Rockwell hardness rating of 62, while some of the cheap brands are as low as 25. This means the needle bearings will wear down sooner, causing joint failure.
Anyway, after two more trips down to that same ORV area, everything is still working flawlessly. I think I’ve finally got all the gremlins exterminated… at least for now.