www.flickr.com
|
Working Without a Net
I recently had the opportunity to shoot group shots at a local charity golf tournament. What made this interesting was that these group shots were to be printed, signed by the celebrity running the event, and handed out to the golfers at the awards ceremony later that afternoon. There was no time for postprocessing, and I never got to see the photos larger than my 2.5" LCD (in bright sunlight, no less) until the 8x10" prints were being signed. (A runner took my CF card to a local printer while I was shooting other parts of the event.) I had to get it right the first time, every time. To make matters worse, I only found out about this gig about 22 hours before I had to show up, so I didn't have much time to prepare. This posed some interested challenges that I had not encountered before, so I wanted to document my process for posterity.
Learn From Your Mistakes
Fortunately, and completely coincidentally, I had shot another golf tournament just three weeks before this one. The conditions were different in that I had plenty of time for postprocessing after that event. This was good, because I made some rookie mistakes during the group shots for that event, and I was able to correct them (somewhat) in post and then learn from them.

At the first event, I had setup two light stands on the putting green before the event started and took most of the group shots there. I had experimented to get a good lighting setup when I first arrived just after sunrise, but it was a good half hour later before any of the foursomes wandered over to have their photos taken. By this time, the intensity and color of the sunlight was changing, and my flashes were no longer setup quite right. It didn't help that clouds were moving through, so the background lighting changed from one shot to the next. I learned several things from analyzing these shots afterward:
- Your on-camera LCD is notoriously inaccurate when viewed outside in any sort of daylight. To dial in the right exposure, you must check the histogram for an image, then trust what it tells you regardless of how the photo looks on the LCD.
- Even if your subjects are lit properly with the flashes, if your background is exposed too dark, the shot will look unnatural. Some of my group shots looked like they were posed in front of a fake backdrop, even though it was actually the real (under-exposed) #1 fairway.
- Bright sunlight -- especially early morning sunlight -- is a fair bit warmer in color (lower color temp) than a standard speedlight flash. This accentuates the "fake backdrop" look mentioned above. To make the subjects blend with the background and make them (not your lighting) be the first thing to which your eye is drawn, the light sources should be colored the same.
- Locating two flashes, one at about 60 degrees to each side of the camera, produces some great light for single-person portraits. However, for multiple people in a line, such a shallow angle is virtually guaranteed to produce harsh shadows cast from one person to the next. It also places the people on each end considerably closer to the light sources, which makes one side of their faces unnaturally bright compared to the person in the middle of the lineup. Locating the flash(es) only about 20 degrees off-axis produces even light and some 3D sculpting without as many harsh shadows.
Do Your Homework

Research -- that's why you're reading this, right? Since I knew I wasn't allowed to correct a bad exposure in post at this second event, and that I couldn't trust the camera's LCD, I needed to know how to interpret the histogram properly. I hunted around the Internet and found a few golf shots that had good looking grass with good sky detail. When downloaded and viewed in my favorite photo editing package, I saw that the large expanse of green grass fell in the 50-75% range of the histogram (ie, in the quadrant just above the midpoint). When I showed up at the course, I simply took a few photos of the grass at my feet and tweaked the camera's exposure until the huge hump in the histogram fell between 50-75%. Because I'd done my homework, I knew that as long as I used these exposure settings, I'd have attractive greens with good definition in my sky and clouds, even if I couldn't see my LCD to verify each shot. Of course, this requires you to set your camera to full manual mode, but you were doing that anyway, right?
This day, I was blessed with consistent sunlight all day. The event didn't begin until 10am, and the few clouds we had were very sporadic. Hence, I was able to leave my camera at ISO 100, 1/180s, f/8 all day long. If clouds had rolled in, all I'd have had to do is take another test shot of my feet and dial in the histogram again to where I knew it needed to be.
You also have to know your equipment so you know when you arrive what you'll have to use to get the desired results.
I knew from the previous tournament that a bare flash produced unnatural lighting on my subjects. I experimented at home with gelling my flashes, and found that using a 1/4 CTO warming gel produced much more attractive skin tones and looked more natural when paired with bright sunlight. Hence, before I ever fired a flash on the course, I already had a 1/4 CTO gel taped to each of my flashes. Beware that a warming gel will make bright red shirts (our celebrity was a Husker football player) really saturated. I wish I'd turned down the saturation on the camera by one notch to compensate. Next time...
Speaking of coloring your lighting, another important part of getting consistent color is hard coding your camera's white balance to match your actual lighting (daylight, in my case). Trusting your camera's white balance is no better than trusting its exposure settings. It can vary widely depending on how much grass, sky, or shade is in each shot. Remember, consistency is the key here. You want to set your camera to values you know to be correct and then trust that they won't change out from under you. The last thing you want is to take two back-to-back shots and have one with a bluish tint and one with a yellowish tint on the same patch of grass.
Unless you've lived your whole life in Seattle, you know that mid-day summer sunlight is really bright. The old "sunny 16" formula tells you approximately how to set your camera to expose for this: set your aperture at f/16, and your shutter speed will match your ISO number. Because I always shoot manual mode on my camera, I've found through experimentation that a "sunny 11" or "sunny 11-and-a-half" rule tends to give more accurate results for my equipment. Because I knew this ahead of time, it took me exactly one shot to dial in the correct exposure for my grass histogram above. In bright sun, the "sunny 11" rule gave me exactly the histogram I was looking for. To make life easier for my flashes, I used an equivalent exposure of ISO 100, 1/180s, f/8, which darkens the shutter speed and brightening the aperture by one stop each. Flashes like wide apertures because they don't have to work as hard.
Another thing you'll realize if you shoot in bright sunlight is that the shadows are comparatively very dark. Dark enough that a digital sensor will show very little detail. People don't like to pose for pictures facing into the sun, and they assume very squinty expressions when forced to do so. Hence, most of the group shots were taken with the sun behind or to the side of the golfers. To make matters worse, golfers like to wear hats. This puts their faces in deep shade, despite the bright sunlight. And heaven help you if one of them is dark skinned! If you want to identify faces (and that was kinda the whole point of me being out there with my camera), you need to fill in those shadows with a flash -- or two.
But is your flash powerful enough to compete against mid-day sun when backed up far enough to get a group shot of six people standing side by side? It takes a lot of light to work at ISO 100 and f/8 from 15 feet away with a wide angle spread. While pushing that light through an umbrella might produce softer, more pleasing light, it'll cost you two stops of light that you can't afford to lose. Gotta go bare.
I have four flashes in my bag, one of which is an old school "potato masher" Sunpak 544 which will put a Canon 580EX to shame for wide angle shots (and cost me only $30). Testing told me that even this wasn't nearly strong enough to get me the level of fill that I wanted. Fortunately, the 544 has a funky bracket that allows me to screw a second flash right next door. I chose my Canon 430EX, and set both flashes to full power in order to get the amount of light that I wanted at that distance. In retrospect, I probably could have turned one of them down half a stop and gotten even better results, but what I got was close enough.
Remember, too, that the light emitted by your flash is cut in half when you move the flash 40% farther from your subject, so placement of the flash is critical. I had my flashes on a stand that sat about 15 feet from the golfers. I placed it too close on a few shots, and I can tell that they're brighter than I'd like. Consistency is key. The nice thing about using the flash(es) to provide most of the face lighting is that it no longer matters as much which direction the sun is coming from. Just position your subjects for a pleasing background and fire away. That said, I did find that on the few occasions when the golfers were facing directly into the sun, I had to move the flashes backward a bit to reduce their power by half a stop or so. That made their shaded faces a little darker, but it kept their bodies at a reasonable brightness.
FWIW, I trigger my flashes remotely using Cactus V4 radio triggers. While they're not perfect, they've been reliable enough to make me enjoy the $100 per transceiver that I saved compared to a Pocket Wizard. Learn more about off-camera flash from these slides which I put together for a training session at our local photo club.
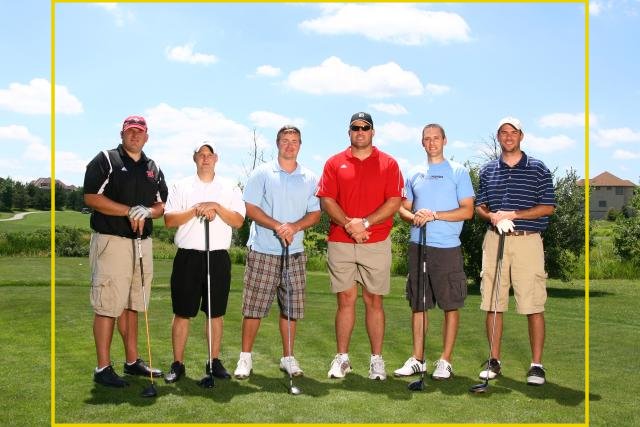
Another aspect of planning that you'll need to know is at what size (or rather, what shape) the photos will be printed. A standard SLR records images shaped with a 3:2 aspect ratio, meaning they're 50% wider than they are tall. Most point-and-shoot cameras record a 4:3 aspect ratio (33% wider than tall). If you're shooting an SLR for a 4x6" print, then you can rest assured that your entire frame (minus a tiny amount around the edge) will appear in the print. If you're shooting for an 8x10" print, then you're going to lose some of your frame off each end, because an 8x10" print is only 25% wider than it is tall. You therefore need to compose your shots so that 10% of the frame on each side is disposable. In the photo at right, the yellow box indicates the portion of the frame which would be visible in an 8x10 print.
I was told my shots would be printed at 8x10" (it turned out to be 8.5x11"), so I left a good sized buffer at each end. More than I needed, in fact, because I wanted to be safe rather than sorry. I ended up leaving a lot more space around all sides than I would have liked because I didn't take the time to do the math and determine exactly how much space I'd lose. The example photo you see has been cropped to the proper size.
End Results

So here's what we ended up with -- a shot that's properly exposed not only for the green grass and blue sky, but also for the faces of the people in the shot. See those shadows at their feet? The sun is at their backs, and their bodies are lit entirely by my flash. If you look closely, you can see the shadows from my flash extending behind their legs. By positioning my flash off to one side (I always put it on the side opposite the sun), I was still able to create a little 3D definition on their face and body contours that you wouldn't get from an on-camera flash. By having the flash a good ways away from the subjects and no more than 20 degrees off axis, I was able to maintain consistent lighting from one end of the lineup to the other.
I could have positioned my two flashes on separate stands and put one off to each side of my camera like I did for the first tournament. It probably would have given better light and ensured that every person had the right amount of light hitting them from one side or the other. However, we were moving fast that day, and having only a single stand to setup was much simpler. Besides, in the event that I had to move the flash backward a few feet to adjust the light intensity, moving one light stand was easier than moving two stands or moving the whole group of people.
What really matters is that the event organizers were quite happy with the photos, and I spent zero time in postprocessing them. Doing a little planning up front saved me a boatload of time on the back end.
This charity golf tournament was setup to raise money for Tiny Hands International, a Lincoln-based organization working primarily to help orphans, street children, and the victims of the sex-trafficking industry in eastern Asia.
Do you like this site?
Help me keep it going by throwing a few pennies my direction.
![]()
![]()
![]()
![]()
Back to Obi-Wan's photography page
or visit Prairie Rim Images
last updated 20 July 2010 Obi-Wan (obiwan@jedi.com)
Links on this page to Amazon are part of an affiliate program that helps keep Jedi.com operational. Thank you for your support!
