
 Nearly two years after removing the 401 V8 from my ’77 Wagoneer, I finally finished rebuilding it and was ready to drop it back in place. I was set to drive this vehicle 800 miles to Ouray, CO, for the FSJ Invasion just 11 days later. It just wouldn’t be a proper road trip if I wasn’t finishing up a major modification the night before, I guess.
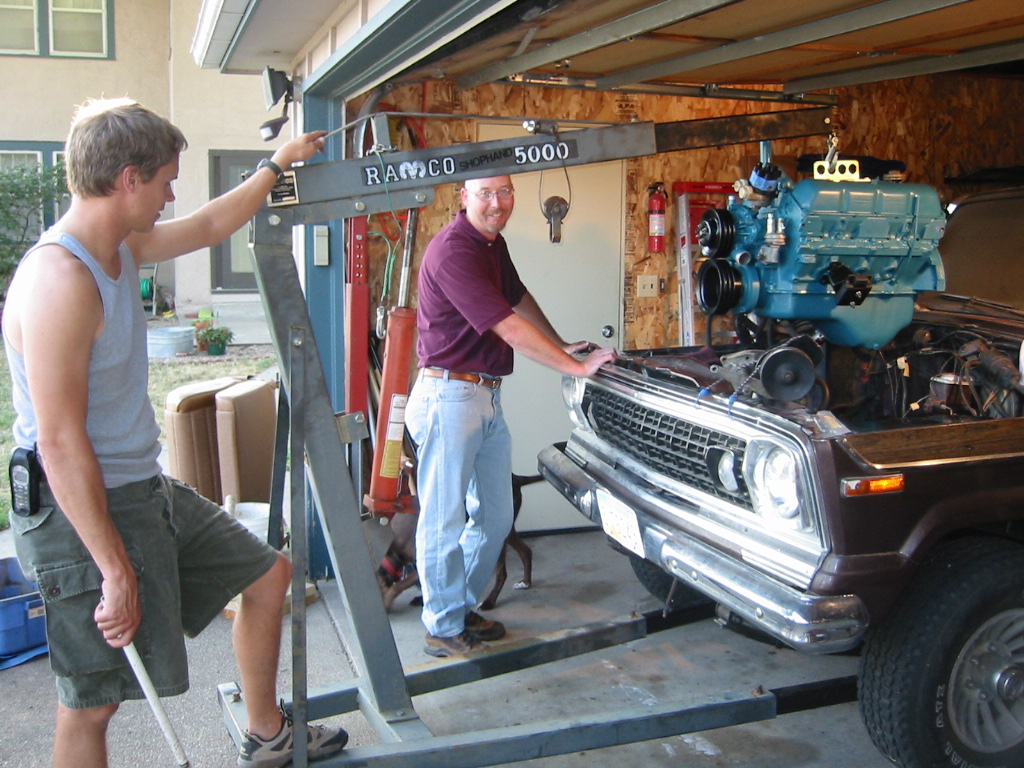
I’d borrowed my father-in-law’s engine hoist for the job. When I removed the engine, I’d bolted a chain to the air injection bolts at opposite corners of the exhaust manifolds and hooked the hoist onto that chain. I later found that those manifolds really aren’t meant to hold that kind of weight, and it doesn’t allow you to balance the engine very well anyway. For the install, I bought one of those lift plates that bolts in place of the carb and has several holes onto which you can hook the hoist for proper balance. It worked much slicker. Since the mounting bolts are only 5/16″, I used grade 8 bolts & washers to attach it.
Bolting the engine into the engine bay requires at least two people, and a third makes things go faster so you’re not constantly running back & forth to each side of the engine checking clearances. Before you hook the engine to the hoist, make sure that the legs on the hoist stick out farther than the arm holding the engine. That engine is heavy, and if it’s hanging out past the end of the legs, it doesn’t take much of a bump when moving it to send the whole thing toppling over forward. That happened to a friend of mine just a couple weeks ago. Not pretty. With that done, hook the engine to the hoist, remove the weight from the engine stand, and unbolt the stand from the bellhousing bolts. While the engine’s out in the open, you need to install the starter mounting plate first. We forgot this the first time until the engine was completely bolted in place. We had to remove it & reinstall it, which killed about two hours. The plate goes between the engine & flex plate, and is indexed by the two dowel pins on either side of the block. The starter hole is on the passenger side, of course. Next comes the flex plate. The flex plate is dished rearward, with the tooth ring sticking out toward the tranny. Next comes the funny looking spacer plate. There’s only one position in which all six bolt holes will line up for the flex plate and spacer, so there’s no way to accidentally put it on wrong. Tighten the bolts to 105 ft-lbs, or as tight as you can make them with the engine hanging from the hoist. It helps to have a strong friend get a good grip on the flex plate when you’re torquing them down.
I found that it’s easiest to maneuver the engine if the exhaust manifolds, accessories, etc, are not connected to the engine when you’re moving it into the engine bay. Attaching the passenger side exhaust manifold after the fact isn’t easy, but I think it’s easier than trying to bolt the engine up with it there. It is, however, easier to do if you have the engine half of the mounts and the rubber bushings loosely bolted to the block as you insert it into the engine. The frame side of the engine mounts have two sets of slots into which the bushing mounts can go. I found that I needed to use the front slots on my ’77 Wagoneer, but YMMV. Just lower the engine and push it rearward slowly, trying not to bank it into anything fragile, until it lines up with both the engine mounts & the transmission bellhousing bolts. The locating dowels that hold the starter plate in place will also locate the bellhousing to the block. Once it’s in place, there are six bolts inserted from the back of the bellhousing mounting flange. The lower one on each side is a 1/2″ allen head bolt that’s larger than the other bolts. Those two lower ones are easiest to insert from below, but require a U-joint socket adapter and 12″ of extensions to tighten. The four upper bolts are easiest to insert from above the engine.
[MORE COMING LATER.]
Hey guys! Looking for oil filler tube for amc 360 intake.What’s available?
.
BJ’s Off-Road (a great source for all full-size Jeep parts) sells a stainless steel oil filler tube for $30:
https://www.bjsoffroad.com/Oil-Fill-Tube-Stainless-Steel_p_638.html