
Trac-Lok LSD Install
in a ’95 YJ Dana 35
I always said I didn’t want to waste money by upgrading the Dana 35 rear axle in my YJ. I planned on upgrading to a Dana 44 some day [UPDATE: I eventually upgraded to a Ford 8.8″]. I’ve also seen lots of D35 axle shafts snap lately, so I didn’t want to help things along by installing a rear locker. However, after a few frustrating hill climbs at 2001 Timber Ridge Run and the 2002 Flatlanders 4×4 Fest, I decided that maybe a cheap, used limited slip differential (LSD) wouldn’t be such a bad idea. A friend (Matt Hickey) had offered me just such an item from his old D35 (he upgraded to a D44), so for $50, I decided to try it. Trac-Loks have a reputation for becoming “un-limited slips” after 70K miles or so, but Matt claimed that this 60K mile unit was still very tight. Time will tell, I guess.
Normally, setting up gears is a job best left to somebody that knows what they’re doing — but everybody’s got to start somewhere, right? I’m good at following directions, so I figured this would be as good a place as any for me to learn. Matt gave me the remainder of an install kit that he had in his garage — sans pinion shims, crush sleeve, or gear marking compound. You wouldn’t believe how hard it is to find gear marking compound for sale by itself without buying an entire install kit. I was a little nervous attempting this in my driveway in the middle of a work week without any of the tools or parts required to adjust the pinion depth. However, I figured that since I was keeping my original gears, I’d go ahead and try to do it by only adjusting the carrier location. I lucked out, and was able to get an acceptable (but not perfect) pattern on the gears without touching the pinion. I’d have been a little more concerned about an imperfect pattern were it not for the fact that when I removed my old open carrier, it literally fell out of the housing into my hand when I unbolted it. So much for bearing preload, I guess. That loose setup worked just fine, so pretty much anything I did myself would have to be an improvement.
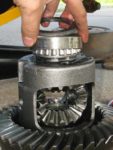
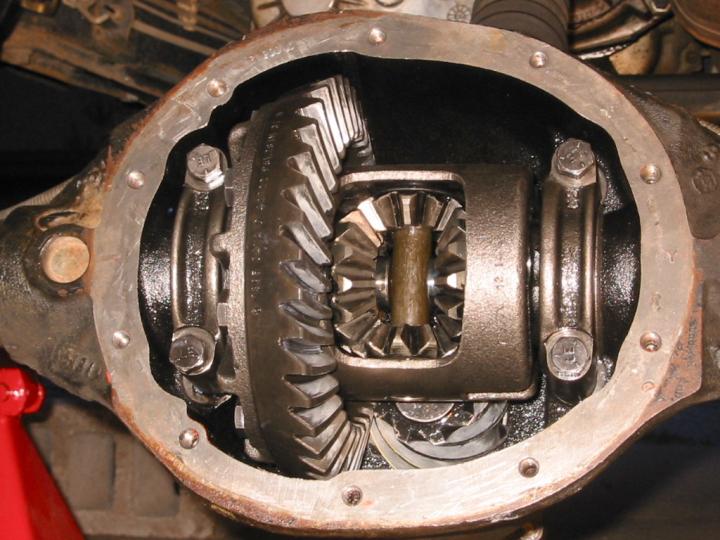
Below is a comparison of the open carrier (left) and the Trac-Lok (right). The guts of the Trac-Lok are the clutch packs that sit outboard of the spider gears (green arrow). When both tires are turning at the same speed, the spider gears will be stationary relative to the carrier. When the two tires spin at different speeds, the spider gears will spin relative to the carrier. The clutch packs in a Trac-Lok resist that spinning, attempting to tie the spider gears and the carrier together and thereby keep both tires turning at the same speed. When the clutch packs wear out, your Trac-Lok is reduced to being just an open carrier again.
 and Trac-Lok (right) carriers")
 and Trac-Lok (right) carriers")
I found some very helpful instructions on setting up gears published by Yukon Gears. It includes various gear mating patterns and how to correct them. You can download the PDF here.
Here’s a step-by-step guide to what I did (photos will follow soon):
- Clean up the old Trac-Lok as best I could using carb cleaner. The factory service manual references all sorts of special tools to compress the clutch plates so you can remove the spider gears. Randy Lymon of Randy’s Ring & Pinion provides instructions on how to disassemble the carrier using more low-tech tools, but I still didn’t have what was required, so I just wiped off the outer case, sprayed carb cleaner everywhere I could, and called it good.
-

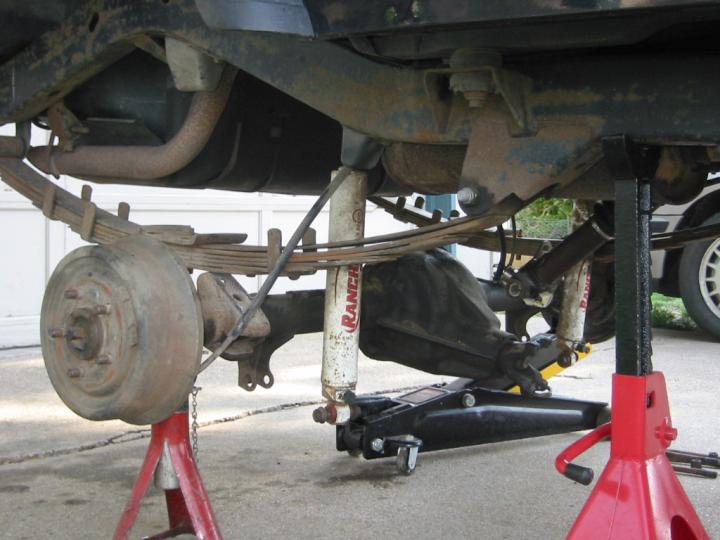
Loose axle
Raise the vehicle up onto jack stands and remove the wheels and brake drums. Since I’ve got a CV rear driveshaft, my rear pinion points upward about 20 degrees from horizontal. This made setting the new carrier in place a bit difficult, so I disconnected the axle from the springs and driveshaft (leaving the brake lines attached), set it on jack stands, and rotated the pinion down to a more convenient angle. I needed to install new leaf spring shims anyway, so I put them in while the U-bolts were off.
- Remove the diff cover and drain the old gear oil into a suitable container for recycling. Scrape the gasket surfaces clean, wipe the cover clean, and clean off the old carrier and housing with brake or carb cleaner.
-
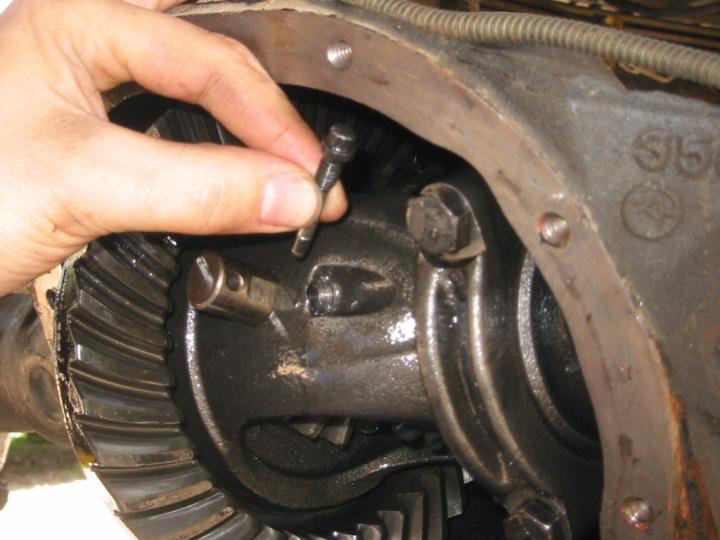
Lock pin
Using a 1/4″ 12-point wrench, unscrew the lock pin from one side of the carrier that holds the big center pin in place. Removed the center pin.
- Go over to the brake drum and push one of your axle shafts inward as far as it will go. Back at the diff housing, you should now be able to see and remove the C-clip from the end of the axle shaft. Go back to the brake drum and pull out the axle shaft, being careful to support its weight so that you don’t damage the seal at the outer end of the axle tube. The shaft tapers down in several locations, so you’ll gradually have more and more slop between the shaft and seal. Repeat for the other shaft. In case you get them mixed up, the left (driver) side shaft is 1.5″ longer than the right (passenger) side shaft.
 C-clipsLeft and right shafts (respectively)
 - Just out of curiosity, I used a dial indicator to measure the side-to-side play in the old carrier before I removed it. Not only is there supposed to be no side-to-side play, there’s supposed to be about .008″ of extra shims crammed in there to preload the bearings. Well, my 47K-mile factory setup had .010″ of side-to-side play. I didn’t even bother checking the ring gear backlash.
- Unbolt the carrier bearing caps, being careful to note which side goes where and which direction they go. There should be letters stamped into both caps and onto the housing gasket surface right next to them. On mine, the left side had a sideways “Y” and the right side had a right-side-up “Y”. Match the letters, and you won’t get the caps installed wrong.
-

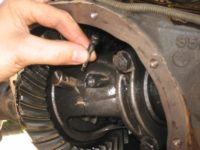
Open carrier removed
Needless to say, with .010″ of slop, my carrier fell out into my hand when I removed the bearing caps. If yours isn’t quite so loose, you may have to pry it out using a small crow bar inserted into the carrier (or under the ring gear) and braced on the edge of the housing. If you plan on re-using your ring gear, be careful not to let the carrier drop onto your concrete driveway! Be careful that each bearing race stays with the bearing it belongs to. The 1/8″ metal disks outboard of each bearing race are the carrier shims. Don’t mix those up, either, as they’ll provide a good starting point when you setup the new carrier.
- Remove the ring gear from the old carrier and install it on the new one. The manual calls for 70-90 ft-lbs of torque on the ring gear bolts. Most complete install kits come with new ring gear bolts, but my original bolts were in good shape, so I reused them. A decent amount of Locktite on those bolts sure doesn’t hurt.
-
Trac-Lok bearing cap shims
Using the bearing caps that were provided with my new-used Trac-Lok (with old bearings still attached) and using the shims that just now came out of my diff, I installed the new carrier assembly into the diff housing. Mine had some side-to-side slop, so (per the factory service manual), I measured it with the dial indicator (.010″) and attempted to add half that number to the thickness of each shim. This will get you a carrier that fits snugly, but can still be removed easily while adjusting the backlash. Once you’ve got the proper backlash, the FSM says to add another .004″ to each side to create some bearing preload.
- The best I could do with my available shims was to add .009″ to the left side, so I gave that a shot, installed the carrier and bearing caps, then used the dial indicator to measure the gear backlash (the distance that the ring gear can rotate while the pinion gear is held stationary). Factory spec is .005-.008″. This will vary from tooth to tooth, so measure it in several places along the ring gear. If there’s too much backlash, you need to adjust the shim packs to move the ring gear closer to the pinion (right). Too little backlash requires you to move it away from the pinion (left). A little trial and error, along with adding the necessary final bearing preload, allowed me to keep the original right shim (.182″) and add .016″ to my left shim (.138 to .154″).
- Now came the fun part. I was unable to located any real gear marking compound (a dry, yellow paste), so I had to improvise. Matt suggested using white lithium grease, but that was too sticky and didn’t leave a visible pattern. I tried adding corn starch (to dry it) and yellow die (to make it more visible), but that didn’t help much. Another friend at a nearby garage loaned me the pencil they use to mark on tires, which had a waxy, crayon-like consistency. I had to apply it to the gears with a screwdriver because the pencil was too big, but it worked great. The pattern I got indicated that the pinion and ring gears were a bit too close, so I backed the left shim down to .152″. That gave me an acceptable gear pattern and about .005-.009″ of backlash, while still having some amount of bearing preload (I had to pound the carrier back in with a dead blow hammer). That’s not perfect, but remember that the original setup was so loose that it fell out into my hand, and it seemed to operate flawlessly. Clean off the excess marking compound when you’re done.
Gear pattern 1Gear pattern 2Gear pattern 3
- Reinstall the bearing caps and torque them down to 57 ft-lbs.
- Reinstall your axle shafts and C-clips one at a time. Again, be careful not to goober up the seal on the outer end of your axle tube.
-

Trac-Lok carrier installed
Reinstall the center pin (the one that came with your Trac-Lok) and screw in the lock pin. You definitely want to use plenty of Locktite on that lock pin. I’ve seen them back out before. The FSM calls for torqing the lock pin down to 14 ft-lbs, but I have no clue how you’d get a torque wrench in there. Just make it as tight as you can, bearing in mind that your 1/4″ 12-point wrench is probably only 4″ long.
- Add a bead of RTV and reinstall the diff cover.
- Add 3.5 pints of 80W-90 GL-5 gear oil, plus 4 ounces of limited slip additive. If I have to add 4 ounces, how come the stuff comes in a 7 ounce tube? Why not a 4 or 8 ounce tube? I added 3.5 ounces and called it good, saving another “full” dose for next time.
- If you’ve got a CV driveshaft like me, rotate the pinion back up where it belongs and bolt the axle back to the springs. Reinstall the brake drums and tires.
- When breaking in your new setup, you need to turn 10-12 tight figure eights in order to work the LSD additive into the clutch packs on each side of the Trac-Lok. I did this on a weekday afternoon in the parking lot of a small office complex. The receptionist inside one of the buildings stared at me with a bewildered expression the entire time. I waved each time I drove by her door. 🙂

")


After the figure eights, I drove around my neighborhood for a few minutes to see if everything was working OK. The gears seemed to be working just fine. No whining on acceleration or coasting. Time will tell whether it’s all setup OK, I guess. Driving to work the next day, I noticed some definite oversteer (wanting to go straight instead of turn) when I powered through turns. In my parking garage, if I punched it while making tight turns up a steep, paved incline, I could bark the tires reliably. The Trac-Lok is definitely doing it’s job. I can’t wait to put the LSD through its paces off road in a couple weeks!
I finally got to use the Trac-Lok off road during our trip to the Badlands in Attica, IN, in June 2002. I must say that I’m very impressed. The difference between this and my old, open diff is incredible. At one point, I was sitting crossed up in a ravine with two opposite tires hanging in mid air. I simply let out the clutch and idled right out of it, which I never could have done when open. The only time the Trac-Lok failed me was when I was trying to climb a 2-foot rock ledge. Lifting almost the entire weight of my Jeep up that incline was more force than the clutch packs could overcome, and the bystanders said they could see my rear wheels spinning alternately while trying to find traction. I eventually made it up using a slightly different line.