Ford Explorer 8.8" Axle Install
in a '95 Jeep Wrangler
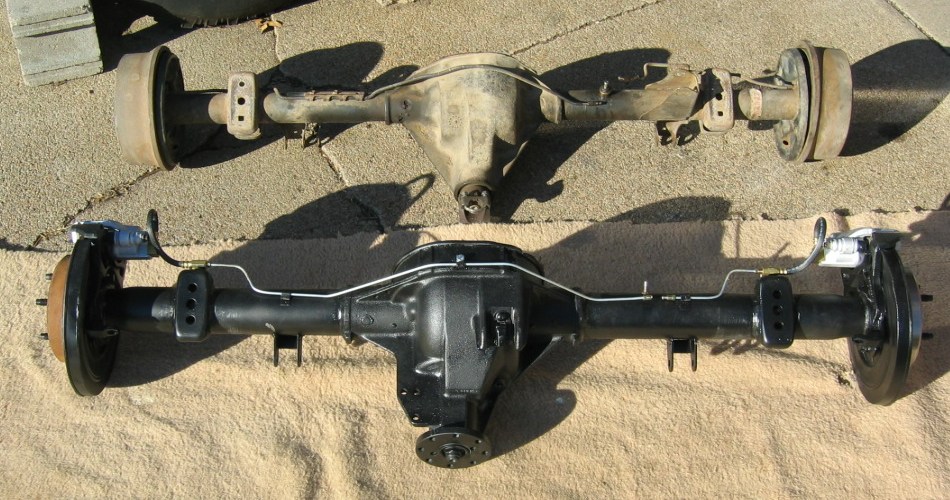
Table of Contents
Why I Did It
In June of 2002, I got tired of having no traction in my YJ's stock axles, so I installed a used (but quite good) Trac-Lok limited slip in my rear Dana 35. The added boost in traction was great. I quickly realized that if you apply light break pressure, the Trac-Lok became almost as good as a real locker. Of course, you need more throttle to compensate for the brake drag. This lead to a more aggressive driving style when climbing hills and ledges. Unfortunately, aggressive driving, 33" tires, and a D35 axle don't go well together.
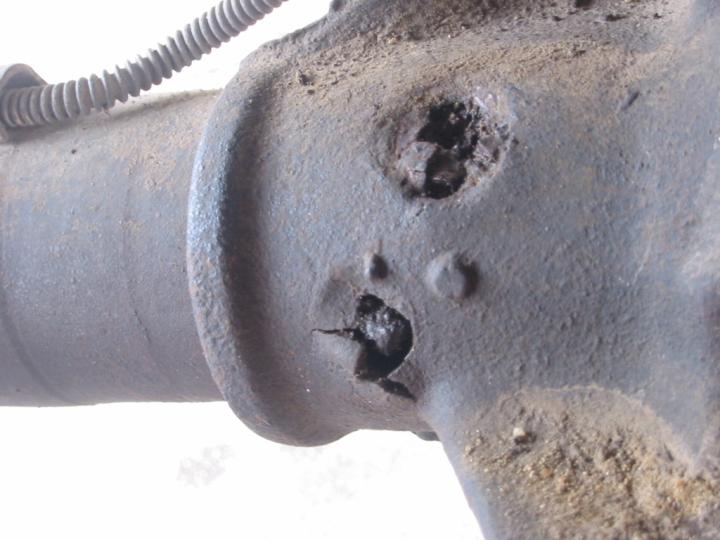
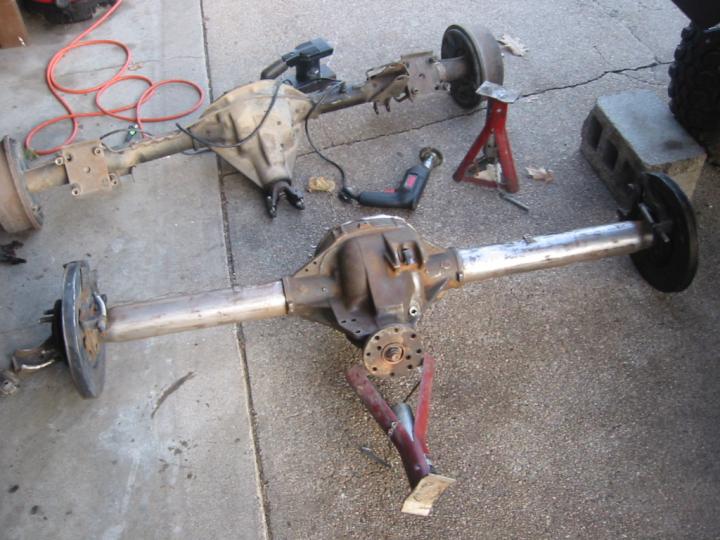
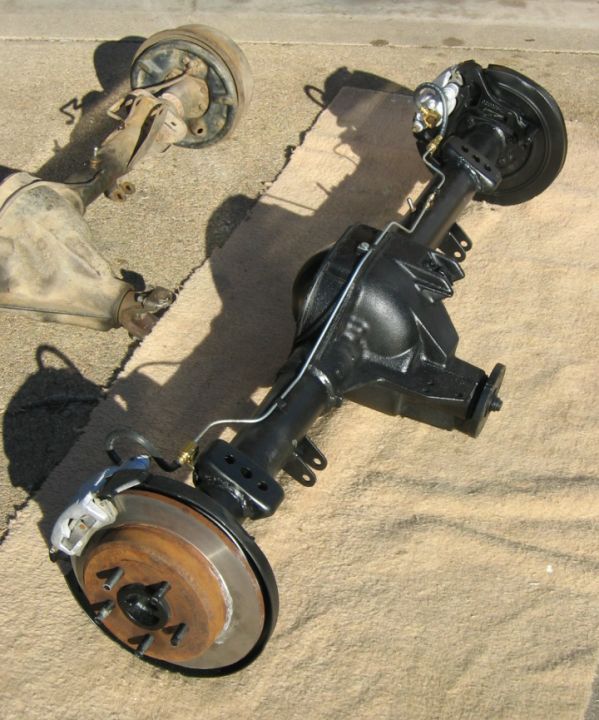
After this trip in September 2003, I noticed something was wrong with my rear axle. I first thought it was just another stretched pinion yoke, the product of too much axle wrap without a ladder bar. I'd already replaced one rear yoke in December 2002 (the '94-95, 1330-style yoke is Spicer P/N 2-4-7631-1, BTW), so I was familiar with the symptoms and procedure. When I went to replace the yoke, I heard some mild grinding noises from inside the axle when I'd rotate the pinion. Unfortunately, further diagnosis indicated that the rosette welds that hold my passenger side axle tube into the differential housing had all three broken loose. That's a Bad Thing(tm), and usually indicates that the axle tube has flexed pretty severely. This is a common problem with the D35 axle. When the tubes flex, the axle shafts are no longer parallel, which causes all sorts of problems inside the pumpkin.


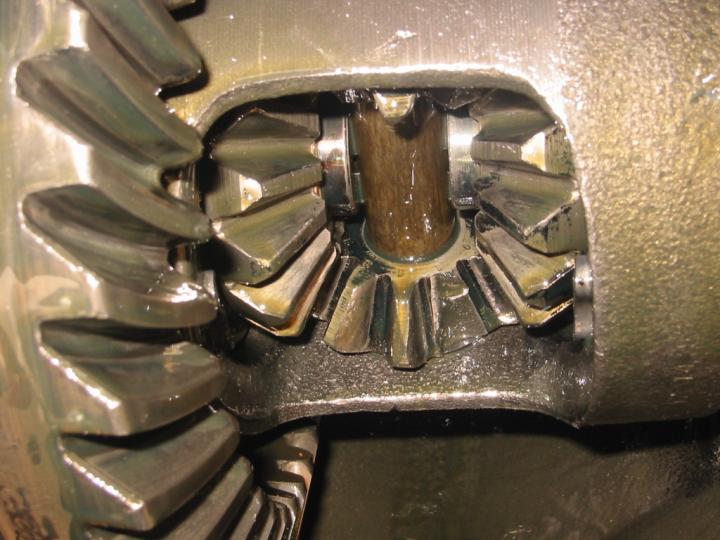
When I got around to opening up the diff, my fears were confirmed. First, the gear oil that ran out when I cracked the cover was silver, not brown. It appears that when the tubes flexed, it distorted the LSD carrier and snapped two teeth off the spider gears. I didn't notice the problem at slow trail speeds, and since I flat-towed the YJ back home behind my '77 Wagoneer, I couldn't hear any noises that may have been emanating from the YJ's rear axle. The teeth apparently got thrown around pretty violently inside the diff, because I was also missing the corner of one of the pinion gear teeth, the Trac-Lok carrier had some large (but cosmetic) divots taken out of it, and the inside of the diff cover was scraped and chunked up pretty badly. When I tried to remove the axle shafts to inspect them, I found that the threaded pin that holds the spider gear cross shaft had broken, no doubt due to the shock stress on the spider gears. That's a fair amount of damage even if the axle shafts are good, so I decided to write off the entire axle assembly and replace it with a new, stronger one.
Since I was short on time and didn't really feel like swapping gears in a pair of Dana 44's and upgrading both axles at the same time, I opted to take the quick and easy (as axle upgrades go) route and install a Ford 8.8" rear axle from a 1995-2001 Ford Explorer. This axle has many good points:
- It's at least as strong as a Dana 44, and is generally plenty strong for anything less than a built V8 engine. Ford has used this axle to replace the venerable 9" in Mustangs and F-150's.
- It's got 1.31", 31-spline axle shafts, compared to the D35's 1.16", 27-spline shafts. Like the D35, it does use C-clips to retain the shafts, but you'd have to break one of these beefy shafts before that becomes an issue.
- It has an 8.8" ring gear (go figure), compared to the D35's 7.5" gear.
- The tubes are 3.25" in diameter, compared with the 2.5" D35 tubes. The 8.8 tubes do neck down to 2.75" just before they enter the brake housings.
- It comes with 3.55, 3.73, or 4.10 gears from the factory -- all three of which are common ratios for stock, late-model Jeeps. If you're still running stock gears (like I was), it's quite likely that you can upgrade to this axle without having to do a gear swap.
- It was available from the factory with a Trac-Lok limited slip differential. Many junk yards call this a locker, so don't be confused.
- It's 59.5" wide (between wheel mounting surfaces), compared to 60.75" for a YJ D35 (the XJ/MJ/TJ are nearly identical). This will move your rear tires inward 5/8" per side, which isn't really an issue unless you're still running the stock wheels with their whopping 5.25" of backspacing.
- It has a 5x4.5" wheel bolt pattern, which is the same as the Jeep YJ/XJ/MJ/TJ.
- The gear oil fill plug is on the front of the housing instead of in the diff cover. If your pinion is pointed skyward for a CV driveshaft, you can now full fill your pumpkin without parking on a hill.
- The above all apply to all 1991-2001 Explorer axles, but beginning in 1995, they also had disc brakes. A rear disc brake swap on most drum-equipped axles costs at least $450-600 by itself.
The Ford 8.8" does have some drawbacks:
- The axle shafts are held in by C-clips, just like the Dana 35. This requires opening and partially dismantling the differential in order to remove the shafts, and if you brake a shaft (which is more unlikely given their beef), there's nothing to hold your wheel onto the axle housing.
- Rather than welding the tubes into the diff housing, the tubes are just held in with pressed-in plugs. These plugs tend to stop doing their job under severe stress, so you really should weld the tubes to the housing with low-hydrogen rod while you've got the welding gear out. Check out this article at JeepWire.Com for more details.
- The selection of gear ratios and lockers for the 8.8 isn't as large as for the Dana 44. In a perfect world, I'd install 5.13 gears someday, but 4.88 is as low as I can go with a D30/8.8 combo.
- The factory diff cover is made of tin foil. Aftermarket covers are available.
- The pinion is offset a whopping 2-3/16" to the right of center, compared with 3/4" for the Dana 35. This additional 1-7/16" of offset on a 17" driveshaft makes a horizontal angle of 4.8 degrees at the pinion U-joint. This isn't a big deal with a stock, single-cardan driveshaft, but with a CV driveshaft, that kind of angle can potentially eat U-joints and cause driveline vibrations. M.O.R.E. claims this hasn't been a problem in their experience. We'll see.
Another thing that makes this swap easy is the fact that M.O.R.E. offers several kits to install this axle in a Jeep YJ/XJ/TJ. The one includes all the mounting hardware and spring plates, and another includes new e-brake cables that will hook up properly at both ends. I emailed M.O.R.E. several times when planning this swap, and they were always quick to reply with detailed answers to my questions. Great folks.
One thing to note is that the 8.8 uses a pinion flange instead of a pinion yoke like most Dana axles. Spicer makes adapters (called "flange yokes") that connect this flange to larger 1330-style U-joints (1994-95 YJ's) or smaller 1310-style U-joints (most other XJ/YJ/TJ's). The 1310 yoke is Spicer part number 2-2-1379. The 1330 yoke is P/N 2-2-1369. I'm told that the stock Explorer driveshaft uses a 1330 joint, so you can grab the adapter from your axle donor if that's the size you need. These adapters bolt to the pinion flange with 12mm x 1.75 thread bolts. The 12-point factory bolts are Ford P/N N800594-S100. I picked up four 25mm-long, grade-5 bolts & lock washers from the corner hardware store.
Normally, disc brake calipers require more fluid to activate them than do drum brakes. That's why the two containers in a stock YJ master cylinder are different sizes. Although it would seem that you would want to change at least the proportioning valve and possibly the master cylinder when adding rear disc brakes, it is reported that the stock YJ setup works well with the Exploder disc brakes. I heard it suggested that perhaps the proportioning valve from a ZJ/WJ (which came from the factory with rear discs) might work even better, but I don't know anybody who has confirmed this.
Semi-interesting measurements of the stock D35 on my YJ and the Ford 8.8" are as follows:
| Measurement | Dana 35 | Ford 8.8" |
|---|---|---|
| Width between wheel mounting surfaces | 60.5" | 59.75" |
| Pinion offset to right of center | 3/4" | 2-3/16" |
| Pinion length, tube center to U-joint center | 11.5" | 11-5/8" |
| Pinion height, U-joint center below tube center | 1-7/8" | 1-7/8" |
| Diff cover distance behind tube center | 4-3/8" | 4-3/4" |
| Bottom of diff housing below tube center | 5" | 5-7/8" |
| Disc brake rotors | N/A | 11.25 x 7/16" |
| Drum brake shoes | 9 x 2.5" | 7.25 x 1.25" (e-brake) |
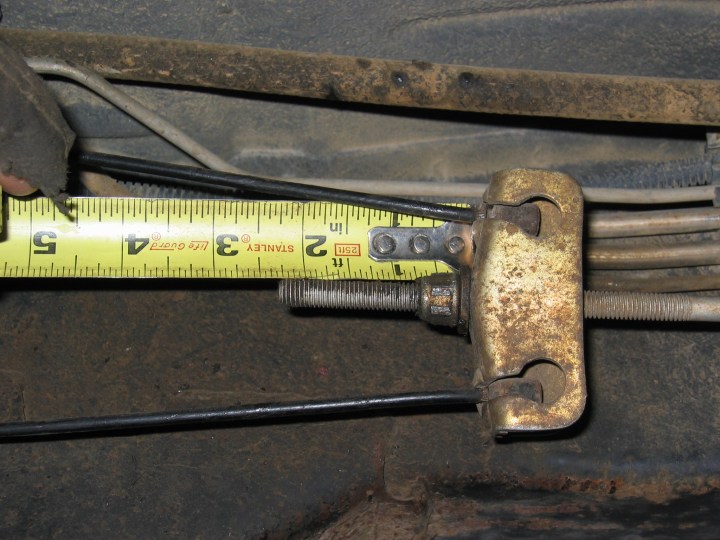
| Distance between spring perches (o/c) | 40.5" | 39-1/4" |
| Tube diameter | 2.5" | 3.25" (neck down to 2.75") |
| Axle shaft diameter | 1.16" 27-spline | 1.31" 31-spline |
| Clearance under diff w/33x9.50 BFG MT's | 10.25" | 9-3/8" |
| Shock eye below tube bottom | 2.5" (center), 3.25" (bottom) | flush |
| Shock length at rest | 20.75" | 20" |
| Remaining shock compression at rest | 4.75" | 4" |
Since the 8.8's tube diameter is 3/4" larger than the D35, your rear end will probably either gain (SOA) or lose (SUA) 3/8" of lift height after the axle swap. In my case, my old D35 spring perches sat about 3/8" taller than the stock Exploder spring perches that I used on the 8.8, so it all evened out. YMMV.
How I Did It
 I called around some nearby salvage yards, and the best price I could
find also came from the only place that had one with 4.10 gears and an
LSD. I paid $400+tax to Hansen's
Truck Salvage in Omaha, NE (about an hour's drive from my house)
for an 8.8 from a 1996 Explorer
(VIN
1FMDU34X9TZA31483 -- perhaps 1FMDU84X9TZA31483?). They claimed
it had a locker, but it's really just the factory limited slip.
A non-LSD axle would have cost just $300. Incidentally, you can search
the inventory of many salvage yards (including Hansen's) online at
www.Car-Part.com.
I called around some nearby salvage yards, and the best price I could
find also came from the only place that had one with 4.10 gears and an
LSD. I paid $400+tax to Hansen's
Truck Salvage in Omaha, NE (about an hour's drive from my house)
for an 8.8 from a 1996 Explorer
(VIN
1FMDU34X9TZA31483 -- perhaps 1FMDU84X9TZA31483?). They claimed
it had a locker, but it's really just the factory limited slip.
A non-LSD axle would have cost just $300. Incidentally, you can search
the inventory of many salvage yards (including Hansen's) online at
www.Car-Part.com.
They told me over the phone that the brakes were in fine shape. However, when I got there, I found that the rotors were quite rusty, both soft brake lines to the calipers had been cut, and the hard line that ran along the axle tube was missing. When I turned the axle shaft by hand via the wheel lugs, it made some scraping noises, but that went away after I removed the calipers and rotors.
The next day, I took a bunch of measurements (for comparison purposes), inspected the pumpkin innards, and removed the original spring and sway bar mounts from the axle.
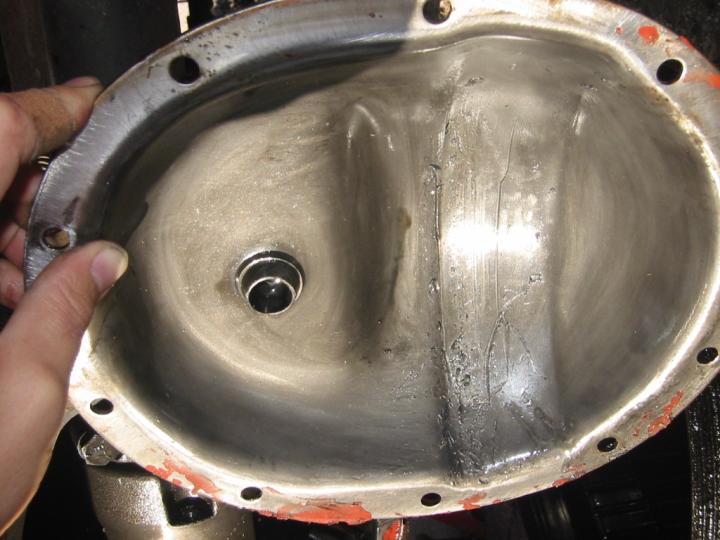
 The inside of the differential looked fine, aside from containing rather
dirty gear oil. It had already been mostly drained by the salvage yard.
It does have 4.10 gears. It does indeed have a clutch-type limited
slip differential, although I couldn't find any identifying marks on it.
The top of the housing has an electrical connector on it that's used by
the Exploder antilock brake system. This sits right above the back side
of the ring gear, where the ABS tone ring is mounted.
The inside of the differential looked fine, aside from containing rather
dirty gear oil. It had already been mostly drained by the salvage yard.
It does have 4.10 gears. It does indeed have a clutch-type limited
slip differential, although I couldn't find any identifying marks on it.
The top of the housing has an electrical connector on it that's used by
the Exploder antilock brake system. This sits right above the back side
of the ring gear, where the ABS tone ring is mounted.
Removing the original spring and sway bar mounts from the axle tubes was straightforward. I don't own a cutting torch, so I instead used a 4.5" angle grinder and two cutting disks, as well as the obligatory BFH. I used the grinder to cut through the weld beads and about half way through the thickness of the mount, then I beat on each end of the mounts with a BFH to finish breaking the weld beads and knock the mounts away from the axle tubes.
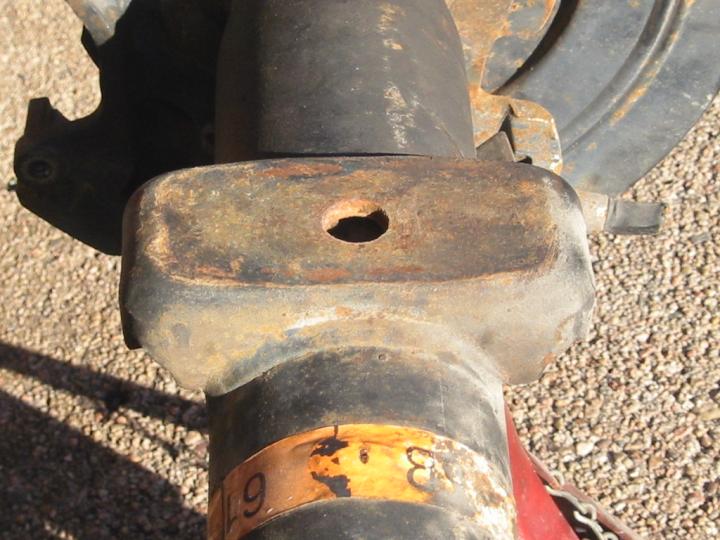
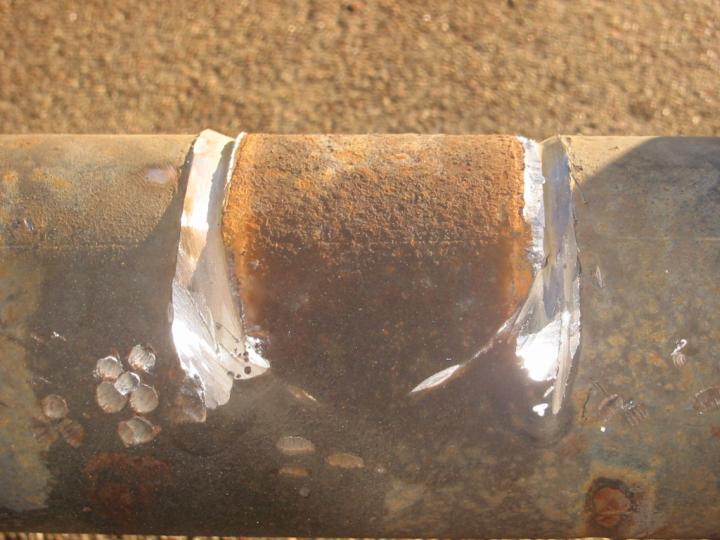
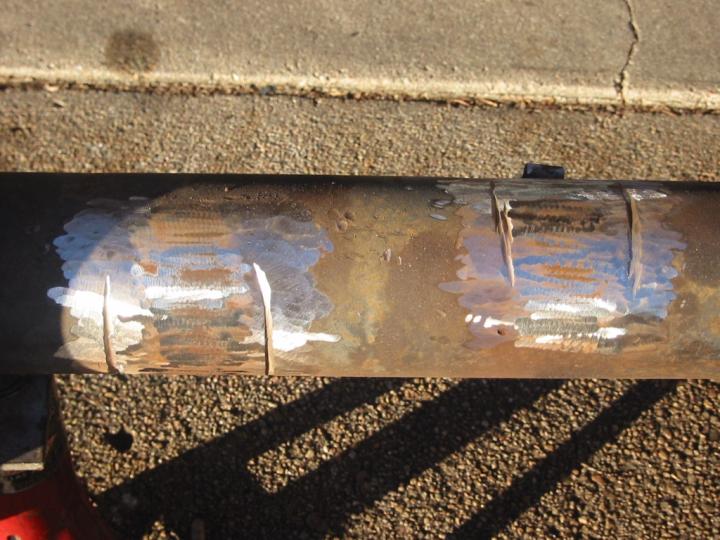
Although the mounts were removed in pretty good shape (I was able to reuse the spring mounts), the cutting wheel dug a little deeper into the axle housing than I would have liked (the worst was still less than 1/8" deep). Ideally, all the material removal would have been from the mounts themselves so as not to compromise the strength of the tubes. I filled in the cuts in the tubes with my welder just in case.
Once the mounts were removed, the remaining metal was smoothed out with a grinder. I used a wire wheel on a drill to remove rust, crud and loose paint from the rest of the axle, then an electric sander with 60-grit paper to clean the last of the old paint from the tubes. This made both welding and painting much easier.
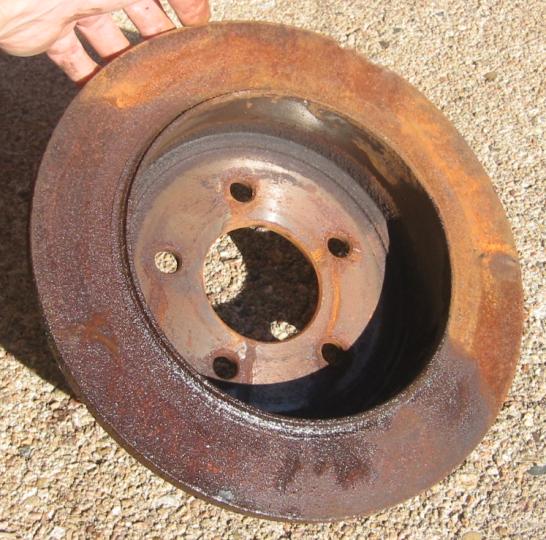 As mentioned earlier, the brake rotors were extremely rusty. Not just
any shop can turn rotors that have an integral drum-style e-brake, so
I had to take them to Lincoln Clutch & Brake. It turned that that there
was a 0.1" difference in the thickness of the two rotors. Minimum spec
on these rotors is .409". One of my rotors was .460", so they turned
the rotor part for $8 (they would have turned the drum for another $5,
but they said that's usually not necessary for just an e-brake). The
other rotor, however, was only .360" thick, so I had to replace it with
a new one.
As mentioned earlier, the brake rotors were extremely rusty. Not just
any shop can turn rotors that have an integral drum-style e-brake, so
I had to take them to Lincoln Clutch & Brake. It turned that that there
was a 0.1" difference in the thickness of the two rotors. Minimum spec
on these rotors is .409". One of my rotors was .460", so they turned
the rotor part for $8 (they would have turned the drum for another $5,
but they said that's usually not necessary for just an e-brake). The
other rotor, however, was only .360" thick, so I had to replace it with
a new one.
I ended up not buying M.O.R.E.'s kit with all the brackets & stuff. I found that it was cheaper and faster to just find the stuff locally. I reused the stock spring perches from the 8.8. I'll be installing a ladder bar, so their anti-wrap perches aren't a necesity for me now. I obtained a pair of stock Exploder spring plates from a junk yard for $20 and cut off the factory shock mounts. I got new U-bolts custom made for $27. I bought new lower shock mounting tabs from Speedway Motors (they're local for me) for $9. $56 vs $122+shipping isn't a bad tradeoff. I realized after the whole swap was done that I probably could have just reused the factory Exploder shock mounts that I cut off the spring plates. It would have been free, and would have saved me having to weld the center brace onto the Speedway mounting tabs. Live and learn.
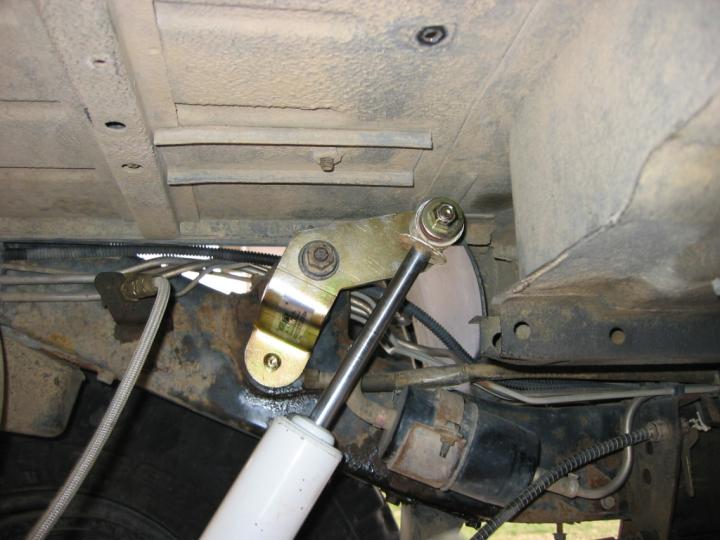
 I did order a new set of upper shock mount extensions from M.O.R.E.,
however. My old shocks were sized perfectly for the stock mounts, the
lower of which hang about 3" below the bottom of the axle. To improve
clearance, I
welded
the new mounts up so the bottom is flush with
the bottom of the axle tube. The M.O.R.E. upper mount extensions add
2.5" of length to the shock, which allowed me to keep my current
shocks while moving the mounts up out of harm's way. Installing these
shock mounts kind of took on a life of its own, so I've written up a
separate page detailing the ordeal.
The net result was that my shocks are now 3/4" shorter at rest, but
that should be OK, because they now sit at a lower angle and therefore
don't need to compress as far when the axle rises. The
additional clearance
under the axle should come in handy.
I did order a new set of upper shock mount extensions from M.O.R.E.,
however. My old shocks were sized perfectly for the stock mounts, the
lower of which hang about 3" below the bottom of the axle. To improve
clearance, I
welded
the new mounts up so the bottom is flush with
the bottom of the axle tube. The M.O.R.E. upper mount extensions add
2.5" of length to the shock, which allowed me to keep my current
shocks while moving the mounts up out of harm's way. Installing these
shock mounts kind of took on a life of its own, so I've written up a
separate page detailing the ordeal.
The net result was that my shocks are now 3/4" shorter at rest, but
that should be OK, because they now sit at a lower angle and therefore
don't need to compress as far when the axle rises. The
additional clearance
under the axle should come in handy.
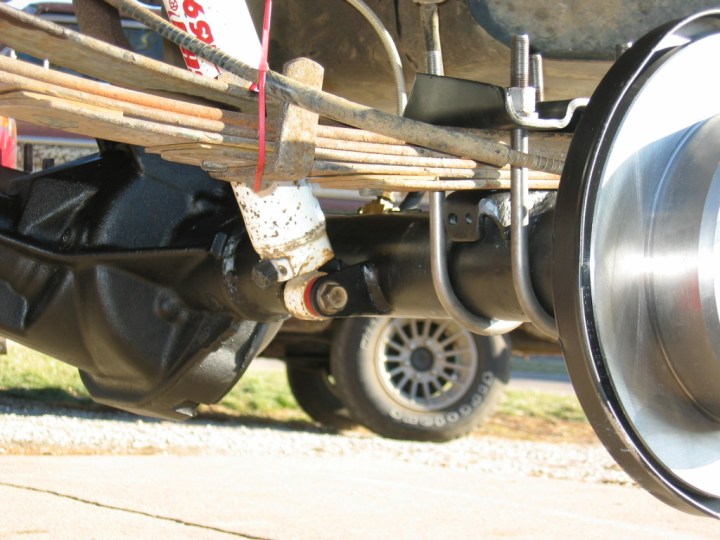
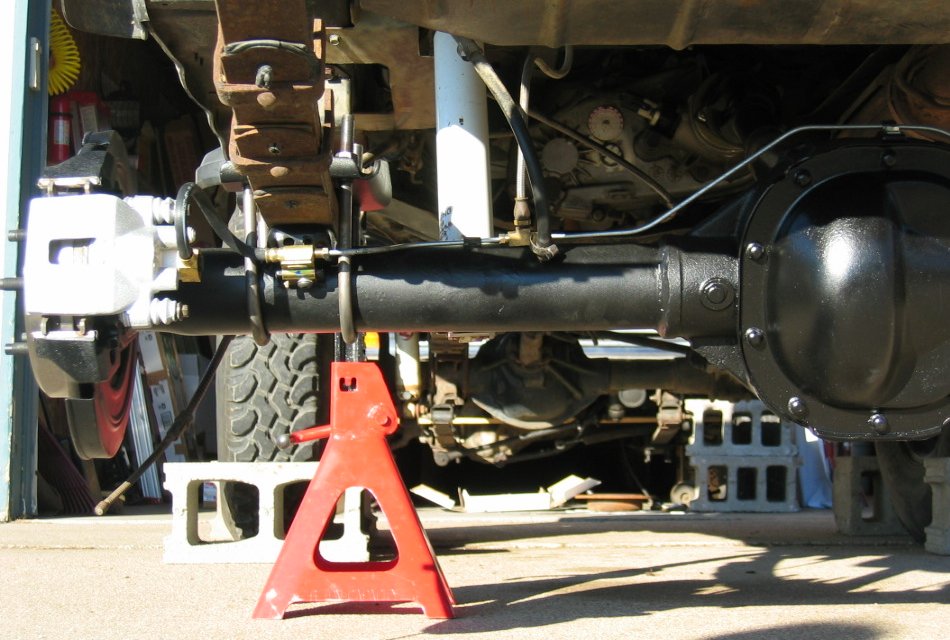
Removing the old Dana 35 from the Jeep was pretty straightforward once I figured out how to disconnect the e-brake lines from inside the drum brakes. You know the axle's wimpy when I can dead lift it across the driveway. I bolted the Ford 8.8" in place, then centered the axle, reinstalled the wheels, and lowered the Jeep's weight onto the rear wheels. I put a bit of weight in the rear end to simulate a normal load and then jumped up & down on my rear bumper to get the Jeep's suspension back down to its normal ride height. Then I set the pinion to the proper angle for my CV driveshaft (2 degrees shallower than the driveshaft) and positioned the lower shock mounts where I wanted them. I then tack welded all the mounts in place and finally removed the axle again so I could finish welding the mounts in the wide open. Tack welding the perches while lying on my back under the running Jeep was made much easier by my new auto-darkening welding helmet. Having to flip a standard helmet up & down while lying under there would be quite a pain.
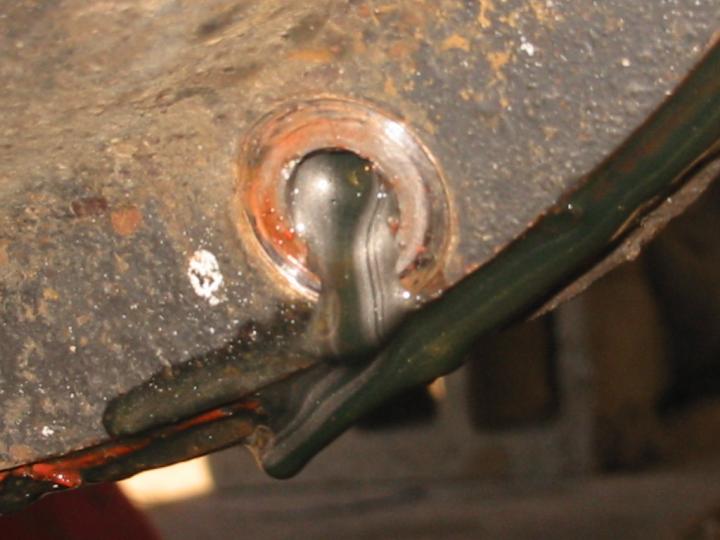
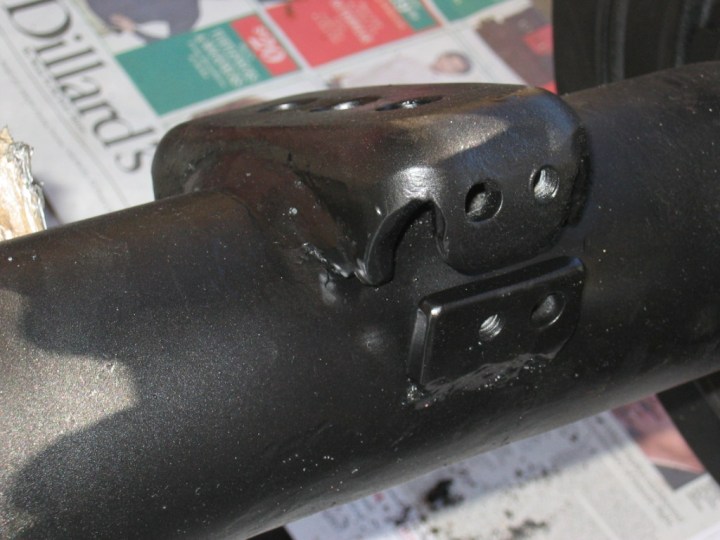
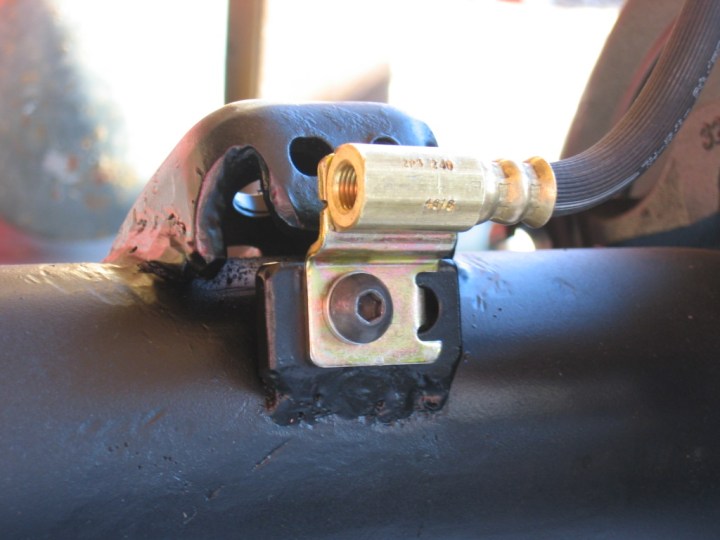
The brake line configuration had to be completely redone. The factory Exploder setup has the soft lines (to the calipers) bolted to threaded holes in the end of the spring perches. The Exploder frame-to-axle hose is an integral part of the left side soft line to the caliper. On an SUA Jeep, you could keep this same setup and use aftermarket extended brake lines for an Exploder. On an SOA Jeep like mine, this won't work. What I did was use two right-side soft brake lines. I secured these lines to the axle tube by welding a 1/4"-thick tab to the axle tube right behind each spring perch. These tabs have one 3/8" hole for the brake line's locating tab and a threaded hole for an 8mm-1.25 bolt that's used to attach the brake line fitting. After painting the axle, I routed the hard brake lines along the top of the axle tube & pumpkin and joined them with my older, braided SS AN4 soft line to the frame using a 3-way junction block near the vent tube's threaded hole.


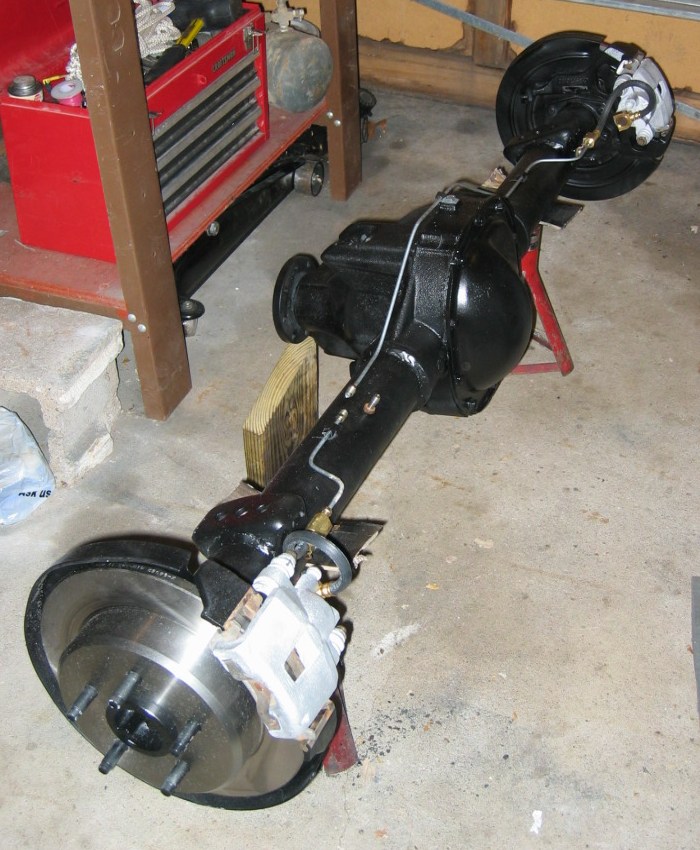
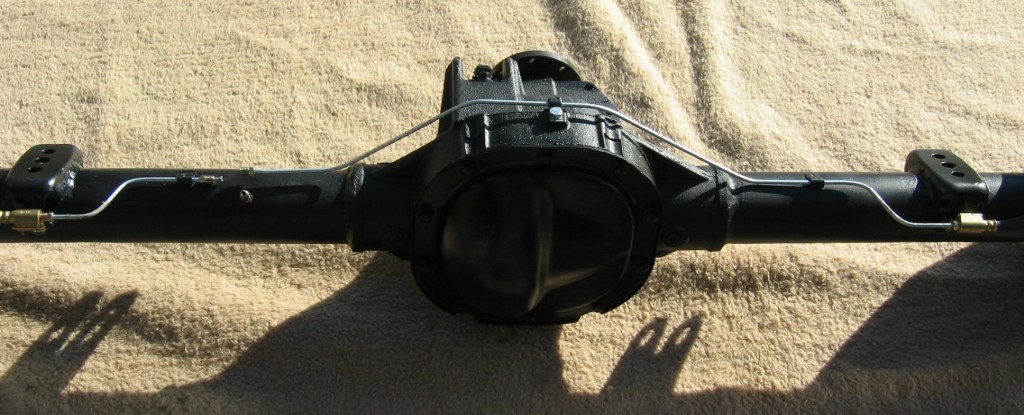

Because I didn't want to do all this work and then have a rusty old axle hanging under my Jeep, I wiped everything down with brake cleaner, coated everything with Krylon "Rust Tough" galvanizing primer (designed for marine and other corrosive environments), then painted it all with Rustoleum semi-gloss black enamel. The pinion flange and spring plates got the same treatment. Just to add a little accent, the calipers were painted with metalic silver instead of semi-gloss black. The whole assembly required two full 12oz cans each of primer and black enamel. Since I was doing this in an enclosed garage (too cold & windy outside), a gas mask was invaluable. BTW, even with no breeze, rattle-can enamel will coat everything in the room with a light film. It happened when I painted my engine, and it happend again with this axle.
POR-15 is reputed to provide a rock-hard surface that's impervious to future rust. I've used it before with good results, but I've also found that while it sticks like glue to rusty surfaces (and bare skin), it doesn't adhere very well to well-painted surfaces or to shiny, bare metal. Whenever I've tried to apply it to shiny metal, it's flaked off in large sheets. Since almost all of my new axle was either painted or shiny, I opted for conventional paint this time. Time will tell how well it holds up. I'm hoping the galvanizing primer does its job (at $6 per 12oz can, it had better).
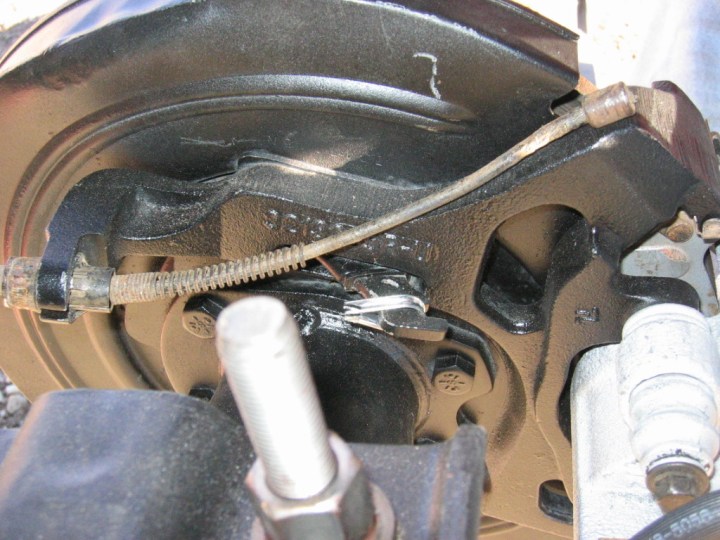
Once the paint was dry, it was time to assemble the brakes. The brake shoes on the e-brakes were shot, so I had to replace those. Man, what a pain. I hate working on drum brakes. At least the e-brake-only drums are considerably less complicated than the hydraulic drums on most rear axles. I had to bend a new hard line, since the original one was missing and probably wouldn't have been ideal anyway. A 48" length of 3/16" tube left about 6" to spare. I secured the hard line to the axle using the factory method -- one metal strap welded to each tube and then bent over the hard line, plus a third strap bolted to a threaded hole in the top of the pumpkin with a 5/16"-18, 1/2" long bolt. I cut and double flared the hard line near the vent hole, since that was a convenient location for the junction block on my existing braided SS line up to the frame. O'Reilly Auto (Midwest chain) loans out double flare tools for free with a $43 deposit.
With everything assembled, bolting the axle in place was straightforward. When bleeding the brakes, it was obvious that the rear brakes aren't getting nearly as much fluid pushed to them as the front brakes are. The 8.8's calipers are noticeably smaller than the D30 calipers up front, but I still wonder if maybe an adjustable proportioning valve would help out a bit. I'm told that the stock YJ valve generally does a sufficient job already. On the test drive, the brakes stopped noticeably faster than before, so I guess the current setup is good enough for now. My suspension is soft enough that the Jeep nosedives badly long before my tires lock up, so I can't easily empirically test stopping distance.

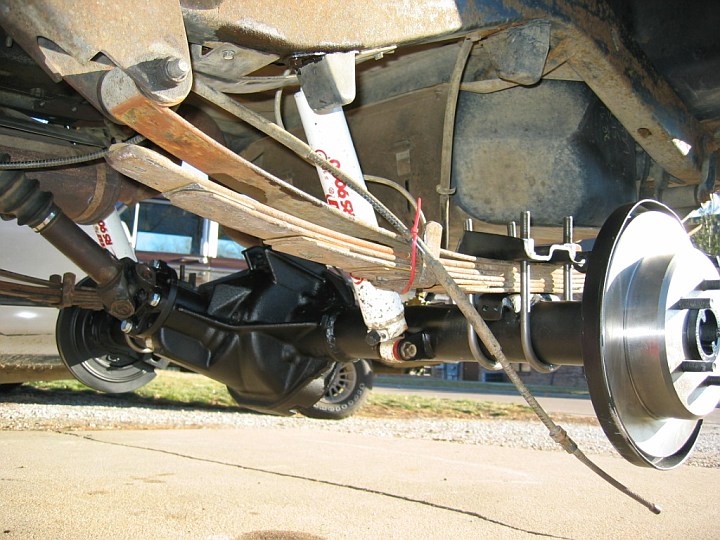
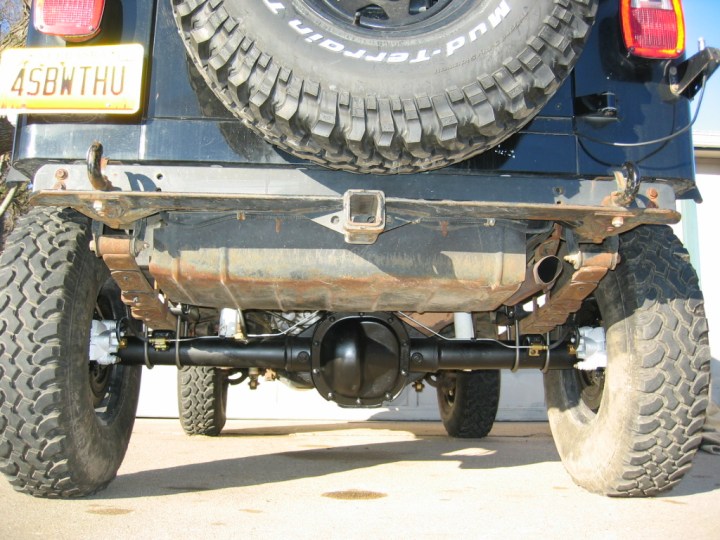
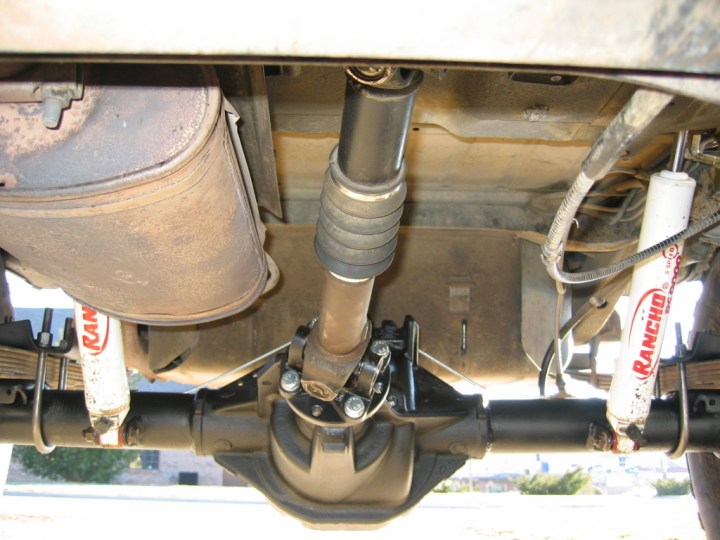
Merry Christmas to me! For the first time in over a month, I got to drive my YJ on Christmas Eve. Still didn't have e-brakes yet and the air tank for my compressor was still disconnected, but at least it moved under its own power. It's got some bad vibes when accelerating from a dead stop, which I imagine is due to the pinion being offset 1.5" farther to the right than the t-case output. That offset with a 17" driveshaft creates an angle of about 4 degrees, which is quite a bit higher than I would have wanted with a CV driveshaft. This wouldn't be an issue with a standard, single-cardan driveshaft. I don't get vibes when cruising, so the 4-degree angle isn't bad by itself, but when the pinion climbs under torque, the combined angle is too large. That's my theory, anyway. We'll see if it goes away when I install my ladder bar.
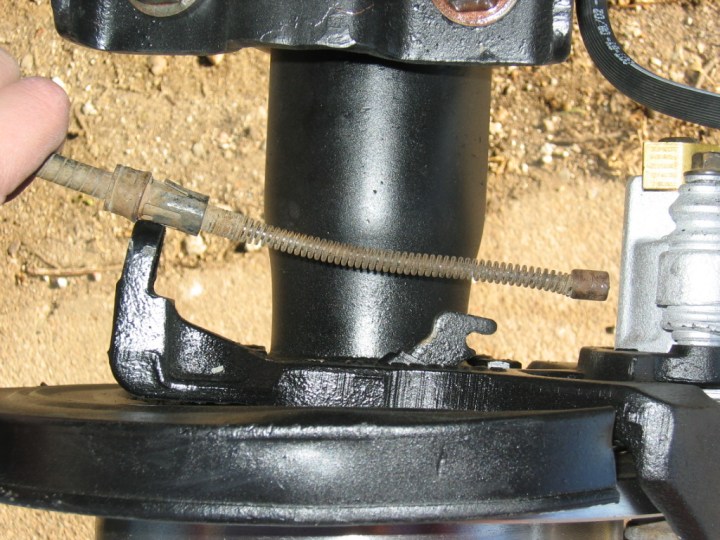
The last thing to hook up was the emergency brake cables. The rear ends of the stock YJ cables aren't designed to mate up to the e-brake levers on the 8.8". M.O.R.E. makes conversion cables that have the proper connections at each end, and are a few inches longer to help with lifted Jeeps. The D35 e-brake connection is at the bottom of the drum, while the 8.8" e-brake lever is at the top of the brake, so I don't think the extra length is really necessary.
I opted not to spend $120 on the M.O.R.E. cables. Instead, I modified the stock YJ cables to work. I basically put a 1/8" cable thimble around the 8.8" e-brake lever, cut about half the spring off the YJ cable, then looped the bare cable around the thimble and fastened it back to itself using a cable lock. The ball at the end of the YJ cable prevents it from pulling through the cable lock. I had to use 3/16" cable locks instead of 1/8" locks because the 1/8" U-bolts weren't long enough to get the nuts threaded on. The most time consuming part was removing 2/3 of the return spring from the cable. You want it to just touch the end of the cable lock when it's not compressed, so that it will help push the brake lever to the "free" position when you release the e-brake pedal. I unwound one of the springs with pliers, but I cut the other one off by running a dremmel tool the length of the spring on both sides. Cutting it off was faster, but not by much. I had to unscrew the e-brake adjusting nut where the cables meet at the frame rail about 1" farther than before in order to free up enough cable at each wheel to wrap it around the thimble. I also had to cut about 3/16" off each of the lock tabs where the cables attach to the axle end, since the bracket on the 8.8" is much thicker than the one on the D35. Viola! Stock YJ e-brake cables connected to a Ford 8.8" for less than $3 in hardware.


Now that it's all done, what would I have done differently? Most of this was learned the hard way during the swap.
- When drilling the holes for the new upper shock mount extensions, I should have skipped the cutting oil and enlarged the drill bit size in very small increments.
- I should have used the shock mounts that I cut off the spring plates rather than buying/making a new pair.
- When cutting the old perches off the axle tubes, I should have been more careful to not cut into the axle tubes with the grinding wheel.
- I should have used high-nickel welding rod from the get-go when welding the tubes to the pumpkin. Yeah, it's pricy ($2/rod). Live with it.
- When welding the tubes, I should have tack welded several spots around the tube circumference and then filled in the gaps evenly rather than working my way around the tube in a continuous line. The former method is less likely to warp the tube.
- I should have masked off the wheel studs prior to painting the axle. Installing the lug nuts to the proper torque was a pain.
Price List
Here's what everything cost me, including sales tax and/or shipping:
| Item | Cost |
|---|---|
| Ford 8.8 axle (Hansen's Truck Salvage) | $428.00 |
| Spicer 2-2-1369 flange yoke (Inland Truck Parts) | 28.30 |
| 12mm x 1.75 thread flange bolts & lock washers (Ace Hardware) | 5.56 |
| 8mm x 1.25 brake fitting bolts (Ace Hardware) | 1.31 |
| Bolt & loop to secure brake line (Ace Hardware) | |
| Nickel welding rod (Ace Hardware) | 9.62 |
| Paint & primer (Ace Hardware) | 21.36 |
| Cable locks & thimbles (Ace Hardware) | 2.87 |
| Hard brake line (O'Reilly) | 4.27 |
| Two brake line flare nuts (O'Reilly) | 1.48 |
| Brake tubing bender (O'Reilly) | 3.20 |
| 2 right soft brake lines (O'Reilly) | 26.51 |
| E-brake drum shoes (O'Reilly) | 27.81 |
| One new rotor (O'Reilly) | 34.23 |
| Turn one rotor (Lincoln Clutch & Brake) | 8.00 |
| Explorer spring plates (Jim Defreece Auto Sales) | 20.00 |
| 4 new U-bolts, washers & nuts (In-Line Suspension) | 27.26 |
| 5-pack of lower shock mount tabs (Speedway Motors) | 9.08 |
| Upper shock mount extensions (M.O.R.E.) | 102.11 |
| Total | $759.97 |
Useful Web Pages
Here's a list of other useful web pages I found regarding swapping a Ford 8.8" into a Jeep:
- Another 8.8"/YJ swap I did two years later
- JeepWire article on welding tubes
- M.O.R.E., maker of kits to install an 8.8 into various Jeeps
- Car-Part.com -- search junk yard inventories nationwide
- Tony's photos of the 8.8 pinion's offset location and how to make the stock Jeep e-brake cables work
- James Hasler's page about installing an 8.8 into an SUA YJ
- Brent Bogrees' page about installing an 8.8 into an SUA YJ
- J.E. Towle's page about installing an 8.8 into a TJ, including brake part numbers
- Stu's page about installing an 8.8 into a TJ. Lots of good measurements for a TJ install.
Do you like this site?
Help me keep it going by throwing a few pennies my direction.
![]()
![]()
![]()
![]()
created 1 Jan 2004
last updated 9 Nov 2011 Obi-Wan (obiwan@jedi.com)
Links on this page to Amazon are part of an affiliate program that helps keep Jedi.com operational. Thank you for your support!
