Ford Explorer 8.8" Axle Install
in another '95 Jeep Wrangler
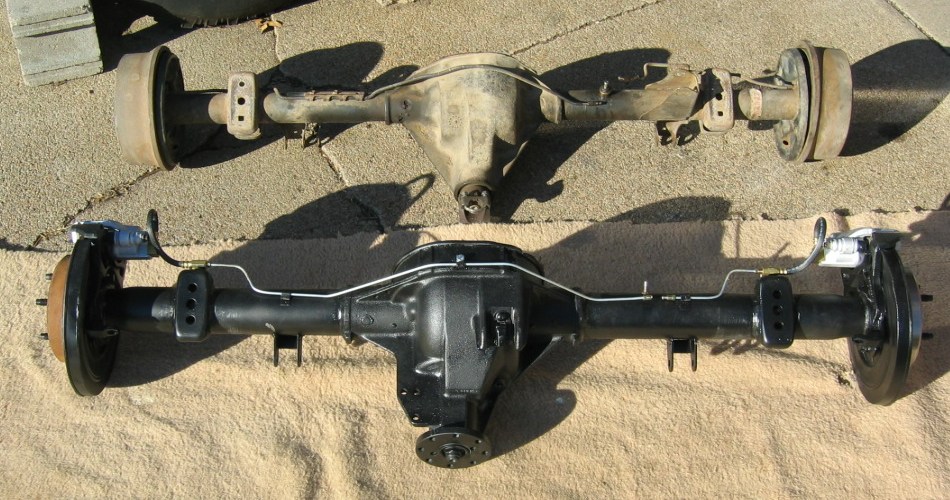
Table of Contents
Until I get them organized and uploaded, photos from this project can be found here, here, here and here.
Why We Did It
Two years after I grenaded the Dana 35 in my '95 YJ and replaced it with an Explorer Ford 8.8", my friends Brent and Justin Kalemkiarian joined the club of disgruntled Powertrax locker owners by destroying the one in the D35 of their '95 YJ. Justin is always anxious to upgrade parts on Ol' Red, so even though they could have simply replaced the locker to get back on the road again, they decided now was the time up upgrade Red's rear axle. Since I've got a well-equipped garage and I'd done a few axle swaps already, they called on "BenFab" for help.
Like my first 8.8" swap, this job was performed on my driveway in the dead of winter. Unlike last time, this year we had 50+ degree temps, no snow, and no sickness to slow us down. Much more fun.
The goal of this swap was not to make the finished product quite as custom or quite as pretty as some of my previous swaps (like my own 8.8" or Bryan Bennett's D44/9"), so things went a little faster this time. We did at least take the time to give it a quick paint job to protect against rust, though.
The reasons for choosing a Ford 8.8" axle out of a 1995-2001 Explorer instead of other options, like an XJ/MJ Dana 44 or a custom axle from Dynatrac, are outlined in the writeup of my first 8.8" swap. Since they had to pay for a gear change anyway to match the 4.56 cogs up front, Brent & Justin chose to install a venerable Detroit Locker instead of a lunchbox locker like the Powertrax that caused this whole mess.
Since we were going to be welding on new lower shock mounts anyway, Brent opted to install M.O.R.E's upper shock mount extensions so we could make the lower mounts flush with the axle. Even with their spring-under lift kit, the low-hanging factory shock mounts on the D35 were a constant source of aggravation, and they had plenty of bruises to prove it.
How We Did It
While Justin and some college classmates were on the Gulf Coast helping hurricane victims clean up their mess, Brent and I stayed behind to fix Red. Our original goal was to have it ready for Justin to drive 500 miles back to school in a few weeks, but proper break-in of the new gears caused Brent to keep Red in Lincoln and send Justin to school in his '98 ZJ.
Brent picked up a used 8.8" from a 1997 Explorer, with calipers and spring plates, but without rotors, at Jim Defreece Auto Sales (a local salvage yard) for $475.
The first order of business was to weld the tubes to the axle housing so that they don't rotate under high torque (as if Red's 4-cyl + auto tranny could generate anything remotely resembling "high torque"). One of the 8.8's weak points is that the tubes are merely pressed into the housing, not welded like most Dana axles are. It's always a good idea to stitch weld the tubes to the housing to help prevent them from spinning. We wanted to do this before the gears were installed just in case we screwed up and damaged the seals with the heat of the welder. They survived with flying colors, but better safe than sorry.
The housing is cast, so you'll have to use a high-nickel rod if you're using an SMAW stick welder. Cast housings are also prone to cracking from the intense localized heat that welding produces. In a perfect world, you would heat the entire housing to 400F before welding in order to relieve the stress. Since I don't own an oven big enough to house an entire axle, I had to slowly work my way around the joint, welding only 1/2" at a time before moving to a different spot on the opposite tube while my last weld cooled off. This made for slow progress, and Brent decided to call it good when we'd welded about 50% of the seam (a full circle of 1/2" stitches). It wasn't my prettiest welding job, but I blame that on the facts that (A) cast is hard to weld, and (B) I hadn't touched my Premier Power Welder in 8 months. That's my story and I'm sticking to it.
Next, we stripped the axle of all the useless stuff that we weren't going to need under the YJ. While unbolting the brake lines, we snapped off both bolts that attach them to the spring perches. We tried to drill out the old bolts, but eventually gave up and decided to drill and tap the holes on the other end of the perches. Soaking the bolts in PB Blaster and heating the perch with a torch before removing the bolts would have been a good idea.
Then we cut off the spring perches, sway bar mounts, and traction bar mounts, resulting in a clean tube. I don't have an oxy-acetylene torch >sigh>, so I had to cut everything off with a 4.5" angle grinder and a BFH. Since we were planning to reuse the stock Explorer spring perches, we had to cut carefully to avoid cutting into the axle tube while still leaving plenty of meat on the perches. We didn't care about the other items we were cutting off, so I didn't need to be as careful about destroying them to avoid cutting into the tube.
With the axle stripped, Brent wire brushed everything and gave it a quick wipe down with brake cleaner. He then gave it a preliminary paint job with galvanizing primer and black Rustoleum paint. We'll have to sand off some areas later to weld on the spring perches and shock mounts, but this will give us a good start and protect the bare metal while the axle is away getting fitted with new gears.
Rather than buying new factory-style lower shock mounts from M.O.R.E or making custom ones the way I did on my own 8.8" swap, we did what I should have done the first time. We cut the shock mounts off the Explorer spring plates and used a grinder to radius them to fit the 3.25" axle tube. Conveniently, I had an old grinder wheel that had been worn down to exactly that diameter, which made a nice template for the axle tube. Grinding the mounts to fit snugly against the tube still took some time, but it was much faster than making my own mounts from separate tabs like I'd done the first time.
Next on the agenda was installing the M.O.R.E. upper shock mount extensions while we waited for the new gears to get installed. The basic procedure is identical to what was outlined in my first writeup. However, since that time, I've acquired a Drill Doctor DD750X, which is the most useful tool known to man (possibly second behind the BFH). The ability to sharpen dull bits in just 60 seconds rather than plodding along with dull bits or constantly running to the hardware store for new ones made a world of difference. We also had Brent's 1/2" drill at our disposal. That combination shortened the drilling time down to about 4 hours. Total time to install the upper mounts was about 5 hours, after you figure in all the messing around with the exhaust, cutting plates, etc.
Useful Web Pages
Here's a list of other useful web pages I found regarding swapping a Ford 8.8" into a Jeep:
- Obi-Wan's first 8.8" YJ axle swap
- JeepWire article on welding tubes
- M.O.R.E., maker of kits to install an 8.8 into various Jeeps
- Car-Part.com -- search junk yard inventories nationwide
- Tony's photos of the 8.8 pinion's offset location and how to make the stock Jeep e-brake cables work
- James Hasler's page about installing an 8.8 into an SUA YJ
- Brent Bogrees' page about installing an 8.8 into an SUA YJ
- J.E. Towle's page about installing an 8.8 into a TJ, including brake part numbers
- Stu's page about installing an 8.8 into a TJ. Lots of good measurements for a TJ install.
Do you like this site?
Help me keep it going by throwing a few pennies my direction.
![]()
![]()
![]()
![]()
Created 15 Jan 2006
Last updated 7 Feb 2006 Obi-Wan (obiwan@jedi.com)
Links on this page to Amazon are part of an affiliate program that helps keep Jedi.com operational. Thank you for your support!
