Warn 8274 Install
on a Jeep Wrangler
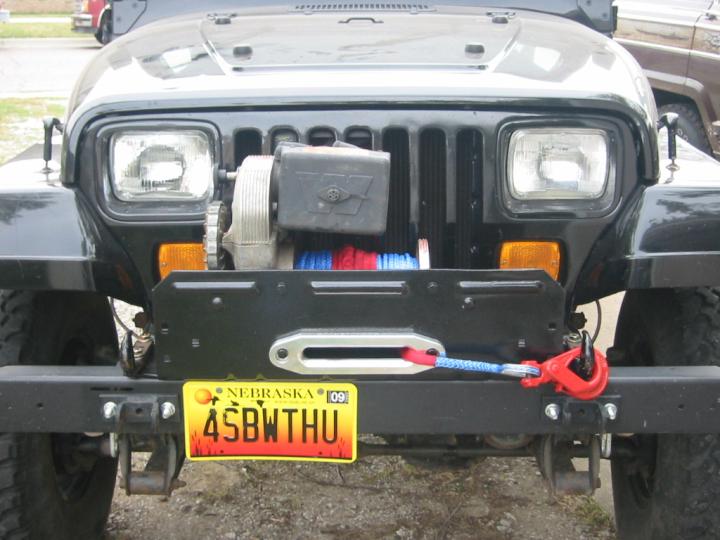
Table of Contents
Nearly everybody who 4-wheels likes the idea of having a winch on their vehicle. On mild trails, it's usually not necessary, so most people can't justify the expense. Besides, in most groups, there will be at least one person who has splurged to get one, and they can always do the honors if somebody really needs winching. However, as the trails get harder, the usefulness of having your own winch increases.
I'd been wanting to get a winch on my '95 YJ for a while, but I didn't want to buy a low-end model, and I couldn't justify the cost of a high-end model for most of the wheeling I do. I checked the classified ads and eBay periodically, and eventually ran across an older, used Warn 8274 at a decent (but not killer) price. Warn has been making the 8274 since the late 1940's, so parts for these things are readily available. The 8274 is only rated for 8000 lbs, but it's the fastest winch on the market and it holds 150' of 5/16" cable. For years, the 8274 has been the winch against which all other winches are judged. I brought home my 8274 with an old CJ mounting plate, but without a cable, for US$570 ($75 of which was shipping).
UPS damaged the package en route, which broke the clutch knob and allowed the hook to escape through the open package. Getting reimbursed was a pain, but for some reason I got triple what I asked for. The loss was just as well, though, because the reimbursement subsidized the new hook I got with my new synthetic winch rope (and then some). The clutch knob took over a month to receive due to screw-ups by Warn, so the parts store I ordered it through waived the $8 cost for me when it finally arrived.
It might have been nice to go through the winch and rebuild it before I started using it, but it seems to work fine, and I've got better things to do with my time. I'd normally document such a job on my web site, but I couldn't top the BillaVista writeup on pirate4x4.com. It has lots of photos, wiring diagrams, etc.
Mounting
|
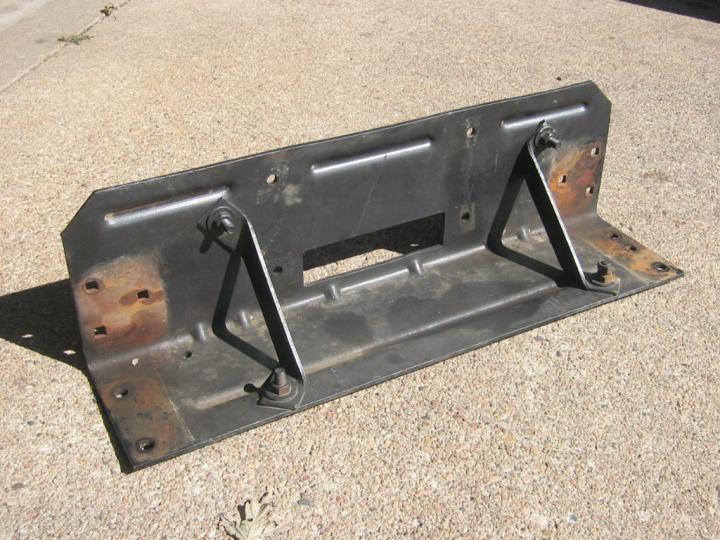
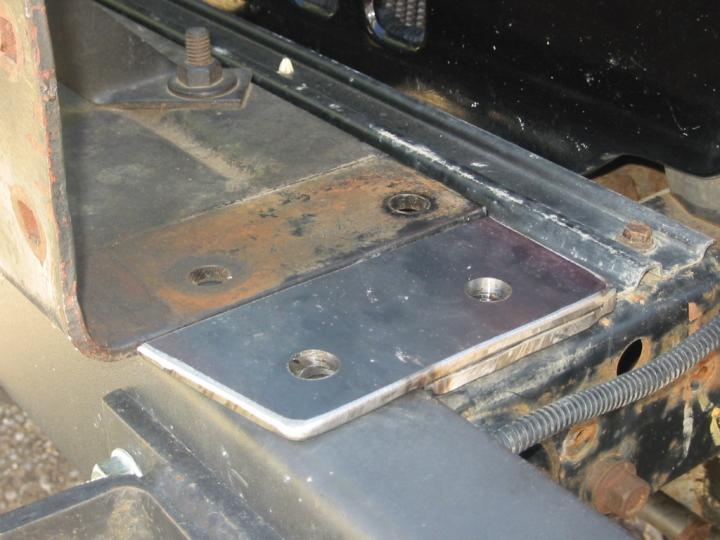
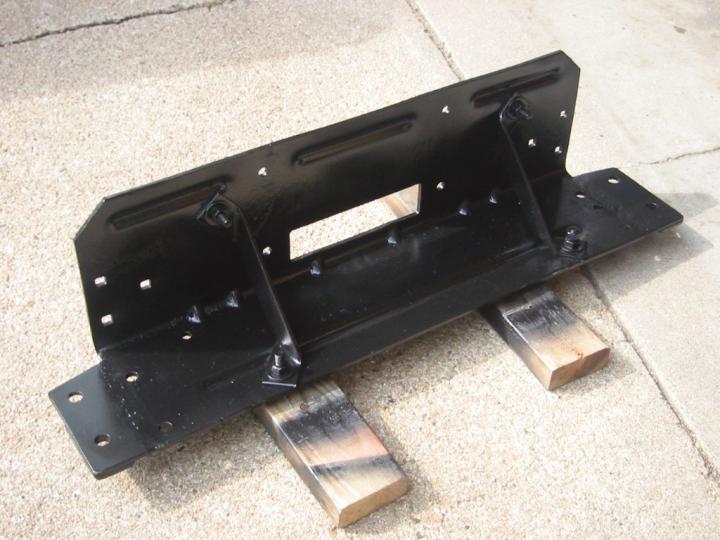
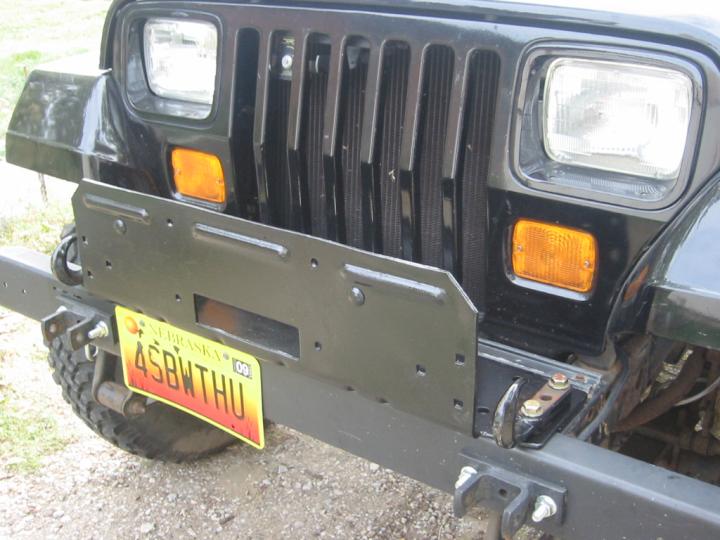
The down side of an 8274 is that they sit up really high (16"), so they severely limit the air flow through a Wrangler's radiator. This is the one reason that I considered buying a low-profile winch instead of an 8274. I've seen some people with older CJ's sink their 8274's down between the frame rails to improve clearance. However, the YJ has a sturdy frame crossmember up there, and I'm not sure it's worth the effort to remove that & rig up a special mount & bumper just to gain 3-4" of height. It would look cool, though. Update: The first time time I drove the Jeep on the highway on a reasonably hot day (90F), the engine ran hot whenever it had to work hard climbing long hills at 3000 rpm. It only got up to 210F, and it dropped back down to 200F when the road leveled out, so I don't think this will be a problem. Besides, I've decided to use that frame crossmember as an air tank, so it needs to stay put. In exchange for the cable + $30, the guy I bought the winch from threw in a Warn factory 8274 mounting plate. This plate was 27" wide, which was perfect for his Scout II and for Jeep CJ's, but it was about 6" too narrow to mount across the frame rails of a YJ. It was quite sturdy, though -- made of 1/4" steel with indents here and there for strength. Since a new 8274-to-YJ mounting plate costs about $170, I decided it was time my welder started paying its rent by modifying this old mounting plate to fit my YJ. I got some scrap 1/4" steel plate from Rivers Metal Products here in Lincoln for $6 and used my circular saw's abrasive blade to cut it up. For each side of the plate, I cut one 2.75" wide by 6" long wings that, when welded to the side of the mounting plate, would allow it to span the frame rails. Since the plate sat on top of my stock bumper, I welded another, smaller 1/4" plate underneath the main wing that would shim the rear half up level with the top of the bumper. The smaller plates were tack welded to the bottom of the larger plates, and holes were drilled in them to match the tow hook mounting holes already in the frame. The bolts are 1/2" (coarse thread), but since I didn't trust my measuring abilities quite that much, I drilled 5/8" holes in the plates so I'd have some wiggle room. That turned out to be a good move. My drill press proved invaluable for drilling through 1.5" (total) of steel plate. The trick is to use lots of cutting oil to keep the drill bit cool. I found that two drops of oil for every 3-4 seconds of drilling (slowest possible speed and moderate downward pressure) worked quite well. When assembled, these new plates will be sandwiched between the frame and the tow hooks. I had to increase the length of the tow hook mounting bolts from 2" to 2.5" in order to thread the bolts completely through the nuts in the frame. Only use grade 8 bolts -- not only are they stronger, but they're more resistant to rusting to the nuts. I snapped a 6-year-old, non-graded, 1/2" bolt in half when trying to remove it from my bumper the year before. That hassle is definitely NOT worth the additional $3 you'll spend now by buying grade 8 hardware! When welding the new plates to the existing plate, I chamfered both sides of both plates along the joint, rather than just butting them together. This allowed for much better weld penetration, resulting in a stronger weld and less material that I had to grind off to make it flush with the surface of the plate. I used 3/32" 7018 welding rod, which is harder to work with, but significantly stronger than 6013. I may have had the voltage turned up a bit high, but it still didn't turn out too bad. This was the thickest material I'd ever welded, so I wanted to make sure I got plenty of penetration. In keeping with the fashion police regulations, after the fabrication was finished, I wiped the mounting plate down with acetone, then shot it with a light coat of Rustoleum primer and several coats of Rustoleum high-gloss black paint. |
|
|
The winch itself is probably 30 years old, and it looks like it. The aluminum housing is quite dull and has plenty of crud in hard-to-reach places. I have plans to clean and polish the housing to a finish that will blind oncoming traffic, but that will have to wait. Hopefully, the fashion police will consider my pretty mounting plate and synthetic rope and be lenient with me. |

|
|
The holes I drilled in the new wings on the mounting plate push the front of the plate out just over 1" beyond the front of my stock bumper. This location leaves just over 1/4" of clearance between the winch body and my grille. Yes, the 8274 is a monster. You can see from the photo at the top of this page that the front marker lights and radiator are now just barely visible behind the winch. |

|

Synthetic Rope & Safety Hook
I was told that the cable on the winch I bought wasn't in the best shape, so the seller kept it to save on shipping costs (it weighed about 35 lbs) and I bought a new synthetic winch rope to replace it. Synthetic winch rope, made of UHMWPE (Ultra High Molecular Weight Polyethylene Fiber), has several advantages over wire rope:
- Most importantly, it's safer. Although it stretches more than wire does at its breaking point, it takes a while to return to its original length. This means that if it snaps, it just drops to the ground rather than recoiling like a deadly bull whip.
- It's about 50% stronger (14,500 lbs vs. 9800 lbs for 5/16" cable).
- It weighs less than 20% of what wire weighs (4 lbs vs. 23 lbs for 100' of 5/16" cable).
- It won't permanently kink, and can be bent in half with no ill effects.
- It floats.
 The safety factor alone was enough to make me buy it. The other benefits
were just gravy. Of course, synthetic is more expensive. I paid $305
(shipped) for 150' of 5/16" rope, a heavy duty hook, two rock guards to
prevent abrasions, a 3/4" D-shackle, and an aluminum Hawse fairlead.
I got all this from RockStomper.Com,
which seemed to have the best prices. The safety hook, rope, and rock
guards weighed in at just 8 lbs -- a savings of over 30 lbs.
The safety factor alone was enough to make me buy it. The other benefits
were just gravy. Of course, synthetic is more expensive. I paid $305
(shipped) for 150' of 5/16" rope, a heavy duty hook, two rock guards to
prevent abrasions, a 3/4" D-shackle, and an aluminum Hawse fairlead.
I got all this from RockStomper.Com,
which seemed to have the best prices. The safety hook, rope, and rock
guards weighed in at just 8 lbs -- a savings of over 30 lbs.
There are two major manufacturers of synthetic winch rope: Master Pull and Amsteel Blue. I originally wanted to buy Master Pull because they offered a relatively inexpensive line colored bright yellow with a matching yellow safety hook. I wanted something highly visible, and yellow seemed to match my black and tan Jeep well. After weeks of waiting and trying to find somebody that had this stuff in stock, I found that Master Pull is discontinuing both the safety hook and the yellow line (grey is still available). I also found that many retailers are fed up with dealing with Master Pull, and some suspect the company has massive internal problems.
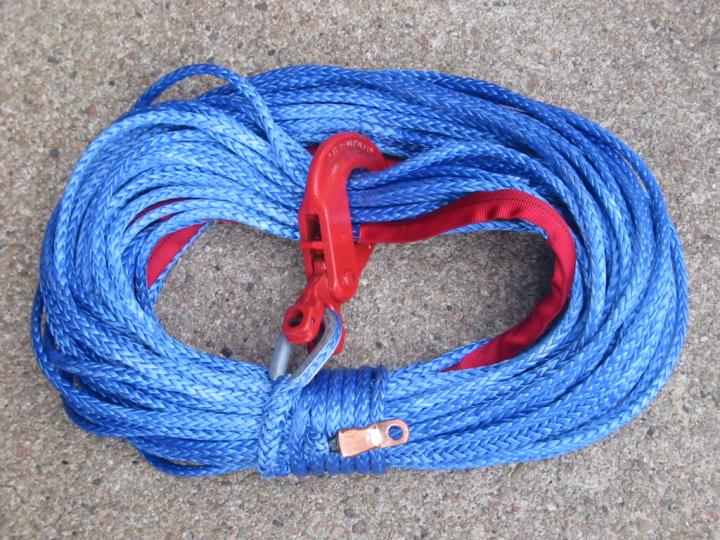
Because of the problems with Master Pull, I ended up buying Amsteel Blue line from Rock Stomper. As the name implies, this line is bright blue (still reasonably visible). Rock Stomper also sells bright red interlocking safety hooks and matching red rock guards (two 5' guards come free with each line). I splurged for a matching red D-shackle as well just so the fashion police would leave me alone. Rock Stomper buys Amsteel Blue in bulk and makes the lines as they're ordered, so it took about a week and a half for the order to arrive on my doorstep (shipped from Colorado to Nebraska).
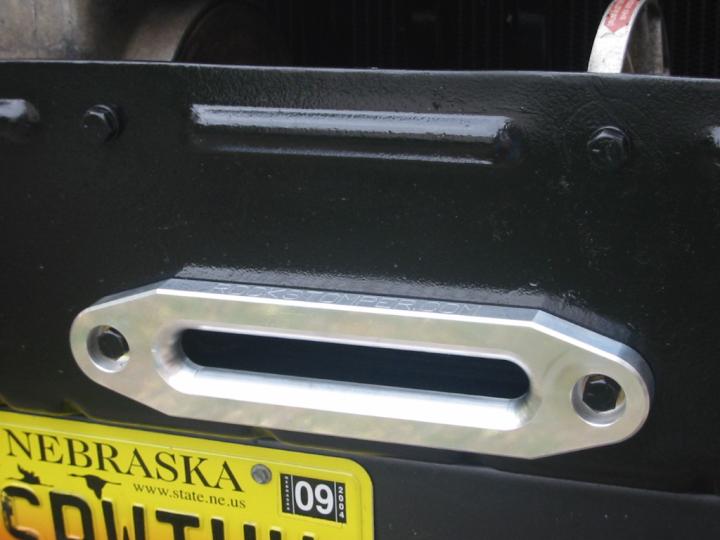 A billet aluminum Hawse fairlead is almost mandatory with a synthetic
line because the steel fairleads (hawse or roller) aren't the smoothest
things in the world to begin with, and if they've been used with a wire
rope, the surface tends to get chewed up. Repeatedly dragging a synthetic
line over one of these fairleads will ensure its rapid demise. Billet
fairleads run about $50, but they have a smooth, polished surface that
your winch rope will love sliding over. They also look pretty (another
attempt to avoid the fashion police). The ones from RockStomper come
with "ROCKSTOMPER.COM" engraved
on one edge -- you can mount this edge facing up or down to express or
hide your support for their company. Mine came with 3/8" mounting hardware,
which is fine for most winches. On an 8274, the lower two mounting bolts
are what hold the fairlead on. These bolts are 7/16", so I had to drill
out the mounting holes on the fairlead.
A billet aluminum Hawse fairlead is almost mandatory with a synthetic
line because the steel fairleads (hawse or roller) aren't the smoothest
things in the world to begin with, and if they've been used with a wire
rope, the surface tends to get chewed up. Repeatedly dragging a synthetic
line over one of these fairleads will ensure its rapid demise. Billet
fairleads run about $50, but they have a smooth, polished surface that
your winch rope will love sliding over. They also look pretty (another
attempt to avoid the fashion police). The ones from RockStomper come
with "ROCKSTOMPER.COM" engraved
on one edge -- you can mount this edge facing up or down to express or
hide your support for their company. Mine came with 3/8" mounting hardware,
which is fine for most winches. On an 8274, the lower two mounting bolts
are what hold the fairlead on. These bolts are 7/16", so I had to drill
out the mounting holes on the fairlead.
One drawback with using synthetic line is that they don't hold up well to extreme heat. Since most winches use the cable spool and the stock wire cable as a heat sink for the brake drum, this can cause problems. You can get around this by installing a 10' (or so) heat guard around the first layer of cable on your drum. Fortunately for me, the 8274 doesn't have this problem, because the brake drum is not inside the cable spool like it is on most horizontal winches.
 Rather than getting a stock-style hook like everybody's used to seeing
on winches, I shelled out the extra bucks for an interlocking safety
hook. These things are stronger and safer than normal hooks, since
once they're locked, they can't accidentally come unlocked. Unlike
standard hooks with safety clips, where the rope is attached to the
main body of the hook, these interlocking safety hooks have the rope
attached to the safety clip. It's the main body of the hook that moves
when you release the catch lever. When you put tension on the rope,
the end of the safety clip is forced into contact with the main body,
preventing anything from slipping out of the hook as long as you're
pulling on it. Hence the safety factor. It also looks cool.
Rather than getting a stock-style hook like everybody's used to seeing
on winches, I shelled out the extra bucks for an interlocking safety
hook. These things are stronger and safer than normal hooks, since
once they're locked, they can't accidentally come unlocked. Unlike
standard hooks with safety clips, where the rope is attached to the
main body of the hook, these interlocking safety hooks have the rope
attached to the safety clip. It's the main body of the hook that moves
when you release the catch lever. When you put tension on the rope,
the end of the safety clip is forced into contact with the main body,
preventing anything from slipping out of the hook as long as you're
pulling on it. Hence the safety factor. It also looks cool.
Wiring
 I decided to use welding cable for my power leads rather than battery
cables because it's both more flexible and considerably cheaper. For
1/0 gauge cable, O'Reilly Auto Parts (Midwestern chain) quoted me $4.69
per foot. I got the welding cable at a local welding shop for $1.61
per foot. You can buy copper ring terminals that can be soldered or
crimped onto these cables at most welding shops, auto parts stores,
or hardware stores. Terminals with 3/8" holes will be more useful
than those with 1/2" holes.
I decided to use welding cable for my power leads rather than battery
cables because it's both more flexible and considerably cheaper. For
1/0 gauge cable, O'Reilly Auto Parts (Midwestern chain) quoted me $4.69
per foot. I got the welding cable at a local welding shop for $1.61
per foot. You can buy copper ring terminals that can be soldered or
crimped onto these cables at most welding shops, auto parts stores,
or hardware stores. Terminals with 3/8" holes will be more useful
than those with 1/2" holes.
I chose to solder the terminals onto the cables rather than crimp them on because it provides a superior electrical connection. Because 6' of 1/0 gauge copper cable makes a huge heat sink, you can't do this with a soldering iron. I heated the ring terminals with an oxy/MAPP gas torch, which sucked down about 12-16" of solder per terminal in no time flat.
The proper method is to fill the cup on the terminal with enough solder that when you shove the cable into the cup, the solder saturates the cable and spills over a bit. The solder should be hot enough to be liquid, of course. I found it just as easy to put the cable into the terminal first, then fill the solder in along the edge. It used less solder that way.
Since the cables only come in black, I used about 4" of colored heat shrink tubing around the ends of the cables -- red on positive, black on negative.
I routed the cables through the slats in the grille, under the lower right (passenger) corner of the radiator support, along the top of the frame, and up by each front corner of the battery. I encased each cable in 3/4" split-loom wire protector. It turned out 6 feet of cable was the perfect length.
As you're standing in front of the vehicle looking at the winch, the positive power cable attaches to one of the terminals on the far left side of the left solenoids. Either the top or bottom terminal will work (they're connected), but the lower one makes for a cleaner setup. The ground cable attaches to one of the two screws on the right end of the motor. The winch will also ground through the mount and frame, but that puts a lot of stress on your existing vehicle ground straps.
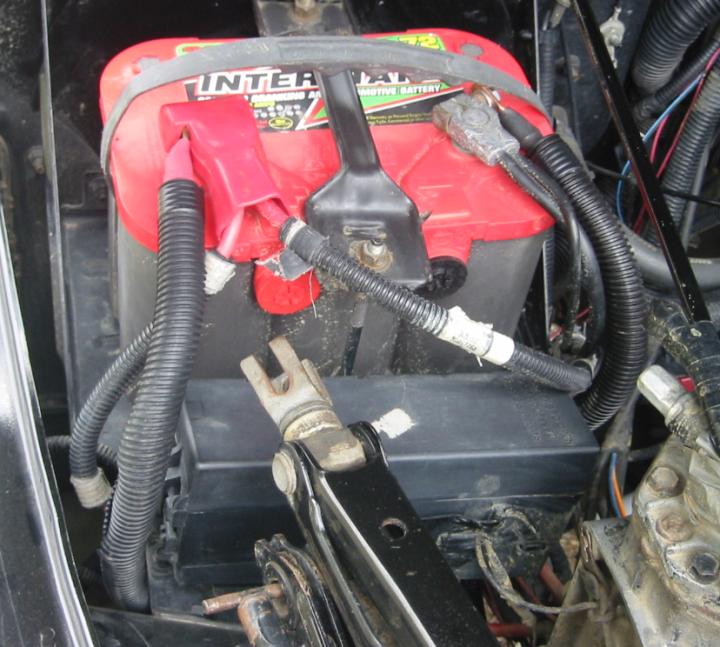 Even though my Optima battery has two unused side terminals, I didn't
use those for the winch because they're not designed to handle the
sustained current draw of a winch. The ideal solution would be to
replace my factory battery terminal clamps with marine-style clamps with
a stud and wing nut that accept multiple cables with ring connectors.
I didn't feel like replacing all my battery cables right now, so I opted
to attach my winch cables to the bolts that tighten my stock terminals
to the battery top posts. Perhaps not ideal, but good enough for now.
Even though my Optima battery has two unused side terminals, I didn't
use those for the winch because they're not designed to handle the
sustained current draw of a winch. The ideal solution would be to
replace my factory battery terminal clamps with marine-style clamps with
a stud and wing nut that accept multiple cables with ring connectors.
I didn't feel like replacing all my battery cables right now, so I opted
to attach my winch cables to the bolts that tighten my stock terminals
to the battery top posts. Perhaps not ideal, but good enough for now.
About 8 months after installing the winch, I rigged up a pair of switches mounted under my dash board so that I could control the winch from the driver seat without having to plug in the remote control and string the wire through my window. I did this by running 10 feet of 16/3 outdoor extension cord through the firewall, along the fender, through the grille and up to the winch's solenoid box. 16 awg wire is overkill, but extension cords are cheap and readily available in a variety of colors.
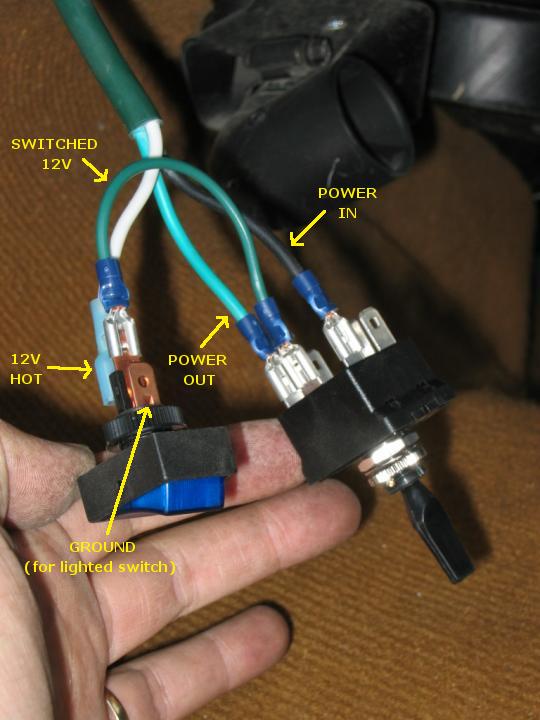
Under the dash, I ran a 12V hot wire to an SPST rocker switch. This is used as a master switch so you don't accidentally bump the other switch and spool your winch out while driving. Although this 12V wire can come from any always-hot source (like your headlight or ignition switch), I chose to run the wire all the way from the winch's solenoid box (via the extension cord) just to keep the winch system self-contained. Since this is a non-fused wire, I used an insulated terminal on the rocker switch to reduce the chance of touching it and causing a fire. I may use a different source some day if the idea of having an un-fused line running all around my engine bay bothers me enough.
From the master switch, I ran a short line to the source terminal of a momentary DPDT toggle switch (SPDT would be fine, but I couldn't find one). This toggle switch defaults to the center position, which is "off." When the switch is pushed one direction, the winch line is powered out. In the other direction, the line is powered in. The two remaining wires from the extension cord are connected to the "in" and "out" terminals of the toggle switch.
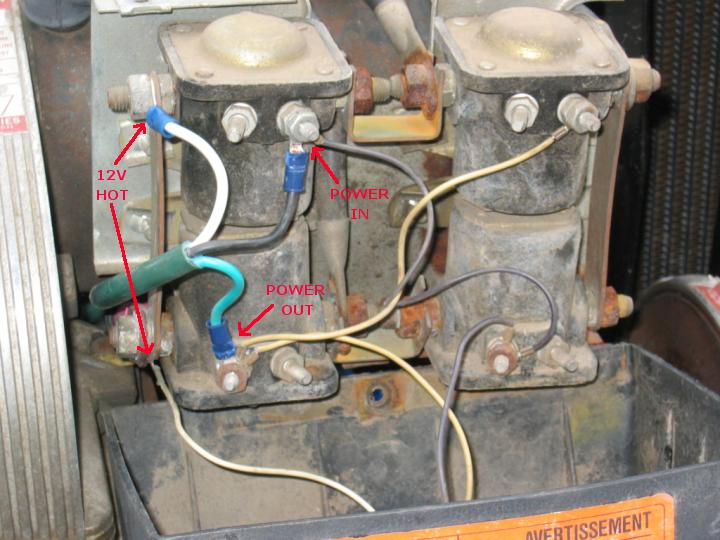
Back at the winch's solenoid box, the three wires from the extension cord are connected with ring terminals to the corresponding terminals that feed the plug for the remote control. On my winch, the white wire is the 12V hot wire, yellow is switched for power out, and black is switched for power in. The solenoid terminals on my winch that power it in and out were reversed from the terminals specified on BillaVista's diagram, so YMMV.
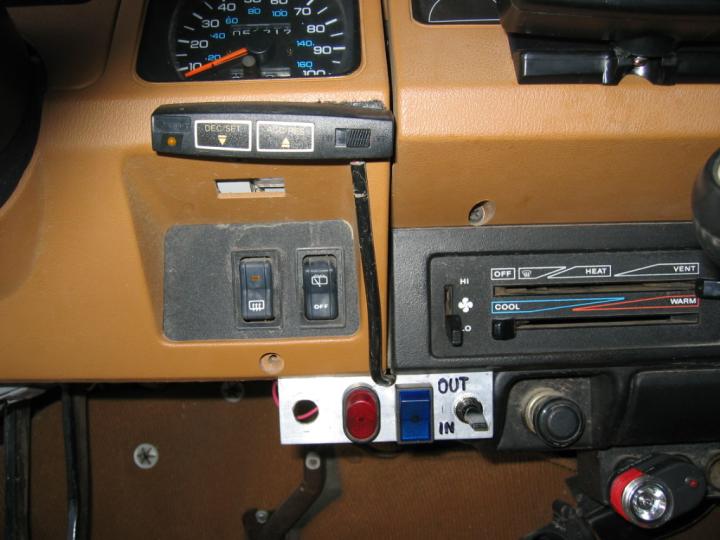
The finished in-cab control is much more convenient than stringing the remote control through the window, and the blue, lighted master switch keeps my 4-yr-old son happy. BTW, the red switch in the photos below is for my onboard air compressor.

A good wiring diagram for the 8274 can be found at the bottom of the aforementioned BillaVista writeup.
Accessories
OK, so you've got yourself a winch with a nice, big hook on the end. That's nice. What are you going to hook it onto if you get stuck? Perhaps the vehicle in front of you... if there is one, and if it is in a location where you can run the light straight from your bumper to his tow point.
If you're the leader, you'll have to find a tree or rock or something to winch yourself from. Not too many naturally-occurring objects will fit a winch hook. At a minimum, your winching accessory kit should contain a tree saver. Tree savers are like short snatch straps, and are used to wrap around trees, rocks, etc, so you've got something to hook your winch onto. The wider your strap, the less damage it will do to a tree trunk, so I bought a 4" wide, 6' long tree saver at the local Tractor Supply. Tree savers generally come in 6', 8', and 10' lengths. Which you should choose depends on the kind of objects you're likely to need to wrap it around. My wheeling is mostly done around trees with trunks less than 18" in diameter, so a 6' strap works well. Tree savers run about $20.
Both ends of the tree saver might be a little big to fit into the hook on your winch line, so a D-shackle is probably also a good idea for your accessory kit. 3/4" is generally a good size for most Jeeps. With a D-shackle, you can hook your winch line to all sorts of things, like tree savers, tow straps, axle straps, etc. D-shackles run about $15.
Now you're all set, as long as you've got a line of sight path between your winch and the thing you want to hook onto. If you're the one pulling out some other poor bum, you may not be able to anchor your rig at a spot that allows a line of sight path between you and the stuck truck. In this case, a snatch block comes in handy. A snatch block is a pulley that you mount to a fixed point using a D-shackle (there's another use) and possibly a tree saver. You run your winch line from your winch through the snatch block and then out at a different angle toward the stuck vehicle. Once, on a particularly twisty trail, I witnessed two snatch blocks being used simultaneously to make the winch line follow a Z-shaped path. Snatch blocks run about $50.
If you're still using steel cable on your winch, then your winch accessory kit should definitely contain a pair of good leather gloves. Cables tend to fray, and those little broken wires will slice through your hand like a hot knife through butter. You should also have handy something heavy to throw onto the winch cable to weight it down if it does snap so that it doesn't fly back and kill you. Neither of these items are mandatory when using synthetic rope, though.
Of course, you'll need something to carry all these things in. I picked up an olive drab, canvas, mechanic's tool bag for $15 from a military surplus dealer here in town. It's just large enough to hold the above items, and is rugged enough to be abused out on the trail.
Of course you can pay $160 or more to buy a pre-assembled accessory kit from many off-road retailers. Chances are, this kit comes with more things than you need (chains?) and is larger than you'd like. I paid about $115 for my custom-assembled kit, and I got exactly what I needed instead of settling for what someone else thought would be handy.
Price Tag
Here's what it cost me to get the winch on my Jeep and fully accessorized:
| Item | Cost |
|---|---|
| Winch and mounting plate shipped from Oregon (eBay) | $570.00 |
| UPS Reimbursement for damaged knob and lost hook | - 94.68 |
| Replacement clutch knob (Warn) | 0.00 |
| 150' of 5/16" Amsteel Blue winch line (RockStomper) | 180.00 |
| Interlocking safety hook (RockStomper) | 50.00 |
| Billet aluminum fairlead (RockStomper) | 50.00 |
| 3/4" D-shackle (RockStomper) | 15.00 |
| Shipping from RockStomper | 10.00 |
| 3/4" Warn D-shackle + tax (Tractor Supply) | 20.31 |
| 6'x4" 15K-lb tree saver + tax (Tractor Supply) | 16.36 |
| 16K-lb Warn snatch block + tax (Tractor Supply) | 53.48 |
| OD canvas bag for accessories + tax (CJ's Military Surplus) | 14.97 |
| Mild steel for mounting plate + tax (Rivers Metal) | 6.42 |
| Gloss black spray paint + tax (Ace Hardware) | 5.06 |
| Four 2.5" 1/2" grade 8 bolts + tax (Ace Hardware) | 4.24 |
| Long bolt for motor + tax (Ace Hardware) | 0.77 |
| 12' of 1/0 welding cable + tax (Praxair) | 20.67 |
| 4 copper ring terminals + tax (CarQuest) | 6.03 |
| 12' of 3/4" split loom wire protector + tax (Praxair) | 8.03 |
| Red & black 3/4" shrink wrap tubing + tax (Scott Electronics) | 7.21 |
| 10' of 16/3 extension cord + tax (Ace Hardware) | 2.78 |
| Momentary DPDT toggle switch + tax (Radio Shack) | 4.80 |
| Blue lighted SPST rocker switch + tax (O'Reilly Auto) | 5.34 |
| Total | $956.79 |
Do you like this site?
Help me keep it going by throwing a few pennies my direction.
![]()
![]()
![]()
![]()
Originally written 13 Oct 2003
Last updated 3 Aug 2004 Obi-Wan (obiwan@jedi.com)
Links on this page to Amazon are part of an affiliate program that helps keep Jedi.com operational. Thank you for your support!
