
June 2000 – August 2002
Rebuilt 401 before installation
When I first bought our ’77 Wagoneer, I knew AMC engines had a reputation for low oil pressure, but I didn’t know enough to realize that the 401 V8 in this particular Jeep was much lower than it should have been. A mechanical gauge verified that pressure was about 25-30 psi when cold, about 20 psi when warm under load, and about 5 psi when idling warm. That’s way too low. Changing to 20W-50 motor oil didn’t help. Rebuilding the oil pump didn’t help. Replacing the timing chain cover (which includes the oil pump body) is expensive ($200) and mine didn’t look that bad, so the next step was to inspect the main and rod bearings for excessive clearance. So, in late June, I pulled the Wag up onto ramps in the garage and opened it up.
What I found wasn’t pretty. The primary surface was worn off of nearly every bearing, leaving only the underlying copper showing. The rod bearings were only about .001 over spec, but the main bearings were off the scale (literally — Plastigage only measures up to .003″). Some of the bearings also had some significant scoring. The crankshaft journals all looked OK, but since the bearings were so bad and I already had it torn down this far, it was recommended that I measure the journals with a micrometer and tear down the rest of the engine to see what else was affected by the low oil pressure.
That decision was a painful one to make, since I’d been hoping to use the Wag to tow my YJ out to Colorado just a couple weeks later. A complete tear-down would mean driving the Honda out there, but I knew this was the right thing to do. <sigh>
I started by disconnecting all the accessories from the engine and meticulously labeling where everything came from. I’m not sure why I bothered, though. None of the vacuum lines and very few of the wires were actually where the belonged. I suppose once I reassemble everything based on the factory service manual, it’ll be entertaining to see just how screwed up it used to be.
I ran into the next problem when I started removing the rocker arms. Each intake/exhaust pair is held down by a single U-shaped bridge with a bolt through each rocker. Of the eight brackets, one had already been replaced at some point, another was cracked, and two more were broken clean in two. I’ve no idea what might cause such damage, but it definitely sounds like a Bad Thing(tm).
While waiting for my neighbor to find his dial caliper so I could measure the pushrod travel, I decided to yank the intake manifold. The stock intake manifold for an AMC V8 is cast iron and weighs 56 lbs. Since I didn’t want to yank the engine until I was sure that the cylinders would need to be honed, all the work so far had been done with the engine still in the Jeep. Note that the Wag has a 2″ lift and was sitting on 9″-tall ramps, since I initially only intended to work on the bottom half of the engine. You can picture the scene as I was standing on the top step of a feeble step stool, leaning into the engine bay with most of my weight (and the manifold’s) supported by my belly on top of the radiator cap and supports. I finally managed to wrestle the manifold out of the engine bay without goobering up either the mating surfaces or my spine, but the next morning I still had red marks on my belly from the radiator.
The project sat idle for over a month while I attended to other duties (including building shelves in the garage to free up some floor space). When I finally got around to measuring the cam lobe lift via the pushrods, I got very erratic readings and got sick of standing on a stool just to reach the engine, so I broke down and yanked it. I wish I’d done that before I removed the intake manifold!
Pulling the heads indicated quite a bit of carbon buildup on some pistons and the bottom of some intake valves. We’re talking 1-2mm thick in places. I guess that increases my compression ratio, right? Yanking the pistons revealed that most cylinders still have the crosshatch pattern except at the top and bottom where the piston skirts rub. The upper bore diameter was worn to 4.169-4.170″ on all pistons. The lower end of the worn area was 4.167″. Spec is 4.165″. I even double checked the taper by measuring end gap on a piston ring, and it agreed with the aforementioned telescoping gauge and dial caliper numbers. Since I wanted this to be a strong tow beast for another 100K miles, I decided I’d probably to break down and get a .020″ overbore to even things out, which would nearly double the cost of the rebuild. <sigh>
The crank’s rod bearing journals were worn down quite a bit under spec and were very out of round (2.242-2.247″; spec is 2.2464-2.2485″ with max out-of-round .001″), so I definitely needed to have the crank reground and get .010″ undersize rod bearings. The main bearing journals were round, but all about .003″ undersize (2.744″ vs 2.747″).
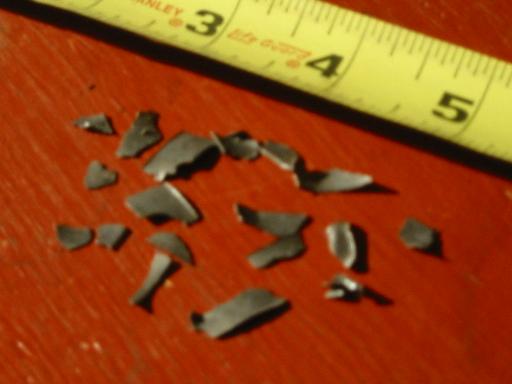
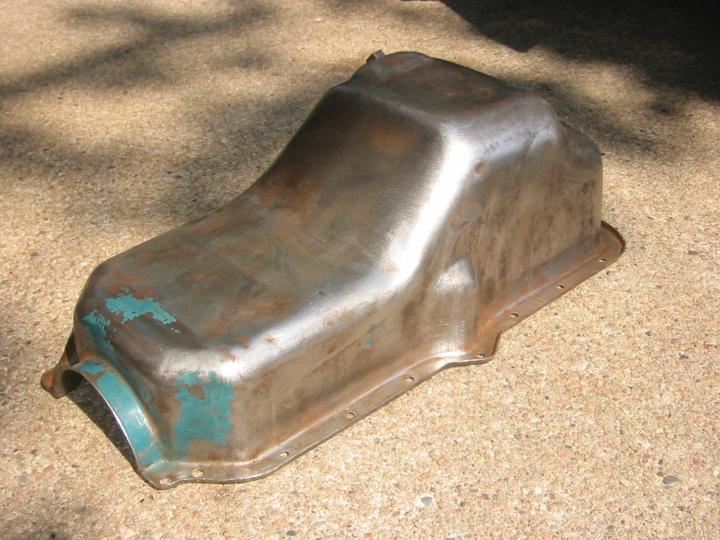
Babbit from the oil pan
When the cam finally came out, I found out why I got such weird readings when I measured pushrod lift. It appeared to be an aftermarket cam with greater-than-stock lift, but it was badly worn. Base circle varied by .004″, and lobe lift varied by nearly .030″. The cam journals were worn about .003″ undersize (spec is .0005″), and the cam bearings in the block were shot. Not only were they badly worn, but also scratched and even cracked. When cleaning out the oil pickup screen later on, I found numerous pieces of curved metal that were identified as the babbit (top surface) from the cam bearings. Can you say “oil starved?” This engine wouldn’t have lasted much longer without a rebuild. Now I needed to choose a new cam.
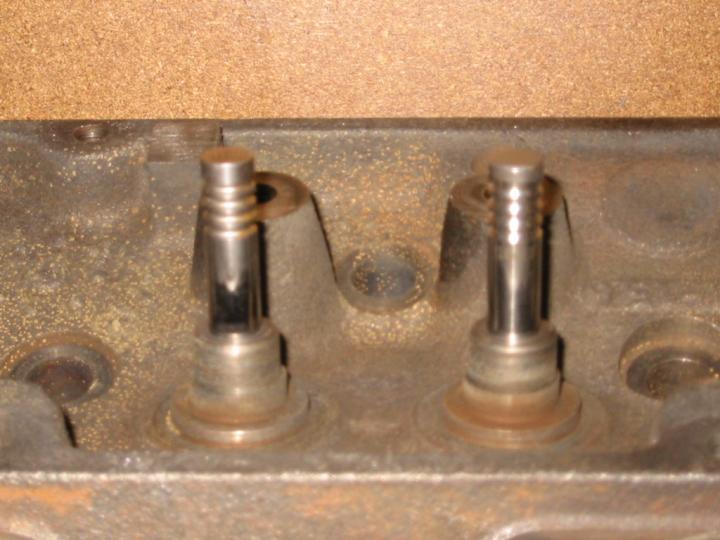
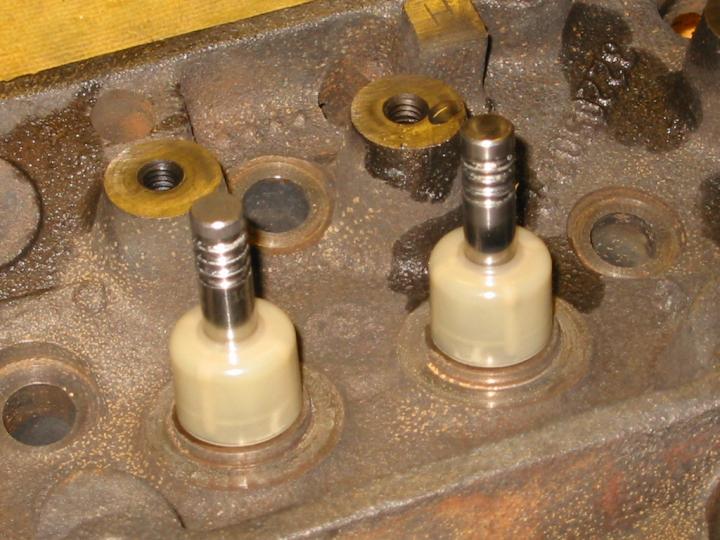
Machined valve guides
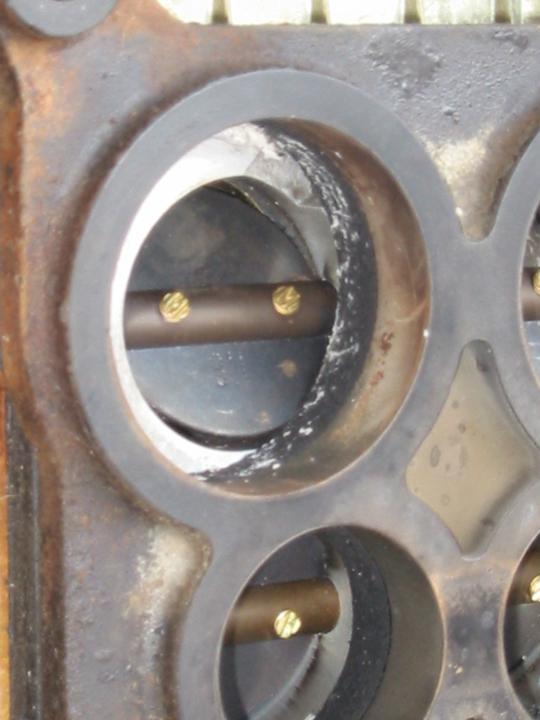
I got both heads torn down. It looked like this thing had half a valve job done on it at one time. The left valves were slightly different (probably newer) than the right ones. The left valve seals were newer. The spring retainers were different. Six of the eight left-hand springs were on upside down, and none of them seemed to be as stiff as the right-hand springs (judging by the pressure I had to exert on the valve spring compressor). Three of the four left intake valves had nearly 1/4″ (yes, a quarter inch) of carbon buildup on the back side of the valve head, while the #7 and all right-hand valves had no more than 1-2mm of buildup. The left side valves also seemed to wiggle in their guides more than the right side, although I hadn’t measured it yet. The #5 rocker bridge was replaced at one point with a non-stock version. The #2 and #7 rocker bridges were broken clean in two. Upon reassembly much later on, I also realized that the upper valve guide bosses on just one of the heads (not sure which one) had been machined narrower (vs original) , presumably to fit a different kind of valve seal. Whatever it was, those seals were no longer on the Wag when I got it.

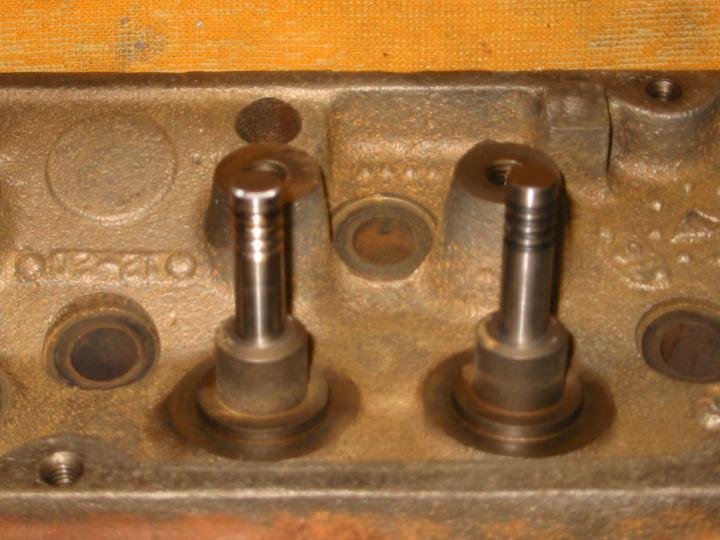
Original valve guides
Finally got the valve guides inspected. The right side valve guides all had small grooves along their inside, while the left side guides were perfectly smooth. Valve head play on the right side ranged from .015-.019″, while the left side ranged from .015-.031″. Valve stem diameter was roughly .368″ for all except the #7 intake valve, which tapered down to .363″ at the worn area closest to the valve head. Factory spec is .3715-.3725″, so they were obviously well worn. Factory spec for the valve guide is .3735-.3745″, with .001-.003″ of guide-to-stem clearance. I wasn’t sure yet just how far out of spec my valves were, but it definitely looked like I needed new valves and re-bored guides. — Scratch that. The above valve shafts were measured with a dial caliper. I re-measured them with a 1″ micrometer, and they were all within spec (0.3715-0.3725″). Must have been the guides themselves that were worn. I was told that even if my valves are good, it might be cheaper to buy new oversize valves and then ream the guides to fit, rather than installing new guides to match the old valves.
All of the above was written prior to 29 June 2001. By spring of 2002, I had planned two trips within the next few months on which I wanted to drive the Wag, so I finally got off my lazy tush and started working on it again. Besides, I wanted my garage back.
18 March 2002: I cleaned up and painted the engine bay with POR-15 so that my nice, new engine would have a clean, rust-free place to live after the rebuild.
16 April 2002: The engine is finally going to the machine shop (Richards Machine) today! Yeah!
30 April 2002: Just got off the phone with the machinist! All the parts check out OK (no cracks, etc). The crank mains need to be bored .010″ under, but the rods can get away with .001″ under bearings and no grinding. He recommends replacing all the rockers (not just the 3 pairs of broken ones) because they’re worn. He agreed with me that the valve guides were basket cases. One head was knurled and the other had already had the guides replaced. He’s going to replace all of them. My valves and pushrods look good, though. I should be OK with a .020″ overbore. He said the engine kit from him costs $550, but he’d have to look into upgrading my timing set and cam. That’s a typical price for a 401 (compared to PAW and Northern), and it includes quality parts (including Clevite bearings), so I’ll probably just go ahead and order the whole shabang from him to avoid the hassle of piecing things together from multiple vendors. He’s going to check on the availability of .020″ pistons and about adding the double roller timing set and the Crane cam to the list. I’m going to double check my list of parts, and we’ll compare notes soon.
7 May 2002: Talked with Matt (the machinist) again. The head is ground. Clevite discontinued their .001″ under 401 rod bearings just a few months ago, so he had to grind the rod journals .010″ under after all. Many (but not all) of the parts have arrived. Once the rest of them show up, he’ll bore the block & balance everything. It’s probably a week from being done. That’s good, because I want to have it running in less than four weeks.
15 May 2002: Matt called on Tuesday and said all he had left to do was balance the engine. However, upon closer inspection, my flex plate had several questionable teeth. He said it’d probably run OK, but if I planned on replacing it someday, I should really do it now before he balanced the engine to my bad one. Lots of places had new & used flex plates for $40, but none of them could get one here in time to get the engine balanced and back to me by Friday. I bit the bullet and spent $72 on the only local one I could find.
18 May 2002: Yippee! I’ve got my engine back! My check to the machinist was just over $1700 for parts & machine work, which is just on the upper end of what I expected it to be. No complaints, though, since it appears to be good work and all the parts are quality brands. He did forget to give me my main bearings and my original pistons, but I’ll pick those up from him soon. Turns out the bearings didn’t get sent from his supplier. Looks like I’ll have spent $2400 on this engine before it’s running again, which is higher more than I initially expected. My wife isn’t complaining, though, since this will basically be her car once I’m done.
Here’s what the machine work cost me:
| Hot tank block, heads, and intake manifold | $70 |
| Replace valve guides | 80 |
| Replace exhaust valve seats | 80 |
| 3-angle valve job on intakes | 38 |
| Suface both heads | 60 |
| Suface both exhaust manifolds | 30 |
| Bore & hone block .020" over | 88 |
| Recondition rods | 60 |
| Balance rotating assembly | 100 |
| Install rods on new pistons | 35 |
| Install new cam bearings | 35 |
| Grind crankshaft main journals .010" under | 85 |
| TOTAL MACHINE WORK COST: | $761 |
|---|
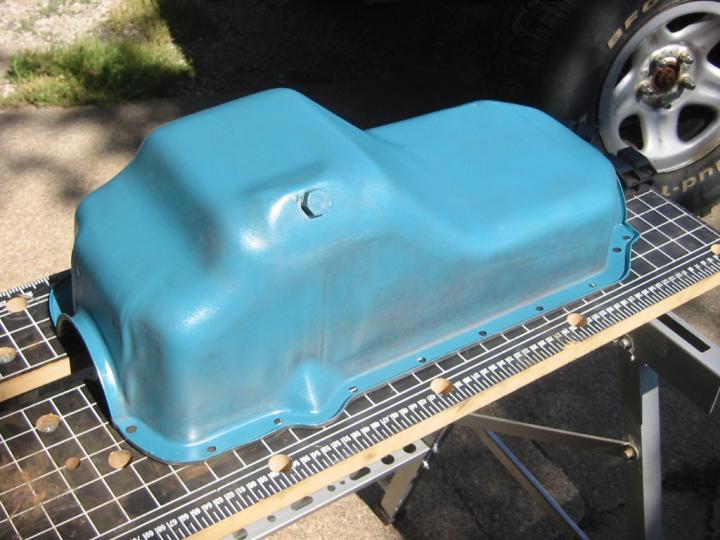
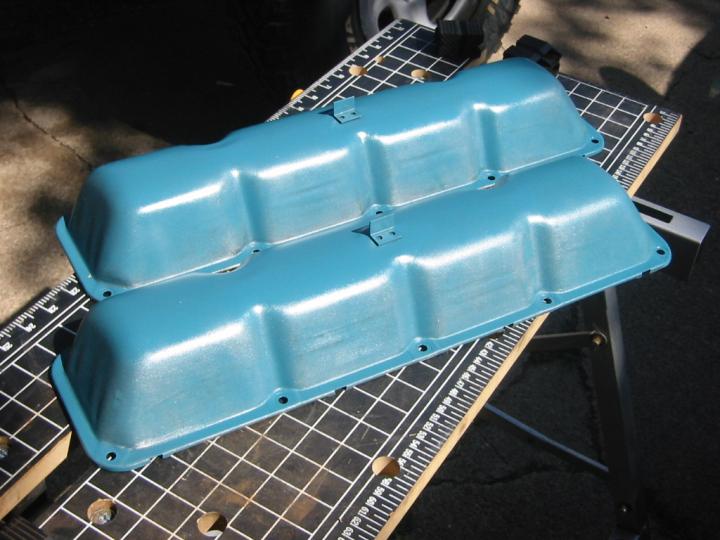
23 Jun 2002: I took some time off from the Wag to get my YJ ready for a wheeling trip in early June. I’ve now finished porting the heads. Took about 12 hours for the two heads. The finish only slightly better than stock, but it’s the shape that matters most for what I’ll use the engine for. I basically removed all the hard edges where the new valve seats and guides were inserted into the valve chambers, ground down the casting flaws in the ports, and rounded off all the sharp corners around the valve guide bosses. I also port matched the exhaust gaskets. I think I now own all the parts I’ll need except for the battery. I finished degreasing the timing cover, valve covers, and oil pan, and have mostly finished de-rusting the later two so they’ll hold paint well.
30 Jun 2002: I finished de-rusting the oil pan and valve covers (well enough for my tastes, anyway) and put a thin initial coat of AMC blue paint on them to keep any new rust away until I get the rest of the engine assembled and can paint the whole thing. It felt good to finally see some shiny, new AMC blue (almost turquoise) parts in my garage! (valve covers) I assembled one of the heads (but forgot the valve seals — grrrr), and will do them both correctly as soon as my hand recovers from the bruises inflicted by the valve spring compressor. I also clearanced the carb adapter so that my secondary valves can now open all the way.


1 Jul 2002: 43 days till I leave for the FSJ Invasion in Ouray, CO. I disassembled the seal-less head, rearranged a few valves to make the valve tip & spring closed heights as equal as possible, and assembled both heads (including nylon seals!) tonight. Wearing a leather glove with a towel folded up inside the palm helped reduce the bruising this time. It felt good to get another stage of the process done.


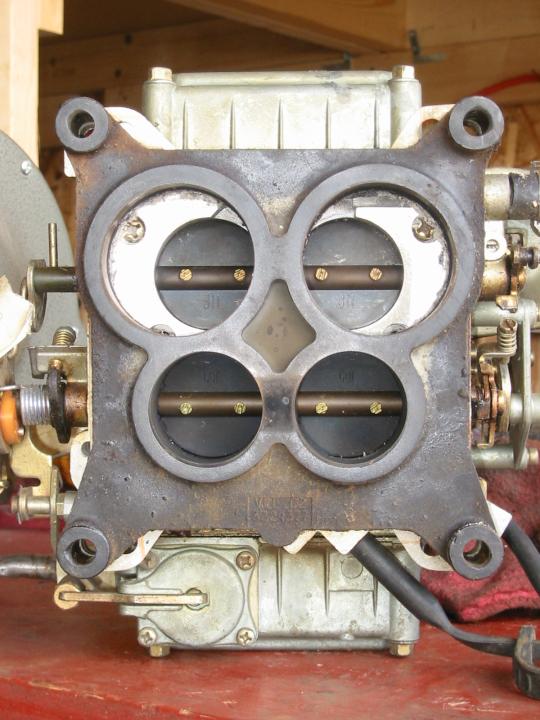
4 Jul 2002: 40 days to Ouray. I finished rebuilding the carb. At some point, a previous owner replaced the stock Motorcraft 4350 spread bore carb with a Holley 1850-4 square-bore carb. The Holley is a 4160-style, 600 cfm 4-bbl (slightly larger flow than the 4350). It works, so I’ll keep it, even though it doesn’t mate up very cleanly to the spread bore intake manifold. This was my first attempt at rebuilding a carb (or doing anything with a carb, for that matter), so it took considerably longer than it should have. I didn’t run across any serious problems, but it probably needed to be cleaned out, and I’m sure it could use some fine-tuning. I still need to find a spread bore gasket to put between the manifold and carb adapter. The Holley rebuild kit obviously didn’t come with one.
13 Jul 2002: 31 days to Ouray. I finished cleaning up the timing cover and oil pump housing last week. I discovered that the oil pump cavity in the timing cover is badly scored, and I finally talked myself into shelling out $250 for a new timing cover. Should arrive next week. I also got the exhaust manifolds port-matched to the heads. The left manifold sat quite high on the head due to poorly-aligned mounting holes, and it required a decent amount of grinding to smooth the big steps where the head & manifold meet. I spent a few evenings last week re-reading my engine building book and factory TSM to refresh my memory on the short block assembly steps. I checked the piston rings for proper end gap and got them installed on all the pistons today, so they’re ready to drop into the block. I hope to have the engine assembled & painted, if not sitting in the engine bay, by the time we go to Nashville (25-29 July).
17 Jul 2002: 26 days to Ouray. Installed the cam and crank. cam got all but 3/8″ of the way in, then bound up. Same with the old cam. Yanked the crank & cam & took the block back to the machinist. The rear cam bearing was installed cockeyed, and he had neglected to test fit the cam when he installed the bearings. The new cam’s journals were also .0003-.0006″ larger than the old cam. Straightening the rear bearing and polishing down the new cam journals fixed the problem. After all the monkeying with the cam, the bearings were kind of beat up, so I had to clean them up with 320- and 600-grit sandpaper. Finally got the cam, crank, and pistons installed again, they they all seem to be moving freely in their respective bores. New timing cover is en route.
20 Jul 2002: 23 days to Ouray. Cleaned threads on head bolts & holes using tap & die set (should have done this before assembly). Installed timing set and both heads. Installed oil pump pickup tube. Straightened oil pan (it got tweaked and wouldn’t bolt up at first). Here it is so far.
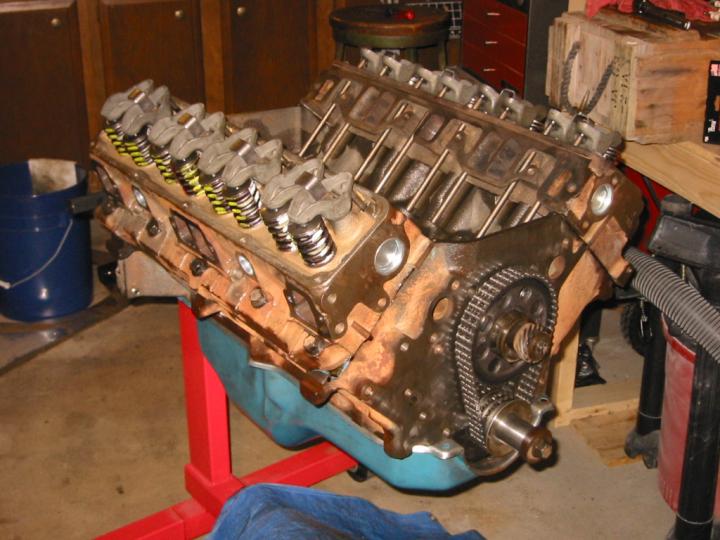
Rockers installed
25 Jul 2002: 19 days to Ouray. Got the lifters, pushrods, and rockers (here it is). Adjusted the lifter backlash per Crane’s specs. The new timing cover finally showed up. What a mess. Took forever to get, then I found I could have bought one locally for the same price (from Ronnie Sutton in Waverly). Measured the oil pump clearances on the new timing cover, and found that it the end clearance was out of spec and worse than my original cover. Side clearance was identical to my old cover. The scoring on my old oil pump cavity wasn’t that bad, so I’m sending the new cover back for a refund. Finished cleaning up the old timing cover, then primed & painted the hard-to-reach crevices on the timing cover, oil pump cover, and water pump with self etching primer and AMC Blue engine paint. Cleaned up & painted various pulleys and brackets with heat resistant, high-gloss black paint. Nashville trip got cancelled, and I hope to have the engine ready to install by the end of this weekend.
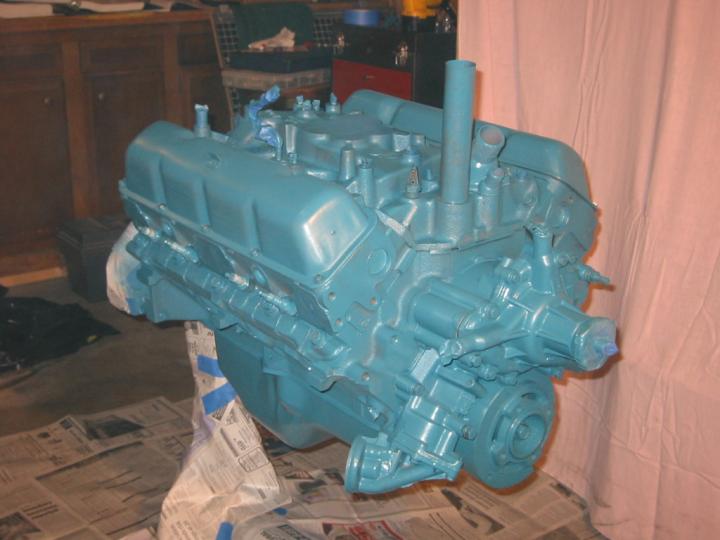
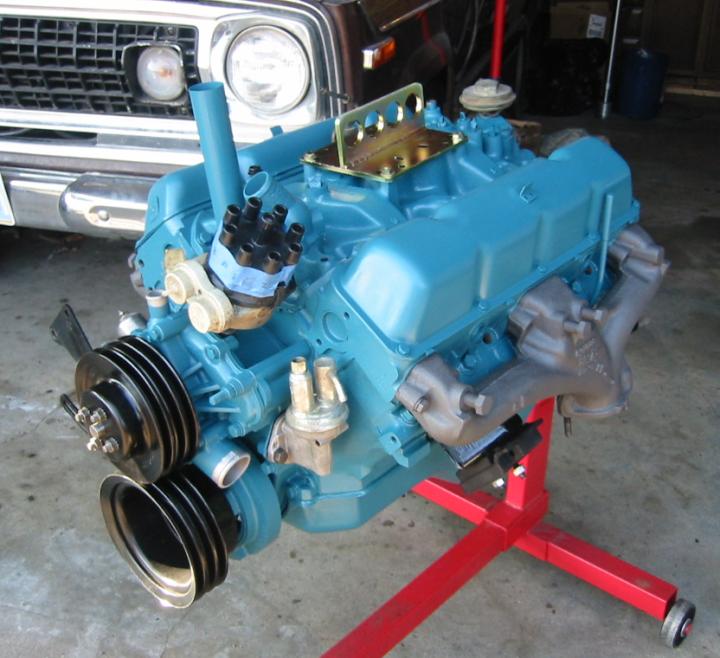
Engine painted
29 Jul 2002: 14 days to Ouray. The long block is assembled, minus sensors & stuff that didn’t want to get painted. One of the bolt holes for the thermostat housing was goobered up, and appeared to have part of an old tap broken off and wedged in the bottom. I re-cut threads on the top 1/4″ of the hole, cut the bolt short (only 3 threads reach into the manifold now), and used plenty of RTV and lock-tite to keep it in place and leak-free (read more). I’ve got three of the four coats of AMC Blue paint on the block and a nice iridescent blue tint on my once-black sandals. Most of the brackets, pulleys, and air cleaner housing are now high-gloss black. Painted the exhaust manifolds with POR-15’s manifold grey paint. Tonight, I’ll finish off my second rattle can of engine paint on the fourth coat, then install many of the brackets and stuff.
2 Aug 2002: 10 days to Ouray. Finished the fourth coat plus a little touch-up on the block. Looks very sharp! Started installing alternator & A/C brackets, only to find that two of the bolt bosses in the Flow Kooler water pump are not as tall as those on the factory pump, so I had to make spacers to get everything to line up right. (I later discovered that Flow Kooler had included those spacers in a little bag. Too late to do me any good, though.) Replaced the return line to the power steering pump, which was cracking. Replaced both motor mount bushings, since one was badly cracked. I owe Matt Hickey & Jeff Pabian much thanks and pizza for helping me install the engine into the Wag Friday night… twice. Note to self: don’t forget the starter mounting plate next time. Now I get to install all the stuff that was too fragile or heavy to attach before installation. I also renewed the registration so I can drive it around the block legally.
6 Aug 2002: 7 days to Ouray. Everything’s wired and plumbed the way it was when I tore it down. I decided to restore it to a known-working state rather than doing it the way the TSM said was correct. I’ll worry about that later. It’s full of coolant and oil. I’m gonna try to start it for the first time tomorrow! Assuming that goes well, I want to rewire the headlights & install a stereo before we leave for Ouray.
7 Aug 2002: 6 days to Ouray. IT RUNS!!! Pushed it out onto the driveway tonight and fired it up. Had a few fires inside the carb until I got the timing set close to right (just a couple degrees BTDC). Fixed a fuel leak due to not using Teflon tape on the carb’s fuel line fitting. The exhaust manifolds & pipes smoked like crazy during the fire few minutes of running, probably due to crud on the pipes & new paint on the manifolds. Ran it for about 10 minutes total in two sessions. The right manifold started glowing, so I shut it down, and the radiator then spewed boiling coolant all over. Later found that the idle mixture was way lean, and realized that I should have had the radiator cap off to get the air out of the system. I hope to finish breaking in the cam tomorrow & then take it out for a test drive.
9 Aug 2002: 4 days to Ouray. Just after I started it up on Thursday evening, all the magic smoke escaped from the wiring under the dash. Spent most of the evening bypassing the ammeter. Ran it again later, only to have it overheat again (but not as badly) and spray coolant all over the engine bay, which removed paint from several spots on the engine. 🙁 Bought a tach on Friday so I could check my ignition timing, even at the higher cam-break-in rpm. Alligator clipped it into the engine bay for testing purposes, and found that my overheating was due to a retarded setting. Got the timing dialed in, and it ran like a top. Finished breaking in the cam, then set the idle speed to 700 rpm. Idles a little rough, probably due to a maladjusted carb. That won’t stop me from racking up the miles this weekend, though. Decided that headlight wiring could wait, but a new stereo will come this weekend.
23 Aug 2002: 4 days after Ouray. With all the little problems that kept popping up with the Wag, I decided to leave it at home and take the Wrangler to Ouray. It was cramped with a family of four, but very reliable. I’ve put about 100 miles on the engine so far, and it seems to be running fairly well. I haven’t really stomped on the accelerator yet, but even at half throttle, it’s got plenty of get-up-and-go. The radiator has a few pinhole leaks, I want to mount a radiator overflow bottle, the old rubber fuel lines could stand to be replaced, and the thermostat housing gasket appears to leak, but other than that, I think the engine is done. I can now turn my attention to the rest of the vehicle. This may or may not be the last entry on this page. Thanks for reading.
I eventually fixed the leaky thermostat housing the next spring by replacing the entire intake manifold with an Edelbrock Performer. Read about the headache.